Feeds:
Posts
Comments

Archive for the ‘pattern free’ Category

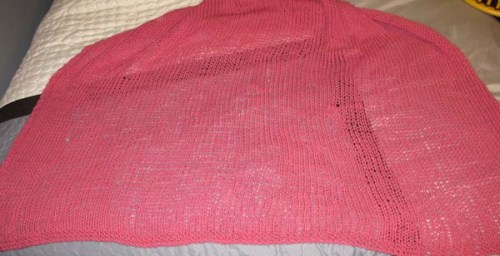
Well, well well.  Sometimes the best laid plans go crashing off the counter and land jelly-side-down.  The poncho didn’t exactly fit!

Why not?  Well, I COULD blame it on blocking….after all, I didn’t swatch, wet the swatch, dry it flat, and THEN count the stitches for my gauge.  I just swatched and counted.   In wetting these cables, I stretched it a little to dry so the cables would lay flat.  However, I checked and got 17 inches and 35 inches, exactly as I had intended.  I could also maybe blame my measuring, as I measured from the top of the shoulder.  That IS where it falls, but that leads to it sliding down my arms, so that was a mistake.

I wound up with a 23 inch hole for the neck.  When I stick a tape measure around my neck at this amount, it seems fine.  All I can say is making it up as you go sometimes doesn’t lead to predictable results.

With my new poncho sliding off my shoulders, I decided the way to go now was to add some 1×1 ribbing at the neck, purling 3 together in 4 places every other row – at each shoulder and in the front and back seams.  I measured my neck area again (just to give me something somewhat random to shoot for, why not).   I then figured out how many rows it would take to reach my new intended smaller number of inches.  This lead to adding 2 inches of ribbing to finish this off.

I picked up my stitches on the same size circular needle, making sure to get each one.  All in all, it worked out in the end, I’m happy with the ribbed result.  Here is the completely finished poncho.

Read Full Post »

This post is mainly for the knitters, but for those who crochet, you can cable too!  I found this Craftsy tutorial online for cables on crochet:  http://www.craftsy.com/blog/2013/12/how-to-crochet-cables/

If knitting cables is old hat for you, you probably already know all of this.  But if you are in the group who says “Wow, look at those beautiful cables on that sweater, I’d love to cable but it looks too hard.”, this post will help you out.  You don’t have to understand confusing looking charts to learn how to cable.  (I put off learning to cable for years because the charts looked hard.)  But it isn’t hard at all!  It really only requires you to look at your cable and do what it looks like needs to happen.  If you want to, you can just make them up and throw them into anything you make.  Here’s an example:RandomCables

Designing your cable:  In my recent poncho post, I showed this as my “random cable”. This is just one I made up that will go around the neckline on this work in progress.  All it takes to make it look professional is to do the same thing to each one and get a whole row of things done the same way.  To do that, make sure you always move your cables over the same number of stitches, and always at a regular interval (move cables every 2 rows, or every 4 rows for example.)  These are stockinette stitches on a garter stitch background.

I would highly recommend doing a project, (or at least a swatch with some leftover yarn), just to practice random cabling.  Just free wheel it and make stuff up as you go, and see how it all comes out looking.  That’s what I did a long time ago with this scarf.  This experimentation helped me know what worked and what didn’t.  It is a mix of random cabling of stockinette stitches with backgrounds of garter, purl and seed stitch, with garter on the edges to help foil curling.  I learned what parts want to roll inward, what parts came out looking wider, etc.  So, here we go!

Scarves - Patterned and Not

Link to post I made about this scarf while I was doing it:

https://ilovesocks.wordpress.com/2009/08/31/working-without-patterns-cabled-purse/

How to cable

Moving stitches to the right:

Here we see a cable which I’ve moved randomly back and forth, stockinette on a purl background.  I’m 2 stitches ahead of my cable, so what I do now is stop and look at it, and decide what I want it to do.  I want this cable to now swing to the right.  I think about what will make this happen.  It will happen if the 2 stitches of stockinette cable go over the one purl stitch to the right of the cable, so that is what I’m going to do.
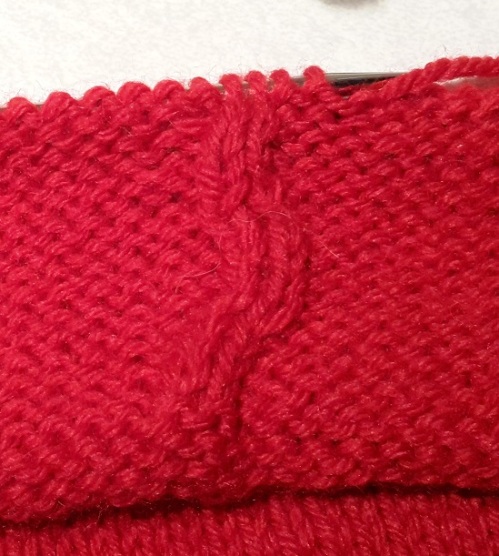
1rightCable

You need a cable needle.  You can use any big piece of bent wire if you don’t have one.  I’m going to move this cable over one stitch.  (You can also move over 2 or a few stitches if you want a more extreme bend to the right.)  I put the one purl stitch on my cable needle.
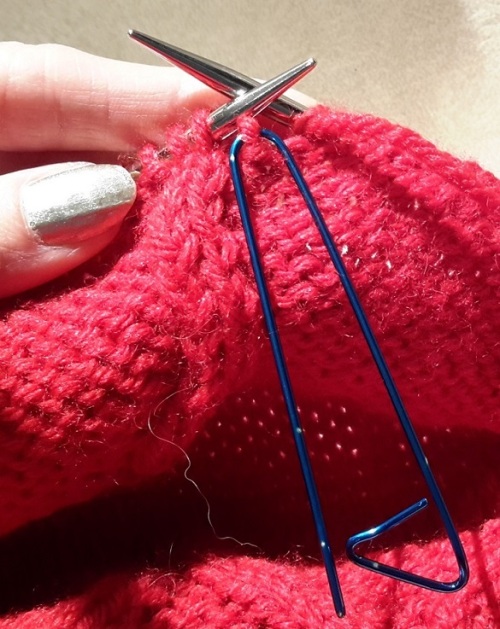
2rightCable

Now I think about how I want it to look.  I want the stockinette to be on the top of the right side of the cloth, so this means the cable needle stitch has to be in the back when I knit the stockinette cable stitches.  If I want the cable to move one to the right, I need to knit the cable stitches first. Throw the cable needle to the back side, then knit the 2 stitches that come next, the cable stockinettes. (photo below)

3rightCable

Next, put the stitch from the cable needle back onto the left hand needle, then work that stitch, (in this case, it’s a purl – do the stitch type you’re doing as your background.)  Then just continue on, working the rest of the background.

4rightCable

In short, just look at it, and see what it looks like you should do to achieve what you want to see.

Moving the cable to the left:

I’ve arrived at the cable, so I stop here and decide what to do.  I’m going to move these two cables toward each other, and eventually cross one over the other.  This means the first cable has to move one to the left.

1leftCable

I purl up to the cable, because I want to see the two stockinette stitches go over the top of the purl stitch on the left side of them, so I don’t need the purl stitch before the cable.

2leftCable

I put the two stockinette cable stitches on a cable needle, which will lay on the front side of the work.  (I don’t want them getting covered up, which they would if the needle with those on it hung to back side.)
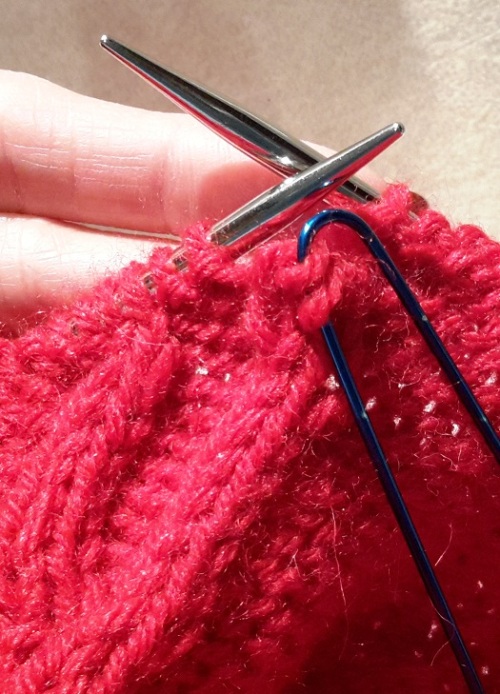
3leftCable

I then purl the background stitch that was to the left of the cable, this moves it behind and to the right side of the cable.  Then put the 2 stitches from the cable needle back on the left needle and knit them.  You’ve finished moving the cable one to the left.

4leftCable

(The plan for this cable:  These two cables have been moved – one to the left which I showed you, then I moved the other one to the right – now they meet.  I’ll do the reverse side of this garment without moving any cables, then when I’m back on the right side for the following row, I’ll cross one cable over the other here.  To do that, I will move one cable over two stitches instead of one, just to get it all over at once.)

5leftCable

Doing a rope cable: 

This is a cable that just twists around and around itself to look like rope.  It has a stockinette background, so doesn’t stand out so much as it would if you do it over a purl, or other type of background.  To achieve rope, I wait 4 or more rows between each cable twist, (otherwise you’ll get a very tightly twisted rope – also okay, if that’s what you’re going for.)  You can see that it looks like three stitches just wrap around 3 stitches each time, and you can see what needs to happen next.  The three outlined in black will go in the front, and the three outlined in blue will go behind them.  So you have 6 stitches involved in  this cable.
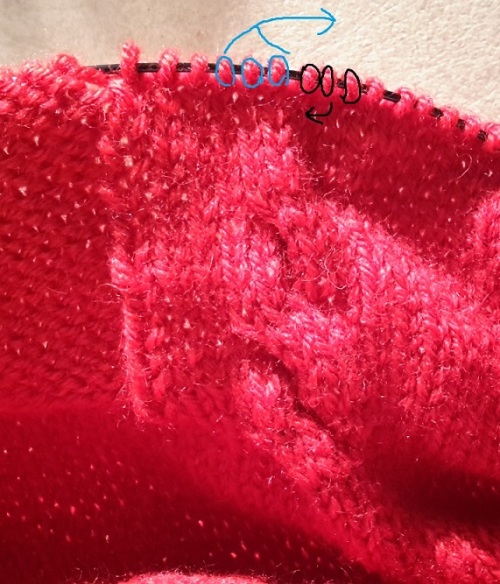
1RopeCable

When you arrive at this cable, the three on the right side (black outline) go on the cable needle and hang in the front, (because you want them to end up in the front). Knit the three on the left hand needle, (these were the blue outline stitches), which will bring those behind.

2RopeCable

Then put the three from the cable needle back on the left needle and knit those.  Finished! Continue knitting.

3RopeCable

How to cable a braid:

(If you don’t know how to braid, please do a search online for instructions.  You will need to know how to braid to do this cable.)  The braid cable is a little more complicated than the other three, but if you know how to braid you shouldn’t have any problem, you already know what it should look like.  The cable on the left is a braid on a stockinette background, but would stand out more on a contrasting background, as you see the cable over purls on the right side does.

I’m including a lot of detail in case it helps someone, but in short, you are only moving one section over the other, left and right, just like what was done to cable above.  I’ve covered cable braids a long time ago, but this is more detailed and has more pictures.

Lets braid: Go up to the stitches that are involved, and stop to think about what should happen next.  Notice I have a band of 3 stitches that are not involved (the three immediately after the purls).  I have already knit those to get them out of the way.  The next 9 on the left needle are all of the stitches involved in the braid.)

1BraidCable

I’m braiding just like you would hair.  I have three equal sections to intertwine.  In this case, I made each section three stitches wide, so there are 9 stitches involved in this cable, but you only ever work with 6 at once, (you only ever cross one section over one other at a time, never two, just like when you braid).

I will keep these same three stitches outlined in yellow to make them easy to follow.  You can see below that these three are the left section that needs to cross in front of the middle section to make the next cross.  Also, you can see I waited 4 rows between moving each part of the cable, (at least up until this point, before I decided to just go crazy random with it).  I never cable on the wrong side for this, only the right side, and only every other visit to the right side.

In the photo below, I have knit 3 more stitches beyond the photo above.  To move the left section of the braid over the middle section, I don’t do anything with the right section of the braid right now.  I knit past it.
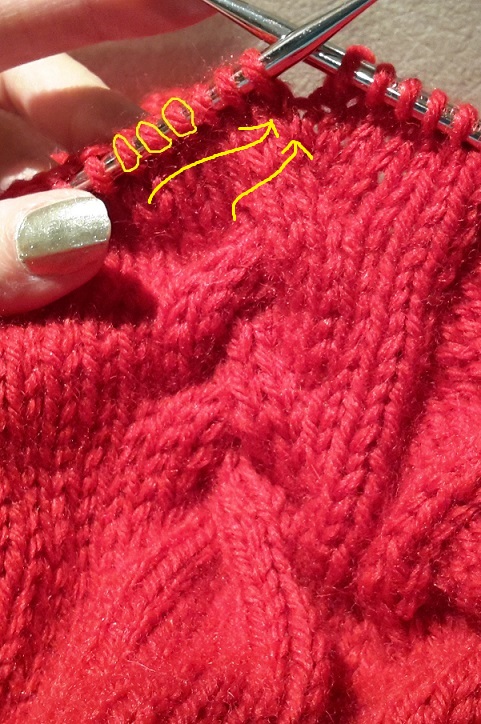
2BraidCable

So what do you do now?  You want these 3 in yellow to go over the top of the three to the right of them.  See if you can figure out what to do with your cable needle, then check the photo below for the answer.
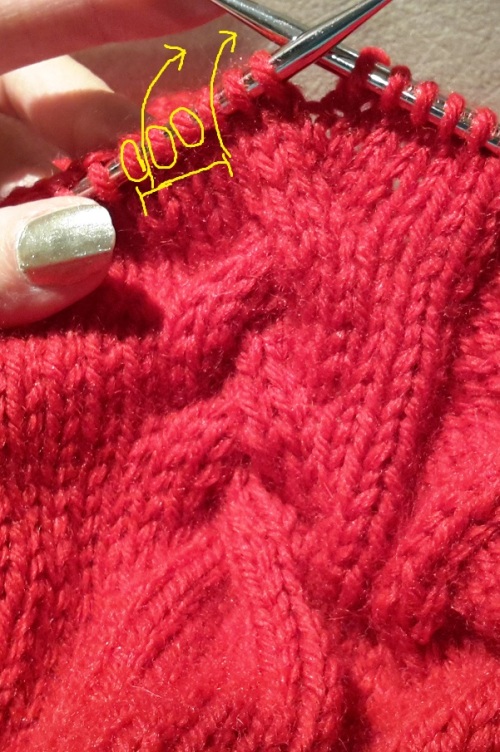
3BraidCable

You can make this happen by putting the three that are next on the left needle onto a cable needle, and putting them to the back side of the work.  Now you are ready to knit the three on the left needle outlined in yellow, which will make them go in front and to the right.

4BraidCable

After you knit the yellow ones, you put the three from the cable needle back  onto the left needle and knit those.

5BraidCable

You’ve made the next section in the braid.  Continue the rest of the row.8BraidCable

A few rows later, how will you do the next section, which goes back the other way?  Of your nine braid stitches, three on the right hand side will have to go onto a cable needle and hang to the front while you work the three to the left of that (the middle section), then put the 3 back on the left needle and knit.  Just knit the leftmost section, and continue your row.

After you do a few cables, you will stop at the cable, look and think, and you will know what needs to happen next and how to do it.  If you make a mistake, and it doesn’t look right, it’s only a few stitches, you can always unknit those few and try again.

RandomCables

Making a repeating cable pattern: Once you’ve tried some cabling, and you know what cables you want to do on a project, then comes a little planning.   If you want it to come out perfect, you’ll have to do some counting to make sure you have the right number of stitches for each cable area with no leftovers.  It may be easier for you if you draw out what you want to do, just to help you count your needed number of stitches.

Counting example from what I did on the red poncho neckline above: The cable starts out 4 stitches wide at the bottom, then splits into 2 groups of 2 stitches, cabling to the left and right, then joins again as 4 at the top.  There were 10 garter stitches between each group of 4 starting cable stitches.  This means each motif was 14 stitches wide.   Great tip to make this particular cable super easy – If you do a stockinette cable on a background of garter stitch, always move your cables when you’re working on the purl side (back side) of the garment.  This will make it so the right side row is always all knits, with no cabling, all the way across!  I only moved the cables on the purl side so the knit side could always be fast and easy to do.

UPDATE:  How much random is too much random?

One piece of the poncho is complete, I still have to make the other rectangle.  Here’s how it came out.

Before blocking:
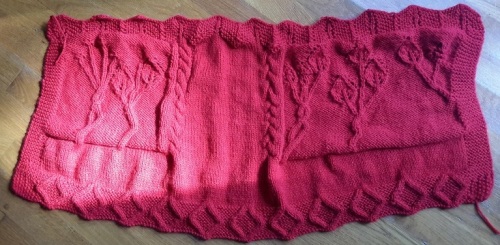
Poncho2016preBlock

After blocking:

Poncho2016postBlock

There might be such a thing as TOO random, as you can see by the very uneven braid.  I was still playing with this garment and doing many things in a very random way.   I didn’t worry about counting rows between crosses of the braid, so I have crossovers that are wider than others.  That can be good or bad, depending on how you view it.  If you have something so strangely made and unfactory-like, its obvious that its a home made object, not a storebought item of which there are a thousand other copies.  On the other hand, you can also view the “too random” cable as childlike, or unprofessional looking.    In the case of the leaves, I like the randomness, because it makes the cables look more like natural tree branches.  The uneven braid, I wound up liking less, because people aren’t used to seeing this much random on most sweaters.  But, that’s what can happen if you play.  As with many things I make up, it may be a little strange looking, but I will still wear it and not worry about it.

I will make the other rectangle using different motifs and see how that comes out!

Reference:  The cabled branches were random, but the leaf came from a chart.  The New Knitting Stitch Library. Lesley Stanfield. Quarto Publishing, 1992. Chart 179, pg. 116.  I didn’t do the cables on this chart, just used the center part of the chart which made the leaf shape, including the yarnovers above the leaf.


Read Full Post »

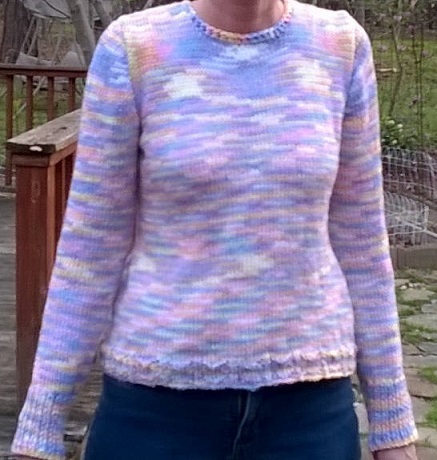
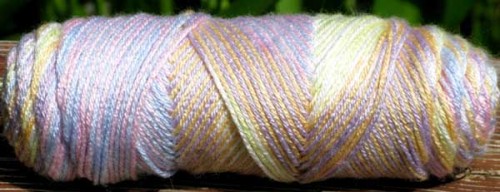
There are some BEAUtiful pastel yarns in the baby color section.  I made this sweater using Caron Simply Soft in Baby Brights Ombre.  I’ve used this color before on an entrelac scarf and people always compliment it.

The color pattern varied with how many stitches I used per row, but seemed to mostly want to make stripes.

babybrightsSweaterKnitting2

My mistake:  I learned something doing this.  It came out a bit short.  Not so short I can’t wear it, but shorter than it was when I held it up to myself and decided it was the right length from the hip to start the armholes.  This is why you see a bulge at the waist, that was supposed to be a bulge for the hip.  (It’s a little weirdly lumpy, but I’ll still wear it.)  What went wrong was that I overestimated how big I’d make the armholes, and made them pretty tight.  I shot for an 8″ armhole, (measured flat on one side from middle of the armpit to over the shoulder), and this turned out to fit, but it was small and effected the sweater length.  From now on I will not do armholes as small as that.

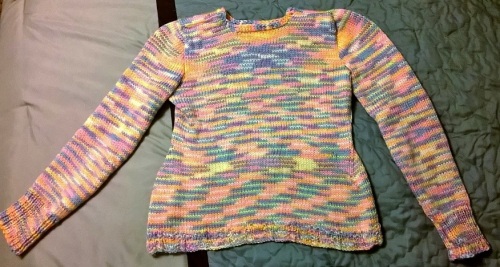
babybrightsSweaterKnitting

This picture is probably closer to representing the colors on this yarn.  Every pastel color of the rainbow except green.

How it was made:

I calculated my needed gauge for hips, waist and bust.  I’ve used this yarn before so I already had my # of stitches per inch.  I cast on in the round at the hip and worked upwards in a tube, increasing or decreasing as needed to reach my numbers.  I tried a knit/purl texture chart for the bottom edge, but didn’t wind up liking it.  The variation in color pretty much hid the textured pattern so you can’t even really see what it is, and it looks a bit messy.  Ribbing /garter /or seed stitch would have done the trick to prevent curling and probably looked nicer.

I divided front and back for the armholes and continued working upward (first the back piece then the front piece).  I bound off the correct # of stitches for the neck in the back and made it shallow, (just a couple of rows from the tops of the shoulders), and kept an equal # of stitches over each shoulder.  Write down how many so you don’t have figure out what that number was when you make the front to make the front shoulder stitch number equal the back number.  The front neck hole I bound off the same way, but made it a little deeper.  Then I did double crochet around the neck hole to make it look nice.  I did a pretty small opening to have the sweater up around the neck so it would be warm … and I almost messed this up!  I can fit my head through this neck hole, but just barely!  Make sure you don’t make your neck hole too small to fit your head through, or you can’t wear your sweater.

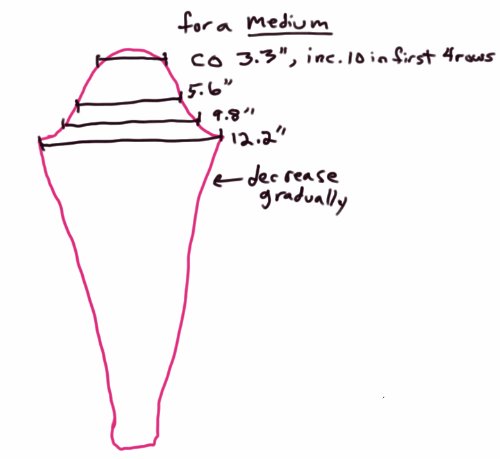
Sleeves with a shoulder cap:  I did something different this time.  I copied a pattern, but in the reverse direction.  I used the sleeve pattern of a sweater I made by calculating their number of inches they used for each part of the sleeve, then calculating my needed number of stitches to achieve this, then doing it all in reverse of the direction of the pattern, which was made from wrist to shoulder, (I do like to make things difficult, don’t I).  I did have a reason – I like to make mine from shoulder to wrist, because I can attach the sleeve after I’ve made a few inches of it, then accurately get a reading on length when I put on the sweater.

The shoulder cap part was about 6 and 3/4 inches high (from cast on to the widest part of the sleeve), and the widths had to be calculated with my gauge to come out like this.  Increase or decrease on both ends equally to make it come out a symmetrical piece.  To get the width in inches for the lower part of the sleeve, measure your arm around the elbow and around the wrist, (add room to the measuring tape for a less tight sleeve).

This is for a tightly fitted sleeve in size medium, not at all baggy.  SleeveKnittingSketchilovesocks

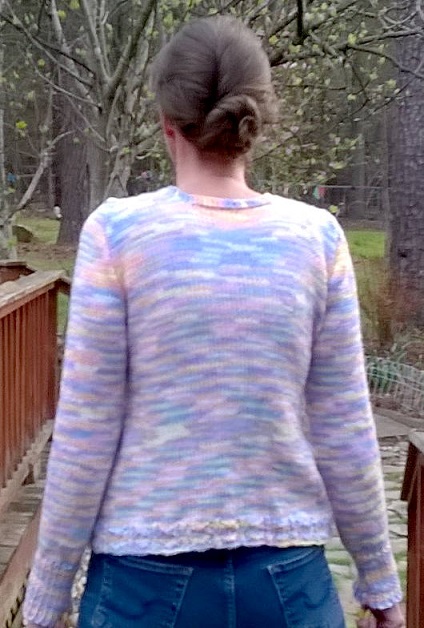
I see by this photo I did pretty thick seams over the shoulders.  I grabbed 2 strands of yarn from both pieces, the shoulder and the sleeve, making a 4 strand thick seam, (plus more for seaming yarn).  I probably could have grabbed only 1 piece of yarn from each piece to make it look better, but I like things bolted down and secure, so there it is.

babybrightsSweaterKnittingBack

Caron Simply Soft, Baby Brights Ombre.  Needles: size 8.  Gauge: 4.5 stitches =1 inch


Read Full Post »

(Quick note for the weavers, I’ve updated my weaving post with pictures of new finished scarves:  https://ilovesocks.wordpress.com/2012/07/05/working-without-patterns-weaving-skirt-and-scarves/)

HomespunSweaterForestFront2This one is SO warm!  I love the Homespun. I’ve made several shawls out of it and they are my carry- everywhere warmth in the summer when the air conditioning in public places always freezes me.  And you can just throw them in the washing machine and not worry about felting.

For this sweater, I knitted a small square and got my gauge, then calculated how many stitches I’d need for all my parts.  (See this post for help with that.)

Body: I cast on my hip amount, then worked upward going back and forth with some garter stitch at the bottom and edges to prevent curling. When I got to the armholes I split to a back and two fronts, and decreased to get my appropriate measurements for under the arm and over the shoulder.  On the fronts, I kept my decreases in the rows next to the garter so my garter border would stay the same width.  Then I bound off and seamed over the shoulders.  Sleeves: I picked up the appropriate amount of stitches at the arm holes and made my sleeves.  I just made tubes, no shoulder caps.  For example: If you make your armholes about 8″ tall for a medium size sweater, you will want to pick up about 15-16 inches worth of stitches.  Just past the shoulder, only a few inches in, I usually decrease a couple of inches to around 11-12 inches worth of stitches, then do most of the sleeve at around 11 inches.  (This measurement will of course vary person to person, so you should measure your arm and use an amount you would find comfortable). I did garter at the wrists to foil curling.  I did my sleeves back and forth on a short circular, so I made the seam at the bottom of the arm where it would be most hidden.  When sleeves were long enough and bound off, I stitched up the side of the arms by pulling yarn loops through with a crochet hook.

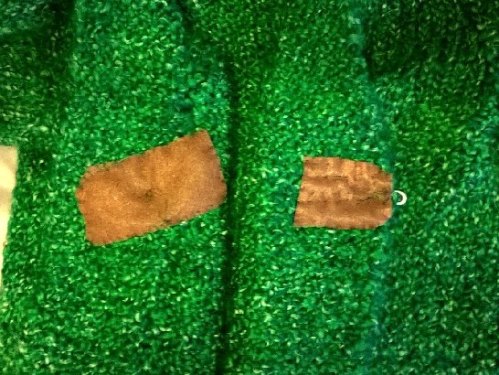
Then I added the clasp with a needle and thread.  I found the clasp pulled on the sweater too much, so I sewed a piece of felt on the back of the sweater behind both parts of the clasp to strengthen this area.  I attached the felt by sewing around the edges, and added more sewing around the clasp to attach it to the felt.  The piece of felt on the right is the most sturdy and doesn’t pull – I put rows of sewing throughout the area, and this seems to work best, so I will go back and do that to the piece on the left too.  You can see in the top picture it pulls a little, but I don’t feel like its going to pull the sweater loose or stretch it out now.

HomespunSweaterFelt

Finished!  It was a fairly quick sweater since I used a big yarn and such big needles.  Now I kind of want to make a similar crazy sweater in one of those fun color changing Homespuns.

HomespunForestSweaterBack

Yarn: LionBrand Homespun in Forest, and size 10 needles.  My gauge: 3 stitches = 1″ on size 10 needles.  Clasp: La petite #1056.  If I remember right, I picked it up at Joann craft store.


Read Full Post »

Warning – This didn’t TOTALLY work out, the neck hole wound up a bit big.  See the final post on the finished product before deciding on measurements:

https://ilovesocks.wordpress.com/2017/06/25/finishing-the-poncho/

_________________________

I’ve never been a great fan of ponchos, (mostly because if I’m cold, I want good coverage, not the open bottom).  Recently however, I saw one in the mall that looked so pretty, I wanted to make it.  It was something like this, with the flowy cable part of the pattern running around the neck and down the front and back:

PonchoFLowy

I haven’t even started on one yet, (I currently have 5 other projects going on), but I did make my plan.  Here is how you design your own poncho.

A common way to make one is to make two identical rectangles and seam them together, like so:

PonchoFoldHowToMake

You attach the two rectangles together with a seam, then you fold it over and seam the other edge, attaching blue star to blue star, white star to white star.  This is great, nothing could be easier than two rectangles – you can make them however you want -crochet, knit, or weave.

To make the appropriate size rectangles

-width of the rectangles
To get the width of your rectangles, (their width is the length of the poncho), put a tape measure on your shoulder where you want the neckline to be, and measure over the top of the shoulder and down your arm to where you want the end to stop near the wrist (or your length of choice).  You will have a longer point hanging in the front, but the length over the arm is probably more critical.

-length of the rectangles
The length of your rectangles will be determined by what size you want the neckline. You can tape measure the point in the front where the neckline is lowest, over one shoulder to the same point in the back.  (See the red line on the drawing below, this is where you measure).  This will give you half the amount of the neckline, so then double it.  When I measure I get 17 inches, (neckline a little lower down), so I will make my rectangles (17+17=) 34 inches long. I have seen patterns suggest 32 inches as a “large”, so try it and see what looks good for you. You just need it big enough to stick your head through it without having it so big it falls off the shoulders, or leaves too much neck area exposed to the cold.


PonchoMeasure

Here is another method I used just to double check the size, (though the measuring tape is probably simpler than this one). 

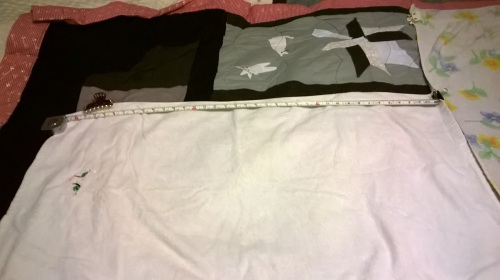
Clip two towels together in the same way you would make the poncho, (following the drawing above). You can use binder clips, hair clips, clothes pins, whatever you have. Wide hair clips like I used will add more variation, narrower items are better.  (This is really a ballpark measurement in my case because I used 3 inch hair clips.)  Put it on. The long point will hang in the middle of the front and the middle of the back, so arrange your towels on you this way.  Adjust the two clips at the neck to the size you want the neckline to be, and move the adjacent two clips so your towel is pinned flat, like shown.  You can also add a clip near the wrist at one edge to mark the length you want the poncho to be (which is rectangle width).

PonchoTowels

Take it off and lay it out on a flat surface. Unhook clips from one seam only, but hook the clips back on to one towel if they weren’t on a corner on that towel.  Lay both towels flat like the drawing.  This will let the clips mark your new size. Measure from corners (or towel edges) to clips as shown, or if both of your end clips moved, measure from clip to clip.  The area outside of where you moved the clips shows length that you don’t want on the poncho.

Measure from any clips that were moved inward to the farthest clip.  You should still be getting rectangles in the general shape of a towel.  TowelMeasurePoncho

TowelMeasurePoncho2

Measuring this way, I get 35 inches on both towels, so I know my earlier 34″ measurement was probably fine.  This is rectangle length.

TowelTrimPonchoIf you want, you can fold the towels to your appropriate rectangle length, re-clip, and try it on again. (Clip white to white, blue to blue.)

TowelFoldPoncho

Now you’re ready to begin making two rectangles.

If you crochet, you may get a fairly thick poncho, unless you use skinny yarn.   This drawing shows one way you can do it, but you can get creative and make your rectangles in any direction you like.  Make two identical rectangles for the flowy neck pattern like the top drawing.

ConstructionPonchoCrochet

If you knit, you can cast on either direction here too, the drawings are just ideas.  Cast on the number of stitches you need to get your appropriate inches on the width or length. (For help with getting from number of inches to number of stitches, see this post.)  To get one like the drawing I put at the top, cast on the width and work up the length like this drawing, doing a cable on one side to get a flowy neckline, and make two identical rectangles.  If instead, you cast on your length, your stitches will be right side up when you wear it, (going up and down).  You can take advantage of this to do flowers or leaves growing upright at the bottom, or whatever you choose.  Whichever way you do it, plan your design carefully to avoid any curling at the bottom.

ConstructionPonchoKnitting

Attach and seam your two pieces like this, and seam following the stars on the drawing above. Make sure to seam on the insides and safety pin it first to check orientation before starting seaming.  (Probably sounds silly me saying that, but when I sew I’ll put one piece on backwards every time if I don’t pin and check first, so with no obvious sleeve holes, I know I’d do the same here.)

PonchoKnitDirection

Hey, I started!  I realized one of my sweaters already-in-progress is a piece exactly 34 1/2 inches long, so that one is now going to turn into this poncho.  Due to the length it already is, I can’t run a longways cable around the neck, but I think what I’ve done already will make a nice neckline, and now I can maybe do some kind of flower pattern growing upwards from the bottom edge or something.   (It will need some kind of design to prevent the stockinette rolling up at the bottom as you see it doing here).  This design edge is just random made up cables on a garter background with a square of seed stitch at the corners.  When I finish this I will come back and add the completed photo to this post.

PonchoKnitting


.

Read Full Post »

Finished another skinny yarn sweater!  I don’t know how long I’ve been working on this one, but I’m pretty sure at least two Christmases have passed since I started.

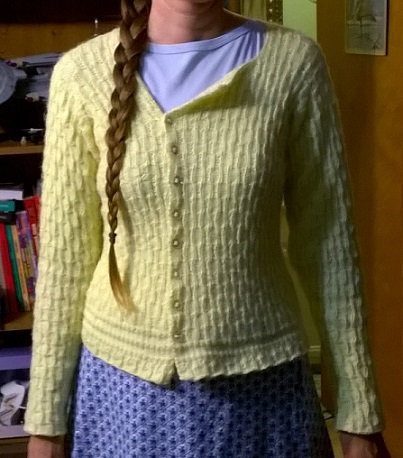
YellowSweaterSkinnyYarnDoneBackI followed a chart for the texture (reference below).  The idea here was to make an asymmetrical front, just to do something a little different, (though similar to what I did on the purple Knifty Knitter sweater).  I made one side wider than the other so the buttons would go down one side instead of down the middle, and I tried to make a flap that would hang over under the neck.  Its not really staying down now, but I haven’t done blocking yet, so I think I can get that part to work out.  This stitch chart was good for that since it looks nice on both sides.

I also made the bottom stripes different on one side of the front.  I would say this didn’t work out fabulously, as the different stripes at the bottom really just look more like a mistake happened.  In the future if I try that again, I’ll probably be sure to include many more stripes (or whatever is different), to make sure it is so obvious that it won’t look as much like a mistake.

Also, the fronts don’t seem to line up at the bottom as well, though I’m not sure why – there are the same number of rows on each piece below the stripe. Possibly an error in button placement?  When putting on buttons, its best to start at the bottom, and make sure your bottoms line up.  I did that, but still uneven, not sure why.  Not too bothered by it.  Close enough. Will wear it anyway.

YellowSweaterSkinnyYarnDoneFront3

There’s only one other thing I might do differently, and that’s to not use clear buttons.  (Hey, I was just so excited to find this many buttons that matched each other in my jar!)  Because you can see through the buttons, you can see the buttonholes.  Usually you don’t see buttonholes when something is buttoned, and knit sweater buttonholes can really kind of look like jagged holes.  I may try to do some hand stitching or machine sewing around the edges of the buttonholes to neaten those up since you can see them.  If it bugs me.  It doesn’t bug me enough to go that far yet.

YellowSweaterSkinnyYarnDoneFront2

 How it was done:  I did my self-measuring, knit a swatch to get my gauge and did my stitch math. Then started at the hip and worked up on the back piece.  I used decreases on the edges to get my size right for hips, waist and bust, then bound off a few and decreased a couple to make arm holes.  To make a shallow neck hole, bind off neck stitches and attach another yarn to one shoulder to keep working both shoulders at the same time on two needles.

I started one side, working up from the hip, back and forth on straight needles.  I attached it partway at the hip to allow me to get it exactly the same size as the back piece (as to where decreases for the waist go and where arm holes start.  I left buttonholes in  this piece.  Then I made the other front piece the same way, without buttonholes.  Then stitches were picked up at the arm hole and sleeves were worked in the round.  I didn’t bother with shoulder caps on this one, the sleeves are just tubes with decreases on the underarm side.

YellowSweaterSkinnyYarnStartSide

I wanted sleeves narrower at the wrist than my circular needle allowed, so I started working back and forth at a point below the elbow when it started to get too tight to work in the round.    The ends of the sleeves were seamed when finished.  This texture chart was a great one for no curling, so no need for fancy edges.  Work in ends, sew on buttons, and all done!

YellowSweaterSkinnyYarnAlmostDone

Yarn: Colombine 99 183 0 – 50% acrylic/50% nylon.  Size 5 needles

Stitch charts followed: The New Knitting Stitch Library. Lesley Stanfield. Quarto Publishing, 1992.  Stripes at the hip are chart #13, pg. 28.  The rest of the sweater is chart #41, pg. 36.


Read Full Post »

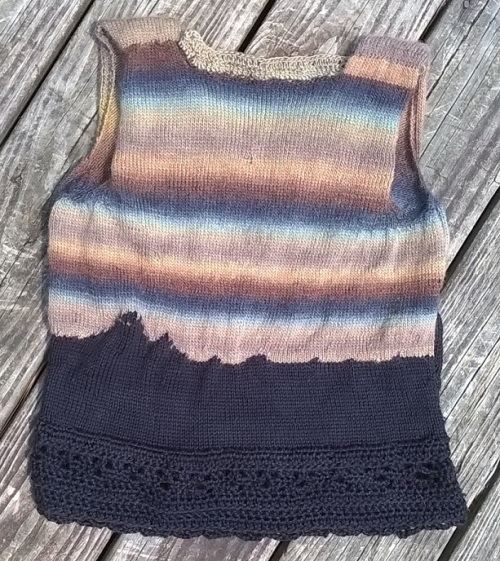
I’ve been gone a long time – I wanted to try knitting with skinny yarn, and oooo did it make the project drag out!

TwilightVest

This is knitting art imitating life, but it was not my idea.  I was inspired by these mittens –  “Crochet Ever After”:

http://www.ravelry.com/patterns/library/deep-dark-forest-mittens

(I didn’t even realize I found the exact same yarn for the sky until I looked at the Ravelry page just now, I had only looked at the photo of the mittens before.  I guess this yarn is really just the perfect stuff for making twilight skies.)

The cool thing about this vest is that it’s a silhouetted treeline sky, and that part wasn’t even my idea.  So what I will say here is what happened along the way in making up a vest.

About Mini Mochi, gauge, hooks and needles: I’d recommend making a ball of it before you start, this is some stuff that loves to unball and tangle. This was Mini Mochi yarn by Crystal Palace, color 331, and size 4 needles.  For the black yarn, I had trouble finding one that matched the Mini Mochi in size that was also wool (so things would shrink at the same rate when washed), so I wound up using what I had leftover at home- Caron Simply Soft in solid black, (which is much thicker and acrylic anyway).  I stuck with the size 4 needles through the thicker yarn too.  My gauge with the Caron, 5st =1″, with the Mini Mochi, 7st.=1″.  Size B hook used for the crochet around the neck and arms.  Size G hook for the crochet around the waist and hips.

I started at the shoulder and did the front, working downwards.  I did 3 stitches worth of seed stitch at the edges to help with rolling (more might have been better – I later added double crochet around the edges because it was still rolling).  Then I worked the back piece the same way, starting at the shoulders, and seamed the pieces together at the end.  I tried with the front to get the same color on each shoulder so the two sides would match, but as you can see, that didn’t work out perfectly, my colors don’t match.  I worked both my shoulders at the same time (on the same long needle) with two balls of Mini Mochi to guarantee that I had the same number of rows on each shoulder, (I had no intention of counting skinny yarn rows).  You may notice a lumpy area right in the middle on the front, below the neck hole.  This is where I tried to do something fancy to help my mismatch that didn’t work out.  After my shoulder pieces met, I was going to gradually blend the two balls of color by stopping rows in a gradual pattern that might mimic clouds (instead of having the two balls meet in a line in the middle, or cutting one ball off and just working with one).  It didn’t work, I have a jagged line that is also lumpy.  Later I may make a black lace butterfly and slap it over the middle there to look like a big silhouette moth over the scene if it really bothers me.

TwilightVestBack

I found doing it from the top down kind of awkward, so in the future, I will probably make my vests from the bottom up.  You have to swatch and do some math to figure out how many stitches to add at what rate to get your angles right and the right number of stitches for each part of you.  That’s true for both directions.  It worked out, but I just like decreasing to do the neck and armholes instead of increasing to do the body (probably just a personal choice).  I found it wound up too low cut, so I added some crochet across the neck front.    Link to my page of stitch and gauge math

EarlyDawnVest1

My trees were done completely randomly, just using black and color where I felt it should go to make a tree shape.  I was aiming for rounded trees because I wanted it to look like twilight in my woodsy backyard.  The same randomness was used on the back where I did a mountain scene.

Since my black yarn was way thicker than the mini mochi, I had to do some more math to grossly reduce the number of stitches once I started the silhouette.  You can see that the black part bunches a little on the mountains – that’s because I wasn’t too obsessive about it and just did stitch decreases randomly the same way I did the trees.  My math showed me my goal number of stitches, or what number I wanted to end up with when I got to all black, but while I was using both colors at the same time, I didn’t worry about calculating on the way there my percentage of color vs. my percentage of black and how many stitches that would give me (too complicated!).  I kind of like the effect of the mountains being a little more bunchy, it makes them look more textured and 3D.   Random crochet added, the same on both sides, at the bottom for decoration (and to make this get done faster, woo!)

EarlyDawnVest2

The sun is so bright, its hard to see what makes this vest nice, the dull browns and silver blues of deep twilight colored Mini Mochi sky. Okay, its 94 degrees, I’m gettin’ outta this sweater.

ItsTooBrightOutHere


Read Full Post »

I’m going off topic today.  I like to do that on occasion – if someone I read on a knitting blog hadn’t one day started talking about spinning and dyeing wool, I’m sure I never would have gotten into it, and I really enjoy it.  So, here’s something I’ve been doing the past few weekends.    It may be new for you, or you may be an expert at it already and much better at it than me – in any case, this will be my one and only post on polymer clay roses for jewelry!

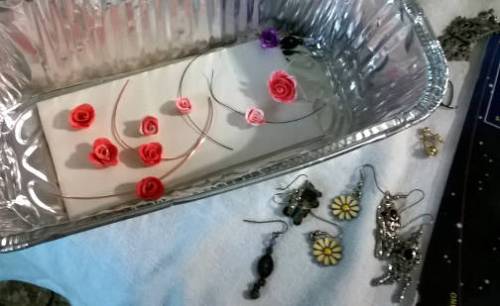
MakingRoses3

So easy!  You make them out of clay, then stick them in the oven.  They turn into a plastic that my clumsy self has already dropped on the floor and happily found they didn’t break!  (At least not on my first dropping – I’m not pushing it.)

Once you make the roses its up to your creativity how you turn them into jewelry -stick wires through them, wrap petals around old posted earrings, etc.  I learned how to make the polymer clay roses with this video by makoccino:

https://www.youtube.com/watch?v=wkgxnnftjCQ

The only thing I did differently on these from the video is that I didn’t glaze them to make them shiny, and on many I used white clay to blend the colors gradually so the flowers could be whiter at the base and deeper colors at the petal ends.

Making blended colors to resemble real roses:  I did the blending by making 3 balls, 3 different shades- a whiter shade, and medium shade and the shade for the ends of the petals.  You only need white clay and the color of your choice to achieve this.  I then rolled each of the 3 shades into a snake and pressed them together.  If you cut your snakes and stack them and squish them, (always keeping the same shades on top of each other), it gradually blends into a clay that changes color slowly.  (Sometimes I didn’t bother to blend, just left the color separated before making petals, you can see this on some of them.)

My biggest challenge has been ending up with earrings that stick out too far.  Here’s what happened and what I did to fix it.

These solid color studs are done like the video, but instead of cutting off the flower and gluing onto a flat earring, I wrapped the petals around some old dingy studs that I had gotten for cheap when I was 15.  The method in the video is better!  I did use the same trick from the video, using a knife to cut it shorter and press it in around the base of the earring to try to make the flower stick out from my head less.  But this was only partly successful, they do still stick out too far, and I don’t really want to wear these.  The smallest stud ones (white with leaves) in the top photo are ok.  Live and learn, I will try to saw these off at the base and see if that helps.

RoseEarrings

This necklace sticks out quite a lot too, but I like it.  It sticks out so much I got stabbed in the chin when I sneezed!  Bit of a surprise!  But again, I didn’t manage to break it, even slamming my head into it, so they are a little tougher than they look.  I made the rose and leaves, and the two beads on each side out of clay, then just wrapped wire in random ways to make the rest of the necklace.   The leaf is just a piece of clay pressed flat and cut with a knife into a leaf shape, then the end of it is rolled into a snake and used to wrap around the flower for attaching the leaves.

This was a bright royal blue and fuchsia before I baked it, but this blue turned into more of a navy after baking.

RoseNecklace2

RoseNecklace1

Making a leaf shape with a rolled snake on the end to wrap around the rose.  This is the back side.  I might attach this wire to one of the barettes.

RoseBack

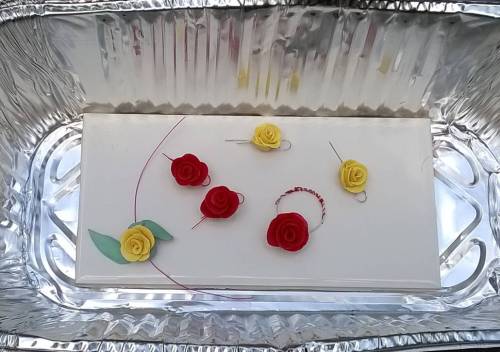
Below is the process of the rose making – The 3 tools on the left are useful for wire cutting and wrapping, and are sold as a set and inexpensive at walmart.  Most of the wire also comes from there, and the clay can be bought at a craft store.  I use Premo! clay.  Its kind of like paint, you can blend colors together, so you don’t need a ton of colors, just black, white, and a couple of your favorite shades.  You can see a glob of green clay for leaves (near Earth on the mat) which I made by blending white, aqua and a little yellow.  SuppliesRose

I have a selection of old dingy earrings (below) from the 90’s that I no longer wear to which I planned to glue roses. To help fix the problem of the roses sticking out, I cut some of them off like shown in the video and glued them onto these dangly earrings.  It’s easier to cut them if you let them sit for a few minutes after you are done making them.  When they get less warm, they get a little less soft.  You can see those finished in the top photo.  Here I show a petal on the mat, white at the bottom and a deeper purple for the outside of the petals.  The mat is a child’s place mat, and helps protect the table, and that is the foil pan I bake the clay in.  I put another pan just like that on top to make a domed enclosure to help keep the clay smells out of the oven.  The first time I ever baked clay, I noticed the smells a lot, but I don’t even notice them now, I’m not sure why.

MakingRoses

The baking pan- I got a ceramic bathroom wall tile from the home improvement store for sitting the clay on (it will make a smooth shiny spot where it sits on that during baking, so best to have the back down).  Several of these I stuck wire through before baking to make jewelry making easier.  It is easier to bend the wire into shapes once the rose is cooked and harder.

MakingRoses2

RosePan

The copper color wire will turn a darker yellower color during baking.  You can see this in the pair of orange roses below, you have two different colors of copper because some of it wasn’t baked.  The copper will turn as time passes in the air, so I’ll see how it winds up looking later after these sit out for a few months.  I love original copper’s peach color, but don’t like the yellowy baked color too much.

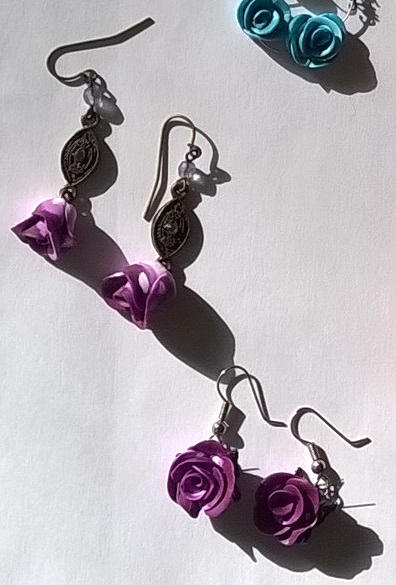
PurpleRoseEarrings

Below, and also in the top photo you can see after I worked out the sticking-out issue. Baking the wires through the peach ones allowed me to wrap them in ways that helped them face outward on a dangling earring, I also tried face down like the blue ones below.  I used bead caps and a potato pearl bead and wrapped wires around those.  (I also like wrapping wires around crystals, like the ones on the left, no need for baking.)

Finishing up: After attaching the loops on the wires to store bought earring wires, I use a tiny amount of Aleene’s tacky glue to clean up anything I need to when done, such as adding extra hold to the back of a rose so it faces outward and sticks well to its wire, or to seal any wires that wrapping has left sticking out or unsealed.  Also glueing roses to the old earrings (use a little rough sandpaper to roughen up the back of the rose and the front of the old earring to help the glue hold.)  It also helps hold the crystals inside their wires on the other pair to dab some on the back side, holding crystal to wire.

RoseEarrings2

So concludes my foray into clay roses.  Back to knitting with skinny yarn, which takes a very long time.

UPDATE:

I did saw those roses that stick out too far off, and I like them and wear them now.  I got this saw which I used to saw down to the metal earring inside.  I found out just how sturdy this polymer plastic is! Despite how delicate these look, they are pretty tough stuff!  I grabbed them pretty hard while sawing off the back, and no damage.  This was not that easy, it was a couple minutes of sawing, then the earring may pop out and need gluing back in (I used the pictured glue when that happened).  It’s much easier to get the right shape before the clay is baked than it is to saw it later, but if you need to, this is possible.

RoseJewelry99

Read Full Post »

SocksHeels

Once I was knitting a sock on the bus, and some guy said to his companion, in a low, but not-that-low voice, “Why would you knit something like socks?  You’re just gonna get holes in ’em.”  He couldn’t understand why somebody would work so hard on something that was going to get thrown away.   Sometimes I dye the wool and spin the yarn too, much more time spent, but these are my warmest socks in the cold cold winter.  I could probably buy something as warm at the big box store, but I haven’t.  Who am I to say why anybody does the things they do.  Including me.  If I were going to sit and spend time figuring out why I did something, I’d probably focus on one of the big things I screwed up in my life, not why I knit a sock (or twenty of them).  Onward!

My latest method of sock hole repair:  In the photo above on the leftmost sock heel you can see what I used to do to fix holes- use yarn to weave a patch over the hole.  This stops the hole from spreading, but isn’t very comfortable to walk on, and at least with my socks, doesn’t seem to last very long.  I have a wooden floor and a wooden deck, some sock tearing does occur on a regular basis.  (It also could be that I’m not doing it right, but in any case – end result, not makin’ me happy.)

All of the socks to the right of that one show what I’ve been trying lately, sewing felt on the heels or entire bottoms.  The felt seems to be a little harder to tear holes in, and it holds up well in the dryer, (for those socks made of acrylic that get thrown in there).  What I’m calling felt is the stuff you get in the fabric section in one foot squares for a pretty cheap price, I’m not actually sure if its real wool felt or a synthetic creation, but no matter, that’s what I’m using.  I’ve tried putting a piece on the top and the bottom side of the hole, and this stops unraveling the best, but I’ve also tried one pair where I just put the felt on the bottom outside and nothing on the inside.  This still seems to be holding up so far, though I don’t expect it to last as long as double sided where all unraveling is encased.  This single layered sock was sewn on a machine and that may help greatly.  The rightmost sock below has a row of zigzag across it, that is the single layer sock and there was a hole in the heel – going across provided extra yarn sealing. The ones I sew by hand might not hold up as well, because I never get as many stitches that way, but it can be really hard to get the toe end under the machine if the sock is really thick, so it has to be done sometimes.  Below you can see how few hand stitches I do, and machine sewn zigzag stitch on the edges of some.

SocksHeels2

I’m not sewing these the “right” way, I’m doing it the quickest and easiest way.  Which is to say I’m not tucking the ends of the cloth under and then sewing, I’m just sewing around the cut edges.  Why? Because its not that easy, especially if your trying to shove a thick sock  and 2 pieces of felt under the machine.  Folding the two pieces under as well just wouldn’t fit, and with felt would probably make a thick uncomfortable ridge to walk on.  You can probably fit it if you take the foot off of your machine, but I seem to get a tangled thread mess when I try that, so I haven’t done it that way.   I tried cotton when I ran out of felt, that is the second to leftmost sock.  Enough time hasn’t passed to see how well that holds up yet.

I like the extra padding under the feet, much more cushy!  Also, they’re even warmer!  The only down sides I’ve seen so far are that it might not be all that cute of a sock anymore, (if you care about that), that it probably won’t fit in your shoe, and that wool socks with 2 extra felt layers need help to dry since they can’t go in the dryer.  Help such as spending a night or two over a heating vent, or out in the sun on a fairly hot day.  I’ve thrown the felted acrylic ones in the dryer with no problem.

I like the felt bottoms so much, I might plan to use felt as the bottom from now on, and stop knitting bottoms on my socks, just attaching a knit top.  I’ll have to see about it.

Hope this helps someone else save their handknit socks.


Read Full Post »

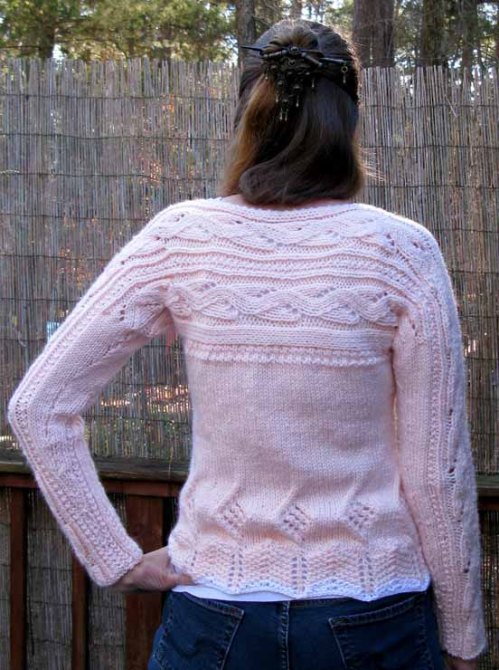
The idea for this sweater came from something I saw in a magazine, the “Meandrous Tunic”, (by Jill Wright in Creative Knitting, Spring 2014, page 62).  For my usual reasons, I did not want to follow a pattern, but I really liked the look of this sweater, and wanted to give making one like it a try.

This was my attempt.

WristToWristSweaterFront
This sweater is made from cuff to cuff.  You start at one wrist and go across the chest, ending at the other wrist.  Then you pick up loops and make the body.

To start – Measurements:   I knitted a square with my chosen yarn and needles and got my gauge, then figured out how many stitches to cast on by measuring the number of inches I wanted the sleeve to be around my wrist and calculating.  (Here is my post on how to calculate your needed number of stitches using your gauge and your measurements.)

I measured the number of inches around various parts of my arm (wrist, lower arm, elbow, upper arm and shoulder), leaving a little extra room with the tape measure so the sleeve wouldn’t be very tight.  Calculating as stated above with these measurements told me how many stitches I’d need for each part of the arm.  I also measured vertically from where I wanted the top sideways part to stop at the front, over the shoulder, and down to where I wanted it to end at the back.  (In my case this was 18 inches, and this was the widest I would need my arm and chest tube to be.)  You also need to know how many inches across you’ll want the neck hole and the hole for the chest (measure around you under the arms to get that measurement all the way around yourself, half of that is the length of the opening for the chest – again, remember to leave a little extra room if you don’t want it tight.)

WristToWristSweaterChestOpening

This photo shows the wrist where I started on the right side, it is open from about the elbow to the wrist because I wanted a smaller circle than my circular needles could pull off so I joined as soon as I could so that at least some of it would be seamed already.  I started with my appropriate number of stitches at the wrist, then increased as I went up to get to the next needed number of stitches, (I increased at the ends and beginnings of the rows until I joined them into a circle, and kept my increases there after joining).  I always increased under the arm to make the increases less obvious later.  Under your arm will be where you put your hole for the chest.   I put a marker here for reference.  In this spot, under the arm, is the part that will go across the chest, so you have to plan your stitch pattern choice accordingly.  I wanted something twisty, but easy, so I chose this one which looks like a cable, but isn’t, and interspersed other random choices of garter, knits, purls and rib.  You may want to choose stitch patterns that look nice and flowy when worked longways. You will want something that doesn’t curl at the wrists.  I had two of the flowy cable looking pattern going the entire length of the sleeve, positioned near the top of the arm, and I added another flowy one to each side once there was enough room after the increases for the upper arm. (Stitch references below.)  (See the shoulder cap section for another tip on choosing your stitch patterns.)

Essentially, you make a tube, but you need to put the neck and chest holes in the right places.  You don’t even need to increase up the arm if you don’t want to, you can have sleeves that are widely open at the wrist, and this would just be straight tubes.

I added shoulder caps. If you want to do your cap like this one, it will be helpful for you to choose stitch patterns with a lot of space in between to make this easier.  For example, I only have the flowy twisty thing that looks like a cable, and I have 4 of them.  So when I turn around and go backwards to do the shoulder cap, I don’t ever have to turn around mid pattern.  I have random knits and purls between the flowy parts, so I always turned around in those.

Here is my diagram which has most of my measurements on it, and the round thing on the right shows how I made the shoulder caps.  If you are looking at your circular with all of the stitches on it, you are looking at that circle, and the thing at the bottom of the drawing represents the marker where the bottom seam of the arm is.  The arrows show how I added rows to the top of the shoulder gradually leaving off the ends of the rows under the arm so there was less cloth there.    This was confusing enough that I did the whole thing in one sitting, not something I might know where I was if I went back to it later (unless you keep really detailed notes).  I followed this diagram twice. You can’t really read what’s written under the circle, but in general, it shows that I was on row 9 of my pattern, did that about 7/8 way around the sleeve (where the innermost arrow makes a U turn), then turned around and went back doing row 10, and stopped about 1/4 of the way from the beginning, etc., keep following the arrows in this fashion, and keep following your stitch pattern and keep notes on what part of it is done. As you can see by the drawing, I didn’t do row 9 on the last eighth of the circle until I got done with the whole thing.  Yarn wrap: Each time I changed direction, I took the next stitch that I wasn’t working off the needle and laid the yarn on the other side of it, then put it back on the needle.  This yarn wrap helped to prevent holes everywhere I turned around.  The yarn wrap kind of looks like a purl, so you might want to turn around in a place that isn’t a knit stitch.  Follow the arrows, turning around in places near the arrows that look ok with your stitch pattern (exactness not needed).  The last arrow goes all the way around and back to the marker.  I did this circular pattern two whole times to achieve the shoulder cap you see.

The photo below this diagram shows a completed shoulder cap.  The yellow marker shows the beginning before any of the cap was worked. Its a pretty shallow cap, but its enough to prevent too much sweater bulging under the arms, which you can sometimes get if there are no caps.

WristToWristPeachSweater

My stitch patterns weren’t all on the same row after the shoulder cap. To deal with this I used 2 torn pieces of a post-it note to stick to my stitch chart, torn very small so I had only the sticking part, with writing on them telling me which one went with which place.

WristToWristSweaterSleeve

After the shoulder cap is done, you are at the armpit, (where your marker is), so here is where you want to split it in two to divide for the chest. You will want some cloth over the shoulder, so you would go a few more inches before you split for the neck hole on the opposite side.  Here is what it will look like on your needles after you split for the chest hole and the neck hole.  You will then be working back and forth on both pieces instead of in the round.  I attached a second piece of yarn from another ball so I could work both back and forth at the same time.  I wanted to be absolutely sure they were the same length, so this ensured that.  I turned a few of the stitches at the edge of the neck hole into garter stitch to prevent curling and make a nice edge.

WristToWristSweaterSleeve2

Below is what it looks like after the chest and neck hole are done.  I had closed the neck hole off a long time ago in this photo.  I measured and figured I wanted 3 to 3 1/2 inches over each shoulder, and the length of the neck hole to be 9-10 inches.  10 + 3 +3 =16 inches.  I needed the chest hole to be 18 inches across, and  I wanted 16 inches from shoulder to shoulder.  So, that is a 2 inch difference.  (Going under the arms adds an extra inch on each side.)  What I wound up doing was making over the shoulders a little longer, then shooting for the 18 inch chest hole to make sure that was big enough to not be tight.  The important thing is to keep the neck hole in the middle and make things equal over each shoulder.  You can hold it up to yourself as you work and see how its going, and that’s what I did.  I checked my measurements with a tape measure, but I also just held it up to me once in awhile and made decisions based on what I saw.

I closed the chest hole by going back to knitting in the round.  You get to cut the second yarn ball off at this point (and that’s always a relief!)  Then just work the next sleeve the same way you did the first one.  Start with the shoulder cap, same as whatever you did before, then go down the sleeve decreasing along the under the arm.

WristToWristSweaterTop

Here’s the whole top of the sweater completed, you can see the hole for the chest and the neck.  I’ve seamed one arm from elbow to wrist but I still need to do the other one.


WristToWristSweaterReadyForPickup

Here is where you will be when you start the body. I used my gauge and inch calculations to figure out how many stitches I would need to pick up.  I went around the hole for the body of the sweater, picking up every stitch and this wound up being a lot more stitches than that.  I decreased crazily (under the arms where it would be hidden) to get down to my ideal number.  I don’t think it is noticeable at all that I did that.  I figured it would be better than leaving stitches off during pick up and maybe getting holes.    Tip: Pick-up is easier if you jab the needle into a stitch, then knit one through it, and make the first row as you pick up. Pick-up loops tend to be a bit tight and harder to work if you have a needle full of only pick-up loops.

After pick up on a big circular needle (same size for everything), I then I did a stitch pattern of knit/ purl alternating, a few knit rows, then another row of knit/purl to make a decorative line across the chest.  Then it was smooth sailing, nothing but stockinette I could do in the dark during tv!  I decreased a little to get to my measurement for the waist, but not much, only 4 stitches, I was going for a straighter sweater.  I increased to the appropriate number of stitches for the hips before starting the pattern at the waist.  Getting the increases out of the way kept me from having to figure out how to keep the counts right for increasing during patterns.

WristToWristSweaterBack
A few more decorative stitch patterns (see below) for the waist and border (to prevent curling), and a couple of rows of white after I ran out of peach yarn and still wanted it a tad longer.  All done!

References:

Idea for format of sweater: “Meandrous Tunic” by Jill Wright, Creative Knitting magazine, pg. 62.

Stitch Patterns:  The New Knitting Stitch Library. Lesley Stanfield. Quarto Publishing, London. 1992. ISBN:1-57990-027-5.  Flowy cable looking stitch: #196, pg.126. Stitch at waist: #95, pg. 62 (only row 3-19 with only the symbols on the left side).  Border at bottom edge:  #284, pg.165 (only the bottom half of the design.  For this I was working from the top down on the sweater, but these rows made the same pattern no matter whether they were worked from top down or bottom up.)

Yarn and needles:  Size 9 needles.  Vanna’s Choice yarn by Lionbrand, color: Soft Pink.


Read Full Post »

SeamlessCrochetContinuousSweaterDone

I’m really loving the seamless / continuous crochet!  It makes such nice objects without the tedious working-in of the ends that you usually get with crochet squares.  To see sleeveless items I have made before also using seamless crochet, see here for part 1 and here for part 2. (Not necessary to read those to understand this post though, no worries!  …Also, that’s not a hole at the belly button area, that is where the jeans are poking through it.)

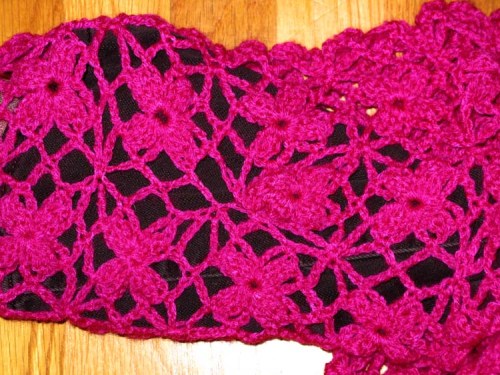
I have been dawdling over how to write this post for the past month, and how much detail I can go into.  What I made up on this sweater was how to get connected motifs into a sweater shape, but I had a drawing in a book to give me the idea, and the motif design itself I got from books.  (The motif I used in this sweater is in both books, see references below.)   So, this post will tell you how to construct the sweater with continuous crochet, but you need to know how to make a motif. In general, this means making a long chain, then slip knot into a ring, then do something of your design for row 1 for the center around the ring, then chains around the outside edge for joining (chains making corners and sides).  You can design your own motif if you wish.  As long as you do them all the same, you will get a pattern.

In one of the books I reference at the bottom (Nihon Vogue-Sha), they have a drawing on how to construct a similar sweater on pg. 77 (see reference at the bottom).  They do this differently than how I did it, and their way may be simpler and better than what I did.  I have not found this book in English though, only Chinese and Japanese, so exactly how they did it was not completely clear to me.  It looks to me like they complete a front half all the way, and then do a back half all the way, then seam some other way when the pieces are completely done.  I don’t think the pieces are joined as they go, but it could be I just didn’t get it.  So, exactly how to construct the sweater is what I made up as I went, generally based on their drawing.  Let me add, I LOVE this book even though I can’t read it.  It is full of drawings, pictures and interesting motifs, most of which I can use just fine just by looking at the drawings.

If you are interested in making these, you may want to buy a seamless or continuous crochet book. The drawings in the books help a TON in trying to attach these things together the right way.  The first sweater I made with continuous crochet was really very confusing as to what parts of the motif attach to what, even with drawings to help.  But you do get used to it the more you make, and it becomes very easy.

How my sweater was constructed:  Look at the photo below.  I made row 1 starting at the waist.  I made this bottom row 6 motifs across. (For sizing – hold your row of motifs up to yourself and stop when its wide enough to go across your hips – careful not to stretch unless you want a tight sweater).  It was worked the way continuous crochet usually is, doing bottoms and rights of the outer chain edge of each motif on row 1, then doing the top chain edge on all 6 motifs after all 6 were done, but leaving off the left outer edge, (meaning don’t work the outer chain on the leftmost motif of the row).  Do Row 2 the same way, the leftmost motif is joined at its bottom, make it, then do its outer bottom edge, joining it to the one below on row 1 as you go, then work its right outer chain edge,  then make the next motif.  After all 6 motifs are done, work the bottom and right outer chain of that last one, then work the outer chain edge over the tops of all of them to get back to the left, and leave off the left outer chain edge on the last one.  Row 2 is done.  The left outer chain edge is done after all rows are done to get back to the starting point.  So, I worked a rectangle with 6 motifs across and 8 rows high, (this is from the hips up to the armpits in this photo), then after working the outer chain over the top of the last row (row 8), I then did the left outer chain edge of all rows, bringing me back to the starting point at the left bottom.  The starting yarn-end is tied to the ending yarn-end and worked in, and those are your only ends to deal with on this rectangle (as long as you didn’t need to join a new ball of yarn).  Back half “body” is complete.

A note about my use of the words “left” and “right” for the remainder –  My words say what was done as I was holding it, however, I was looking at the backs of all of my motifs as I went (the inside of the sweater).  So left and right as I say it will match what it looks like when you are doing it, but you will notice it seems reversed in some photos, because the sweater isn’t inside out in all of them.

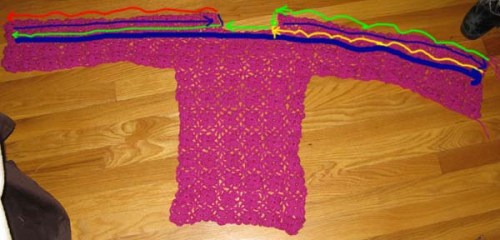
1ContinuousCrochetSweaterBackThen, to work the piece for the arms, I started at the left wrist and worked the first row all the way across to the right wrist.  That was joined to the first rectangle (the body) when I got to the point where the armpit would be, and as the bottom outer chain (of each motif) was worked on that first row.  You have to hold the arm motifs up to your arm to decide how long you want it to be, and make sure you are doing the same number of motifs for each arm and getting the body joined in the middle.  Using markers may help.

The photo above is not half of the sweater, my arms were going to be six motifs tall total, (3 on the front side, 3 tall on the back side), so this is 3 rows, which is the back half, plus 2 half rows which are really on the front, and allow for the neck hole.  (So the back half of the arm piece has no space for a neck hole, the motifs go all the way up, and it is simply a long rectangle.)

Neck hole:  This was kind of complicated, let me draw out how I did the half rows for the neck hole in 2 ways.  Look at the second drawing below, if it makes sense, that will allow you to skip all of these words!  Number one to remember, if it is a pullover, it has to fit over your head or you can’t wear it.  I used the already made parts of the sweater to stretch around my head and see how many motifs would have to be missing in the neck hole to get it to fit over my head.  This is pretty stretchy, and I only needed 2 motifs to be missing.  It may help to count these out before you start and mark the last motifs you do before leaving the neck hole.

The dark blue lines below are motif rows, worked to the right.  The other drawn-on colors show how the outer chain edge of each motif was worked (back over the top to the left).  So, we start with the bottom dark blue row, the last row of the back half of the sweater, (worked all the way across, to the right). For the right side – Follow the yellow line back to the left, this is the outer chain edge of that solid row, stop when you get to where you want the neck hole to be, don’t work over the tops of the neck hole motifs yet.  Then, work the dark blue row right above the yellow line, making motifs to the right, working them from the neck area to the right side wrist (in my case this was 10 motifs).  Then follow the green line back to the left for the outer chain, go over the tops of those motifs you just made, then go around the left side of the first/ leftmost one, then do over the tops of the solid row below for the neck hole, then do over the top for the length of the other sleeve to the wrist and stop.  The topmost solid row on the back half is now fully complete (except for the left outer chain edge, which you always leave off, for around the left wrist).  Left side – Then work the dark blue line over the left side sleeve, from wrist to neck, but stop, leaving a neck hole in the middle (have the same number of motifs as for the other sleeve, in my case 10).   Then follow the red line to do the outer chain over your last motifs on the left sleeve.  (You still leave off the left edge of that sleeve.)  At this point, your neck hole so far is complete, all of the outer chains are done everywhere except the left wrist.

1ContinuousCrochetSweaterNeckHere is another drawing in case one is easier to understand than the other, they say the same thing:

Sweater

Finishing the front half of the sleeves and making sleeves into tubes – After the neck hole row / rows are done, you then do more solid rows the same way you did the first few.  (In my case, that was 2 more solid rows so that I would have sleeves 6 motifs tall.) You work the bottoms of the motifs that go over the neck hole the same way as you make them on the usual starting first row, just remember not to connect them so that you leave a hole.  Your neck hole should not have any unworked outer edges left on it after you pass over it with the next solid row, it is complete.

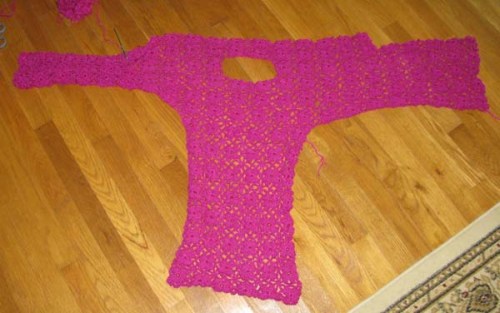
The photo below shows  how I connected the sleeves.  I didn’t seam them later, I used working the outer top edge of my last sleeve row (done on the leftward return after making the last row) to attach to the bottoms of Row 1 as I went.  (The bottoms  of row 1 were already finished when you did row 1.)  Looking at the photo below, you can see this joining.  It looks like I’m going the wrong way in the photo from what I said, but as I said before, it may be inside out when you are working it.

Complication modification – how I made this more confusing, and why you see another half row there at the top – (You don’t have to do this, you can make yours a solid row to make it easier to do.)  My sleeves are 6 motifs tall (in the middle) and 5 tall from the elbows to wrists.  I didn’t want my sleeves to have a very wide opening at the wrist, so I only made my sleeves 5 tall at the ends.  The simpler sleeve way – If you make yours the same number of motifs high all the way across, that makes it a little easier, you just join your sleeves into tubes as you are returning from the right with the outer chain on the top of the last row, making sure to leave openings starting at the armpit for the body as you are doing that top edge of the last row. (Just work across the body motifs without joining).  Once joined, your right sleeve is finished, and the edge at the right wrist is already done.  Once you get back to the left wrist, you work the outer edge on the wrist of the joined sleeve to finish it and cut the yarn here where it meets your starting tail.  Only one more yarn tail to work in, and both sleeves and the neck hole are completely finished.  You only need one more rectangle now for the front body.

2ContinuousCrochetSeamlessSweaterHalf

The complicated way – Adding extra half rows for sleeve modification:  You can work row 5, (the last solid row on the long sleeve rectangle), get to the right wrist with the motifs, then starting at the right wrist join the top outer chain of row 5 as you go to the bottom of row 1 until you get to the right elbow.  At this point continue working over the top of row 5, but stop joining it to anything. Work over the top of the top row with the outer chain back over the neck hole and stop at the left elbow (or to wherever you want row 6 to start – lets say elbow for simplicity). Now you start making and joining row 6 motifs from the left elbow to the right elbow. Then when you get to the right elbow, work the top of row 6’s outer chain – you will continue connecting the right sleeve into a tube now (I made this text purple to connect you to when it was last purple – that’s when you stopped connecting the right sleeve into a tube). You will be using the top of row 6 to connect to the bottom of row 1 at this point.  (See note below on bunching up that first row 6 motif.)  Stop connecting into a sleeve tube when you get to the arm pit of the sweater.  Keep working across the top of row 6 for the body area doing your top outer chain, and go back to joining the top of row 6 to the bottom of row 1 when you get over to the arm pit on the other sleeve.  Join this sleeve down the length, first while working the top of row 6, then it will turn into row 5’s top when you get to the elbow.  When you get to the wrist, you then need to work the left edge around the wrist, and cut the yarn and work in the end.  Your end yarn should join at your starting yarn for the long rectangle sleeve piece.

Note on bunching up end of row 6 motifs:  Below you see the “complicated sleeve” elbow, and what the underside of the sleeve will look like if you add the extra half row.  Here you see row 1 joined to row 5 on the left, and to the right of it, row 1 joined to row 6 where you see the extra motif in there which is looking bunched up.  To make that join, you just squish the usual joining spots on the hook and pull the yarn through all of them at once.  Your joining happens under the arm so this bulging at the elbow is not really obvious, as you can see in the two photos where I’m wearing the sweater, you wouldn’t have noticed it.

JoinSweater

Below is what it looks like after both sleeves are tubes.  The front body is another rectangle, identical to the back rectangle.  You work it in the same way, I would suggest starting at the waist and working up like you did the first piece, joining on the right side edge as you do the last motif of every row, then joining the whole rectangle to the front of the arm piece when you do the top outer chain of the last row. Leave the left edge undone and unattached to work last, and join at that left edge after you’ve joined the rectangle to the front of the arm piece at the tops of the last row, (row 8 on mine).  This is the simplest way to do it.  (Not what I did!  I attached the yarn at the armpit and tried to work downward, attaching to the arm piece first. It worked, but something about the joining was confusing and I had to cut and restart on the opposite side, so doing it the way you did the first piece in all the same directions and just attaching the two with the top edge of the last row of motifs, then the left edge, is probably the easier way to go.  Once again, your last yarn tail will be where your first starting tail was, so only one more tail to work it.

3ContinuousCrochetSeamlessBackToFront

Whew!  I think it’s harder to explain than it is to do!  If you stuck with this post this far, bless you for your infinite patience, and may your projects all come out lovely!

SeamlessCrochetSweaterContinuousBackDone

Books on seamless / continuous crochet that have this motif in them:

Continuous Crochet Motif 60. Nihon Vogue-Sha. 2009.  ISBN-10: 9866817466.  The motif I used on this sweater is design No. 6, page 13.  This book also has a drawing showing how to construct a sweater in a little different way on pg. 77.

Seamless Crochet. Kristin Omdahl. 2011.  Interweave Press LLC, Loveland, CO. ISBN 978-1-59668-297-9.  The motif I used on this sweater is in this book too, called Lace Flower motif, pg. 60.


Read Full Post »

No knitting or crocheting on this one, however, once you see how to make a plant hanger, you can let your creativity flow and crochet or knit one if you prefer.  This is the quickie method of making one, it takes almost no time at all.

You will need thicker yarn or rope for the hanging.  I chose to take some of the yarn and ply it to itself, then ply it to itself again to make really thick yarn.  This plying took a few minutes and that was the most time consuming part.

Plant13

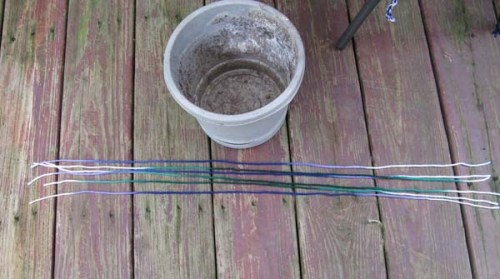
1. Cut equal length strands, long enough to go under the pot and have a couple of inches left over.  I used 6 strands of Red Heart acrylic yarn.  (See the note on number 8 about why the number matters.)  Choose a pot that has a rim at the bottom for catching water.  You can also use one of those plastic catchers, just put it under the pot as you are making the hanger so that it will fit inside.

Plant12. Tie one big knot in the middle.

Plant2

3. Spread the strands out equally. (I had 6 strands, so there are 12 strings spread out.)

Plant3

4. The knot goes in the middle under the pot.

Plant4

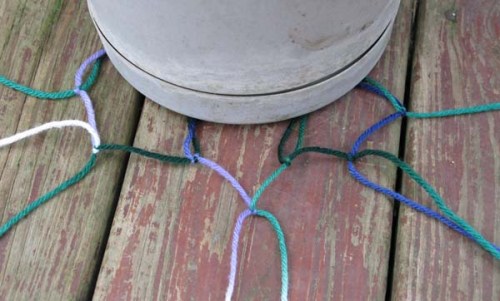
5. Take each 2 adjacent strands and tie them in a knot. (If you had 6 starting strands, this will be 6 knots.)  Try to get them about the same distance from the center knot.

Plant5

6. Tie another knot above the first using strands from knots next door as shown.

Plant6

7. I tied a 3rd knot in the same way.  Then I tied a thick strand around the rim of the pot.  (I plied yarn together to make thick yarn, but you can also braid it, crochet it, or just use a thinner strand for this.)

Plant7

8. Tie the knotted bottom part to the rim strand, trying to get it the same  distance from all of the knots.  I have 6 places where it is tied to the rim strand, this means 6 places between the knots where I could hang it from.  I chose to use 3 clumps of rope, but I also could have used every space and done 6.  (Something like 4 would have had it hanging a bit unevenly.  If you want 4, use 8 strands of string to start with.)

Plant8

9. I left the ends hanging on the thicker rim strand, but tied bows in the remaining ends of the other strings and trimmed them neatly.

Plant9

10. Hang it with thicker yarn, braided yarn, crocheted yarn, or rope.  You will probably need something thicker here, as wet mud is pretty heavy.  For this reason I would not use a pot bigger than this one.  Keep in mind, this will stretch much longer due to the weight, so make it shorter than you want it.  I used yarn twice as long as I wanted and looped it over the rim strand without tying another knot.

Plant10

11.  Three clumps of yarn on, equal distance apart.  Tie a big overhand knot (leaving long enough ends).

Plant11

12. Tie another knot above it for hanging on the hook.

Plant12

Add mud and a plant and hang on a hook.

Acrylic yarn will last awhile if you are careful when you water to not let the bottom overflow and get it dirty.  This one has big spaces so when you water you can tip the plant at an angle to dump the water out so mud doesn’t get on it so much.  It will last longer if it is inside or on a porch than if it is in the sun and rain.

If you want to, knit or crochet it.  You can even add buttons to make it cute.   (Make the same way as you’d make a hat – make a flat circle for the bottom, then keep going but stop increasing to make a ring in a tube shape to go upward on the pot).


Read Full Post »

CrochetShrug1Front

It is very easy to design a bolero or shrug with either crochet or knitting.  The drawing below shows you just two ways a shrug or bolero can be made.  As shown in the top drawing, you can work across the body, starting at the end of one sleeve, increasing to make the body a little bigger, then decreasing to do the other sleeve.  Then seam the sleeves where the stars show.  And of course you can also work upwards instead, adding increases to add the sleeves, or downward, using decreases to remove sleeves.  Your choice.

Or as the bottom drawing shows, you can just make a rectangle, working upwards (or sideways), and seam the sleeves where the stars show.  You can decorate it by adding ribbing or a crochet trim to the top and bottom edges.  (My drawings are always a little crooked, but you get the idea.)

ShrugHowToBoleroHow to measure yourself (for knitting):  You need to measure across the back of your shoulders, then add to that measurement about 4 inches (10 cm.) to each end for short sleeves (or whatever number inches you want for any other length of sleeves, just add it twice for 2 arms.)  For long sleeves, measure your arms.   For the bottom drawing – example, 18″ body + 4″ sleeve + 4″ sleeve = 26″, so make it 26″ wide for a short sleeve shrug.  (You will need to know your gauge if you are knitting so you will know how many stitches to an inch.  See this post for gauge, inches and knitting calculations)

For the height, measure around your upper arms.  This is the height you want to make the sleeve part (or the whole thing if you’re making a rectangle).   You can add a couple of inches if you want a looser sleeve.

For crochet getting measurements is easy, you just chain until it’s wide enough, holding it up to yourself (no stretching).

CrochetShrug1Back

The shrug above is the shape of the top drawing, made with arms and a body.  I started at the bottom / back with the star pattern (in blue), but since it is one of those that is alternate, I didn’t use stars the whole way.  (By alternate I mean not one motif above the other so it makes an even edge, but each motif over the space between the motifs so the edge is uneven.)   Since I wanted short sleeves, I did the second row with two end motifs that stuck out farther than the body.  I then did some arch mesh type stitches (just chains connected with single crochets here and there) across the top to even out the edge.  Then I switched to triangle mesh stitch (in purple, references below).

When you don’t have a pattern, and you switch from doing one thing to doing a very different thing, you never really know how many stitches to pick up as you go. So, I just added triangle mesh stitch from one end to the other. I knew it would be wide enough that way, but chances were also good that it would be too wide to exactly match the blue part.

It was, and this picture shows what I did about it. I had two choices, 1. I could have seen how it went, counted how many triangle mesh repeats would have made it perfect, then ripped back and done it right.  Or 2., (what I usually do), I made it work out as I went.  I had too much fabric forming after the change to the new stitch, so I pulled it together in a bunch – pulling a loop through, connecting several places on the row I was working, and pulling them tight. I did this once, then again on the next row in the same spot when I decided it was still ruffling out too much.  If you do this in the middle, it looks like you meant to do that!  Often button-down-the-front-shirts have that gathered place in the back to give you moving room, it just resembles something like that.  here you can see that pulling the purple top row stitches inward makes it into a butterfly shape. CrochetShrug1ChangingPattern

I then worked up until it was the height I needed, and ready to fold over and seam.  Here’s what it looks like at that point.  I also added the purple shell trim for the bottom edge at the back.  I waited to do the shells at the neckline, I did this as I seamed so that I wouldn’t have to cut the yarn and have more ends.

CrochetShrug1Shape

Below shows you how to fold to make it a shrug.  I made a seam across under one arm, then I crocheted the shell border across the top for the neckline, then seamed under the other arm.  CrochetShrug1Seaming

CrochetShrug1Seamed

Above, the finished shrug looks like this.

Another:

CrochetShrug2Front

This one is done in zigzag crochet, and used up lots of leftover yarn from other projects (yay!).  My cousins taught me this stitch, but something similar is in one of my books too so I can give it a reference below (they call it chevron stitch).  The zigzag made a nice shape for the neckline, so I didn’t bother with a border on this one.   It is very simple, almost just a rectangle.  I left a little bit of a “body” area for the bottom back, the two shorter rows you see at the bottom.

CrochetShrug2Finished

Then I rolled it over and seamed for under the arms as shown above.  This one had very short sleeves, so that is only 2 inches or so at the edges.

CrochetShrug2Seamed

I’m not sure I like how the shorter body rows came out, I feel it makes the back a bit baggy.  I may just do shrugs as rectangles without them from now on.   I will see for sure soon though.  I’m working on a knitted shrug with Lionbrand Homespun, and that one will be just a rectangle.  I will come back later when that is done and add a photo of it as an update to this post, (to try to keep most of the shrugs together).

CrochetShrug2Back

The knit shrug, simply a rectangle, which used up all the rest of my Lionbrand Homespun yarn.  This one came out with more of a casual look, like a fuzzy t-shirt.

I did ribbing (1k, 1p) for the bottom 3 or 4 rows in brown, then switched to stockinette with 4 rows of garter on each edge to help the sleeves to not curl.  I did this half and half colors as an experiment to see how that would come out -if it would make it so I could wear it one way or the other and have it look different on the front.  Then ended with the same, 3-4 rows of brown in k1, p1 ribbing, and seamed the sleeves as shown in the shrug drawing above.

KnittingShrugRectanglePreSeamMore detail on calculations:  I measured shoulder seam to shoulder seam across my back, then added 6″ for each sleeve, and did a small swatch in this yarn and needles to calculate how many to cast on.  I found something unexpected, the seaming caused the sleeves to pull inward (not sure why, I think I did it evenly, so I wound up with 5.5″ of each seamed area instead of 6″ for each sleeve.  (The swatch gauge was size 10 1/2 needles and 2 inches =5 st. with this yarn (so call it 2.5 st. =1 inch).  I made the body 15 inches, +6 inches for each sleeve = 27 inches wide.   To figure out how many cast on stitches I needed,  I wanted 27 inches x 2.5 (stitches per inch) =67.5 st.   So I cast on 68.

The top 2 pictures show it with the beige side facing front, the bottom 2 show it with the purple side facing front.  You can see that it got wider sleeves by doing a rectangle shape than you do if you made it like the top 2 shrugs.  It has more of a t-shirt look with short sleeves.  I was unhappy with the baggy back flap on the shrugs above.  This one doesn’t have a baggy back, but seaming a rectangle does give you bagginess under the arms.  (I haven’t decided yet which I prefer.)

It does keep you warm, I can see myself bringing this around with me in the summer, where many places have the air conditioning way too cold for comfort in sleeveless shirts.

KnittingShrugRectangle


References:

Good news!  You can get pieces of the book I’m citing for free on google!  Link here, (or search for the book on google and you’ll find it).  Unfortunately you can only see the shell edging of the stuff I’m citing.

Chart for the triangle mesh stitch: The Crochet Stitch Bible.  Betty Barnden. 2004. Krause Publications, Quarto Inc. pg. 92 (not online).

Chart for the stars in blue:  Continuous Crochet Motif 60. Nihon Vogue-Sha. 2009.  ISBN-10: 9866817466.  Design No. 17, pg. 24.  (This book is in Chinese, I only follow the drawings.) (Often available on amazon in both Chinese or Japanese)

Arch mesh stitch: The Crochet Stitch Bible.  Betty Barnden. 2004. Krause Publications, Quarto Inc. Pg. 87. (not online)

Shell EdgingThe Crochet Stitch Bible.  Betty Barnden. 2004. Krause Publications, Quarto Inc. Pg. 126. (online)

Zigzag stitch:  Mine was taught to me by my cousins, and is repeats of 7 double crochet, chain 2, 7 dc, 3 dc in one spot, repeat.  To see a chart that is similar for more details, this book has one called “chevron stripes” that is about the same thing: The Crochet Stitch Bible.  Betty Barnden. 2004. Krause Publications, Quarto Inc. 71, pg. 185. (not online)

Yarn: Top crochet shrug, purple is Red Heart Shimmer in “Purple”, blue is Red Heart Shimmer in Turquoise; bottom crochet shrug, sorry I don’t know!  These were all odd balls of yarn left over from other projects with no labels.  They are all the width of “sock yarn”, some of which had written on it “fingering weight”.  Knit shrug, all lionbrand Homespun.  I lost a couple of the labels, not sure about the brown but it might be “Prairie”.  The purple is “Gothic” and the beige is probably “Rococo”.

Hooks: Both done on size G (6, 41/4mm.).  Needles:  size 10 1/2

Read Full Post »

The only instructions I used for this vest were for the staggered fern lace that runs down the middle, and a chart for the bottom edge at the hips. You can get the staggered fern lace instructions here for free:

http://www.knittingdaily.com/media/p/109896.aspx  (This page will allow you to download the pdf “Techniques for Knitting Stitch Patterns: A Guide to Knitting Stitches from Knitting Daily”.  Inside this free ebook you find instructions for “Staggered Fern Lace”, among some other very nice stitches.)

KnittingVestStaggeredFern

Basic Instructions: The vest is worked from the hips upward, and for the back I just started the fern lace a little later with stockinette done first.  After making a back and front, I seamed the sides and shoulders.  Three rows, plus a loose bind off row of knit 2 / purl 2 ribbing was used at the armholes and around the neck.  I didn’t do the neck in the round, the knits/purls go back and forth to leave a split in the middle at the front.

KnittingVestStaggeredFernBack

Those are the basics of how to put it together, but first, you need the math and measuring to figure out how to do it with your choice of needles and yarn.  Get your measurements, then do a small swatch with your chosen needles a little bigger than 2 inches by 2 inches (5 cm. x 5cm.).  With this information you can easily calculate how many stitches to cast on, and what numbers to increase and decrease to for each body part.  (For more detail on how to get from measurements and a swatch to these numbers, see this earlier post:  Working Without Patterns – How to get the right size when designing with knitting)

The Fern pattern is 20 stitches wide, so just keep an equal number of stitches on each side of it to keep it in the middle, and do your increases and decreases at the side seam edges.

The chart for the bottom edge (see reference below) – you can do anything you want for the bottom rows, just make sure it’s something that won’t curl if you do your sweater in mostly stockinette like this one.  (I love stockinette, I can do it while watching tv and don’t have to look at it, so it gets done pretty quickly on autopilot.)

Shaping the pattern for the neck:  This is what I did for your reference, but you can do this any way you want to for your chosen neckline.  For the back, when my armholes were big enough, I bound off the 20 stitches of the pattern and worked the over-the-shoulder stitches back and forth for about 5 rows, then bound those off.  Your measurements and math will tell you how many stitches you want for over the shoulder, although at that point you can just hold the lower part of the sweater up to you over your shoulder and count.  (If you want a seamless shoulder, just string yarn through the loops to hold them until you are ready instead of binding them off, then do Knitting Daily’s Grafting on the Needles over the shoulders when you are done making the front.)

For the front – basic instructions: I split the pattern in half in the middle, then ran each half up the side of the neck to make it look more flowy and continuous.  After splitting it in the middle and doing back and forth on each side, I did my decreases to get the correct over-the-shoulder numbers on the knit stitches immediately outside the pattern stitches.  The white arrow in the photo below is showing you which knit stitches are disappearing as I knit 2 together every couple of rows (the ones just outside the “purl 2” in the pattern).

KnittingNeckRustyFernVest

Just do what you feel intuitively needs to be done.  You know you need a certain number over the shoulders and you have to get to that number – somehow.  Any old way.  You can stop your pattern if its easier, or continue with it, or change it into something completely different on each side of the neck if that is easier.  If what you’re doing seems too hard, try doing something easier and more fun!  There are no rules in making up your own clothing.

For those who want to know – Continuing the patterned stitches in the front -more detail:  Note:  This made a pretty small neck hole, so if you prefer a bigger neck hole, you may want to knit for longer, and modify as mentioned below.  Previously, I worked until the end of one pattern repeat (completed row 12 and was starting over with row 1).   I divided the middle of the pattern (of 20 stitches across) by flipping stitch 10 over stitch 9, and stitch 11 over stitch 12 while doing row 1.  In row 1, on one side I did the last 9 stitches of the pattern, then for the other side I did the first 9 stitches of the pattern, (continuing what was done before).  Whether you include yarn forwards is your choice.  Sometimes I did, sometimes I didn’t.  Even rows are all still just purl rows.  Row 3: last or first 9 stitches of the pattern (depending which side you’re on).  Row 4: purl.  Row 5: the last or first few stitches of the pattern (beginning or ending with 2 purls)…by this time you are used to working the pattern, so you will see what needs doing.  However many stitches you have left, do that number, along with the purl 2.  This row (row 5), was the first row I did knit 2 together in the stockinette area to decrease for the over-the-shoulder number.  If you are making a bigger neck hole, you would likely do this sooner.  Row 6: purl.  Row 7: pattern stitches with 2 purls, and a k2tog in the stockinette area. Row 8: purl.  Row 9. pattern stitches with 2 purls and a k2tog in the stockinette area. Row 10: purl.  By now you realize you have fewer and fewer pattern stitches because the pattern keeps knitting things together, and you are leaving out most of the yarn overs, so eventually the patterned stitches just disappear.  I kept the 2 purls for an edge (since you purl both sides it is garter, so it made a nice non-rolling border.  The neck would have been okay without a ribbed border, but I added one anyway.)  Row 11 was the last row I knitted 2 together in the stockinette region because at this point, I had my correct number of stitches for over the shoulder.  I started another pattern repeat (although there was no pattern left at this point, just for numbering sake), I did rows 1-6, then knit row 7 loosely and bind off.  (I did not do seamless shoulders, just regular seams on this sweater.)   Tip:  The group “sl1, k2tog, psso” counts as 3 stitches.

Chart for the bottom few rows of the sweater at the hips:  The New Knitting Stitch Library. Lesley Stanfield. Quarto Publishing, 1992.  Pg. 26, chart #4, three repeats.

Yarn and needles:  Size 8 needles with ribbings done on size 7 dpns.  Yarn is Promotion Bergere de France (no color written).

Read Full Post »

For the Knifty Knitters, (or other brand of round loom users)  – A shrug or wrap!  Scroll down and see the note below about the delicateness of this garment before deciding to make one.

KKVioletShrugBack

This is done with one strand of worsted weight yarn instead of 2 strands, (this yarn is the Caron One Pounder).  This makes a garment that is looser and see-through, and has a lot of flounce, but still gives you warmth on days that are not too cold.  It has the risky delicate factor mentioned below, but it also makes a nice feminine garment.  If a Knifty Knitter is all you use, you may like the option of making a less thick garment with some swish.

How it’s made:

IMG_1876With one strand of yarn, e-wrap all pegs except one on the largest knifty knitter loom, and keep going back and forth until its long enough.  I leave that empty one because I work while watching tv, and this allows me to not accidentally connect the edges when I’m only half paying attention.

Making the shrug: Go back and forth until it reaches from one wrist to the other (drape it behind you over your shoulders to check).  Sleeves usually look best when they reach a little past the wrist as shown below, so shoot for this length.   (Make sure it’s laying flat without the loom weight stretching it to get the length right.)

VioletShrugFront A shrug is really nothing but a set of sleeves.  After it’s long enough, bind off the edge. Roll it lengthwise with the inside out, and seam with the yarn in the spots shown below.  (Pin it first and carefully try it on to make sure you get the seams a comfortable length.)

VioletShrugSeams (You might notice my seams have stuff on them and holes, that’s because I didn’t make mine into a shrug, I just pinned it into place with hair clips to show you what it looks like if you want to make one.)

Making it into a wrap:  To make it into a wrap instead of a shrug, don’t seam it, add fringe at the ends as if it were a scarf.  I would suggest making it a little longer than wrist length.  Mine is on the short side at shrug length.VioletWrapEdgesThe ends of stockinette garments tend to want to roll, and the fringe helps pull it straight, especially after you wet it and let it dry.  Using only one strand of yarn makes this garment very loose and swingy so there is less rolling.

KKVioletWrapFrontWrapped

KKVioletWrapBack

Delicateness!  Unfortunately, any time you make something that is very loosely done (skinny yarn with big needles), the big holes in it put it at risk of getting pulls.  You will have to be very careful with any garment done on a knifty knitter with only one strand of worsted weight yarn instead of the usual two.  This means hold it up if you are around jumping dogs, keep it away from the cat, don’t put it in the dryer, and hand wash it.  If it gets caught around a jean button or bra hook in the washer, it will get pulls and may be ruined.

Knifty Knitting thicker, with the usual 2 strands: You can probably make the shrug on the Knifty Knitter with the usual 2 strands of worsted yarn, but it will be thick and the sleeves will be very warm.  The wrap likewise, you can do it, but it will be a VERY thick wrap, and not have the same “hang”.  You are also more likely to have a problem with edge rolling on the sides and ends of a thicker wrap, or the sleeve ends of the shrug, so you might consider adding some purl stitches to the edges to help with that. or some crochet stitches.   Loom e-wrap stitches are the same as “twisted knit” stitches. Here is a short youtube video which shows you how to do purl stitches on a loom: http://www.youtube.com/watch?v=MYFKncd7iDg

What to do about pulls:  I would feel remiss if I did not include some info on repairing pulls, if they should happen.   Sadly, they never seem to end up repaired quite like the original, so the best is really to protect the garment and not let them happen, but here’s some hope if they do.

PullsRoseShrugThis is what my Rose Shrug looks like after a tryst in the washing machine.  You can see some large holes in it.  One loop gets caught on something, and a long string is pulled out.

Attempted fix #1: On the left you can see an early attempt at fixing that, just by tying a knot in the long pull on the backside and cutting it off.  It was quick, but doesn’t look right.  Many nearby stitches are pulled too tight.

Pulls1

Attempted fix #2, on the right.  Look at the anatomy of the pull (this is the back, or purl side).  Below, you see that this one long loop can be followed several rows across on both sides where that one yarn was pulled tight (the tightness ends above my finger on the left and the same on the right).

Pulls2

So, get a crochet hook and pull the long yarn back to where it came from.  First divide it in half evenly by following the yarn to the loop next door, and pulling half of it through that loop.  Now you have two loops, one loop will get pulled to loosen the left and the other will go right.

Pulls3Keep following the yarn along its tightness in both directions, pulling the length through all of its tight loops. Try to give them the same looseness that they originally had.

Pulls4The big loop will get shorter as you work it to the beginning point of the pull.

Pulls5 Here is the finished product after fix #2.  It never seems to come out looking perfect.  Perhaps with more careful trying.

There is also always the option of tacking stuff on top of pulls to hide them, such as knit or crocheted flowers or butterflies.  Depending on where the pull happens, this can wind up looking good if done in a yarn that is related or goes well with the garment.  If you make the thinner wrap, you will probably want dainty flowers or butterflies done in a thinner yarn so that it doesn’t weigh it down.

Read Full Post »

How do you get the right size when knitting without a pattern if you are using a “new to you” yarn?

It’s easy to get the right size when you crochet, you just chain, wrap the chain around you, then stop when it’s long enough to fit.  You can create a knit garment that fits perfectly too, all you need is a tape measure, a calculator, and the time to do a small swatch in stockinette stitch.

SmallSwatch

Stitches per inch (or centimeter), horizontal counting:  Your swatch can be fairly small, so it doesn’t really need to take up much time.   At the minimum, you can knit a square just over 2 inches by 2 inches (or ~5 cm. x 5 cm.) using the needles and yarn you’ll want for your project.  The goal is to get the number of stitches per one inch.   You want a little extra room around your counting space, because you want to count in the middle of the swatch.  The top and bottom rows can pull differently, and the side ends can just be confusing looking.  Make sure not to stretch the fabric at all when measuring, just let it lie in its natural state.  (*See note below on margin of error and knitting more inches.)

For centimeter users:  1 centimeter is really too small a space to get an accurate stitch count, so it may be helpful to knit more centimeters, count the number of stitches in 2 or 4 cm., then divide that number by 2 or 4 (whichever you used), to get the number of stitches per centimeter.   (*See note below on margin of error and using more centimeters.)

Stitches per inch (cm.) in the vertical:  The swatch doesn’t need to be very tall, about 2 inches will do it, so you can count the height in the middle if you need it, also getting a number for vertical stitches per inch.  If you’re knitting for someone else and have their measurements, this number is useful.  If you’re knitting for yourself, you probably don’t need this number, except that it is a way to double-check your decisions.  When knitting for yourself, you can generally just hold the garment up to yourself and see if it’s long enough, so in that case you don’t really need a count in the vertical.  Most garments are knit top down, or bottom up, not usually sideways, so the horizontal number is the one you really need. (Though, of course, it could come up if you decide to knit sideways).  If you are following a pattern using a different yarn, such that you need to recalculate all of your stitch numbers, this vertical number can be useful as using a different gauge can throw off the sleeve and garment length.

Once you have your numbers, (number of stitches in an inch horizontally, and number of stitches in an inch vertically if you need it), you just measure yourself or the body in question.  Multiply your number of bodily inches by the number of stitches in an inch, and that’s how many stitches you cast on.  Use the photo below, it shows where you need to measure, and you will have to increase or decrease in various places as you go to get to each new number of stitches.  If you’re making a cardigan that you will wear over a bra and a long sleeve shirt, make sure to wear these items when taking your measurements, and keep notes on what you were wearing when you took the measurements so that you know if you use these measurements again later to make something else.  Don’t pull the tape measure too tightly – we want good honest numbers that will give us good fit.

When casting on, be sure to leave yourself some room.  I always add a few extra stitches to make sure my garment has some give.  If it’s a little too big, you can still wear it, but clothes that are too tight can be annoying or unwearable.   You know now how many stitches are in one inch, so you can decide if you want less than an inch of give, or a couple of inches of extra room

*Margin of error:  You can just count the stitches (or number of rows) in one inch (or 2 or 3 cm.) somewhere in the middle of the small swatch, but you may end up with 3 and a half stitches, or 6 and a quarter stitches. (And that’s fine, your calculator can still do it for you.)  But it can be hard to measure fractions of a stitch with surety.  If you do a bigger swatch, then count the stitches in 2 inches, then half it to get your number of stitches per inch, you can get a more accurate count.  (Same for centimeters, if you knit a bigger swatch, say 8 cm., then count the number of stitches in 4 cm., then divide by 4 to get your number of stitches in 1 cm., it is more accurate than just counting the stitches in 1 cm.)  Knitting more stitches to count will decrease your margin of error, but of course takes more time, so you have to choose, time vs. the potential for error!

Here is an example of how to do it, with some bad art and some made up numbers for measurements:measurementsThe gray lines show where people tend to be the biggest or the littlest, so these give us good places to know about in the horizontal.  Hips, waist, bust or chest, shoulders, and neck. (You only really need “neck” for items that have high, tiny necks such as turtlenecks or mock turtlenecks.  Remember the head still has to fit through it.)

The green lines show you where to measure in the vertical.  Hips (or wherever you want the bottom of the sweater to be) to armpits, hips to neck, and length of the arm from the shoulder seam to where you want the sleeve to end.

The blue lines show you the circumference of the arm, which lets you know how big to make the armhole, and the width of the sleeves.  Remember to leave some wiggle room inside, as tight armholes are very uncomfortable, and that the hand has to be able to pass through the wrist space.

The math, and casting on:  If you plan to make a sweater from the hip upwards, and the hip line measures 40 inches around the person, you need 40 inches if you knit in the round.   If you’re going to make a front and back piece, each piece needs to be cast-on at 20 inches.

If you knit a swatch with your chosen yarn and needles, and you get 6 stitches per inch, 6 st. x 40 inches = 240 stitches to cast on in the round; or for front and back 6 st. x 20 inches = 120 stitches to cast on.  Remember to add a few extra stitches for your chosen amount of extra room.

Following a pattern using a different gauge:  On a related subject, lets say you want to knit following a pattern, but using a different yarn, or on different needles. Then you may need to recalculate your number of stitches for every single thing you do, and as mentioned above, it may also effect the vertical.  I did this recently, I made the Tilted Duster from Interweave Knits magazine (Fall 2007) using Caron Simply Soft yarn in Victorian Rose on size 8 needles.  Their gauge was 4.25 stitches in 1 inch.  Mine was 4.5 stitches in an inch.  It doesn’t sound like much, but it did change the numbers.  I went through and got the number of inches for the number of stitches they told me to do every single place in the pattern, then calculated how many stitches that would be in my gauge.  A lot of calculating, but it came out nice!  (I made a non-gauge related mistake, it said make the collar 5 inches but I kept thinking they said 6 inches for some reason instead, so mine is high, but I like it.)  Here is an example:  They said cast on 78 stitches.  78 stitches divided by 4.25 stitches per inch = 18.35 inches.  (That’s their gauge).  Mine is 4.5 stitches per inch, so 18.35 inches x 4.5 stitches per inch =82.57 (or 83) stitches to cast on.

KnittingTiltedDusterInterweave

Read Full Post »

This post is a continuation of Continuous Crochet Part 1, which you can find here.

In the last post, I explained my first attempt at a crochet tank top using the continuous crochet method, (meaning the method where you use motifs, but they are all connected to each other as you go instead of having to attach them all together at the end – eliminating seams and lots of loose ends).  I explained the troubles I ran into, and what I did to fix them.  This time, I used what I learned the time before, and chose a chart that would make it easier.  (By that I mean one that has motifs all in one flat row, no staggering.)  Here’s what I got:

CrochetContinuousTankPinkFront

You don’t need a chart, you can just do granny squares or anything else you make up, but I used one from the book in the reference below.   It is really a lot easier to start doing this method using charts, then try to make up your own motifs after you understand how they are worked together and you have had some practice.  It can be confusing in the beginning.

So, this is really quite difficult to explain, especially without violating a copyright and just showing a chart from the book, which would help it all make so much more sense.  So, if you can, get your hands on a chart.  Before starting to make a shirt just like mine, be sure to read the note below on the neck hole, this part of this design should be checked before starting.

The motif:  Essentially, you start with a long chain (on charts, the beginning chain is usually shown in blue), work your way up it as you make each row of your motif, then use the outer edge of the motif to connect it to surrounding motifs.  Row:  You leave the top edge off of every motif so you can work that at the end, getting your yarn back to the beginning of the next row, and you leave the left edge off to work after you’ve completed all of the rows, getting your yarn back to where you started.  Maybe this very undetailed drawing will help:

ContinuousCrochet1

Making the body:  Each black circle is a motif.  Blue shows the long starting chain of each motif, it connects from the motif before it.  You make a long row of motifs, but you leave the outer edge off of them on the top, and on the left edge.  Red shows where you complete the outer edge, bringing your yarn back over the top to the beginning to start with blue again and do the next row.  You work the tops, but you still leave the left edge off so you can work that downward to finish it.  See the drawing below, and you see a purple arrow pointing downward.  That shows where you work the last left edge and get back to where you started.

This is how I started this tank top – the above drawing shows how I made the body of it from the armpits to the waist.  It is one flat piece, all motifs worked to the right, then return to the left doing the tops, then work the next row to the right. 10 motifs long, and 4 motifs high.  I knew to make it that size by holding it up to myself as I went.  The number you choose doesn’t matter, whatever fits you, but It is important to use an even number of motifs across, and plan where you want the arms and shoulder pieces to go. (You will need the same number of motifs under each arm, that is why even is important.)

I wanted one motif under each arm, so I knew I would be working a front and back piece separately that was 4 motifs each.

Once I had the 4 rows of 10, I joined them together using the outer edge (follow the purple arrow).  You just join them in the same way the motifs joined together on the flat part, this makes the tube for the body.  (I tried working in the round at the beginning, but I wasn’t ending up in the right place and there was too much backtracking.)  If your tube is too small, now is when you can make another row (or 2, to keep it an even number), on one end, going back and forth.   After joining them into a tube, you will need to make the back and front pieces above the armpit level.   I chose to keep going without cutting the thread.  This means what was the bottom before is now the top, the work is flipped upside down, and you keep working upward as if you always worked that way.  (So it may help to print this drawing out if you’re using it to follow because at this point you flip the drawing upside down too – everything on the shirt is still worked the same way as before.)

Work the front and back motifs back and forth in rows like before.  (I chose to keep the front and back connected as one piece instead of making a front and back separately and joining at the shoulders.  This kept me from cutting the yarn.)  The middle of the front/back piece, (indicated by green Xs), is where the neck hole goes, so don’t connect the motifs to each other here so that you leave a hole.  I realized late that this design gave me a very small neck hole, which worked out, but was a close call!  It is important to know if your head will fit through this hole, this should be checked …ideally before starting… but if not, be open minded to changing your design later.  If you don’t leave a big enough hole, you won’t be able to wear this thing at all.  When you’re working on the body, you’ve got some finished motifs there, see if you hold 2 of them together if your head fits through.  If your head doesn’t fit, design yourself another type of neck opening, or don’t connect between the sides of the 2 top middle motifs on the front piece to leave an opening to which you can later attach a button or other closure if you choose.

After making the last row of the back piece, when returning on the outer top edge, connect it as you go to the motifs on the body of the tank where it should meet to seal it up into a shirt shape.  If you didn’t ever run out of yarn, you didn’t need to cut it once during this project.  No messy ends!

ContinuousCrochet3

CrochetContinuousTankPinkBack

Book reference: Continuous Crochet Motif 60. Nihon Vogue-Sha. 2009.  ISBN-10: 9866817466.  Design No. 3, page 10.

Yarn:  Phildar YSATIS, 427 (500 427 006)

Hook: G or 6 or 4 1/4 mm.

Read Full Post »

ShawlPinHairSticksDone copyEver make a cardigan and not worry about putting buttons on it?  Most shawls also don’t come with closures. Sometimes when its really cold out, you kind of miss the closing option – so, make your own shawl pins!

ShawlPin2DoneThis shawl is pinned on the backside with safety pins, the shawl pin here just adds decoration.  Bling for your knitting.  (This is a pattern shawl, the Summer Flies shawl, which you can find here: http://www.ravelry.com/patterns/library/summer-flies).   Below, shawl pin doing actual pinning:

ShawlPinDone1

Making the Shawl Pins

You’ll need some sticks.  You can buy wooden dowels, or get sticks from the yard (both are pictured above).  If you get sticks from the yard, make sure they are a good hard wood, nothing that breaks too easily, and nothing rotten. Ideally, you want them a little thinner than a pencil so they don’t put big holes in your sweaters.

You’ll need some tools.  I used a dremel for the shaping /sanding.  You can also sand by hand, but of course it will be slower (take a nice long set-down and relax with some lemonade while you sand :-)).  You’ll need a couple of different grits of sandpaper (I used 100 grit “medium” and 220 grit “very fine”), and something to make a hole in the stick (I used a drill with a small bit -something around 1/16″ or 1.5 mm.).  You may have luck just pushing a thumbtack through it, you’ll have to try).  If you want to seal and protect your sticks, polyurethane or acrylic sealer.

You’ll need some decorations to make a big top for your stick so it doesn’t fall through your shawl.  This can be anything you think will look good.  I used an old pendent from a necklace, some wire from the craft store, a seashell from the beach, some sea glass beads, and the top of a broken hair stick.

SticksRoundingBreak your stick to about the length you’ll want it to be.  Use the dremel with the sandpaper tool, or the coarsest sandpaper to shape one end into a rounded point. Shape the other end flat by sanding a lot on one side, (or whatever shape will fit best with the decoration you chose). Tips:  If your stick starts to catch on fire or burns black, try using a slower speed.  Its a good idea to wear safety glasses.  Even though I’m right handed, I hold the dremel in my left hand and move the stick on the dremel instead of the dremel on the stick.  Mainly because I do this inside and this puts most of the dust on the table instead of in my face.

SticksSanding1Sand the sides of the stick and the rounded point smooth.  This smooths or removes the outer bark.  I do this by hand, and I used the medium grain sand paper, (#100) for this, then finish it off with the #220.   I make a hole in the flat part because I will use wire to help hold decorations on, so having a hole to put the wire through is helpful.

SticksHoles

Staining and sealing: I used a bent up paperclip through the holes to keep the hole from getting sealed shut. I stained these to give them a little color, sanded slightly with very fine paper, sealed them with polyurethane, then sanded slightly again with very fine paper, each time just to remove any scratchiness. (Meaning you don’t really need to sand, just swipe off any rough stuff each time).

SticksUrethanedPinned

Here is an assortment of useful jeweling tools -though mostly not necessary for this. Various thicknesses of wire; and cutting, flat and rounded pliers (you can get this set of 3 pliers at the big box store for $9).  Tip: Real stuff (such as real copper and silver wire) tarnishes.  Some of the cheapo craft wire from the big box stores doesn’t tarnish quite as quickly.  If its really important to you whether your piece does or doesn’t tarnish, and you’ve got months of time before you need the piece, get some of your chosen wire and leave it out for a long time before using it to see how it looks later.  Silver can be polished with a polishing cloth from a jeweler, and I was told copper can be cleaned with damp baking soda and a soft toothbrush (but the one time I tried that I scratched the piece up, so, at your own risk!).  For this already tarnished pendant, I won’t mind when the rest tarnishes to match.  I don’t mind the old look on my knitting.

ShawlPinWireCutThroughSo, I have a thin piece of wire, about 8 inches long or so going through the hole.  Below:  I wrap it around the pendant to attach it, in and out and around it again, letting the ends wind up on the back side.  I left the loop on it where it used to hang on a necklace, I will attach another decoration here.ShawlPinWireWrapBackIt comes out looking like this from the front.  Since the wire matches, it is not that obvious.  People don’t usually look at things very closely, so its unlikely anyone will ever notice the wire, and it makes a secure attachment better than glue would.

ShawlPinWires

I use some glue too.  I use Aleene’s Tacky Glue, but any craft glue would probably do.  I put some between the pendant and the stick to help hold it in place. I used an old bobby pin to dab glue on the ends of the wire to help dull them a little.  Its best to tuck them between the stick and pendant, then cut them to that length to really keep the ends from getting caught on things, but gluing them to something helps too.  I also put a dab of glue on the loop I had to open to add the butterfly decoration to help seal it shut.

ShawlPinApplyingGlueFinished pin below, securely attached and made from a stick from my yard.  This is an old pendant my mom had, but you can get pendants like it, and the butterfly, at the craft stores.

ShawlPinDone1aAnd of course once you’ve got the wire, you wind up making other fun stuff like the necklace (a crystal wrapped in wire, then wrapped in felted wool, then hung on the copper wire).

ShawlPinOnShawl pins also make great hair sticks!  (Which of course also means that if  you don’t want to make shawl pins, you can buy hair sticks with big tops to use as shawl pins.)

ShawlPinHairStickDetails on each stick:  1. Stick from the yard with necklace pendants, stained and polyurethaned.  2. Wooden dowel, unstained, red wire wrapped around a glass stone (glue behind the stone helps with security).  3.  Wooden dowel, stained and polyurethaned, seashell glued on to a flat end of the stick with copper wire wrapped around for both decoration and security.  A separate wire is bent and hanging through the hole, beads added to each end, and wire wrapped into spirals with the round nose pliers to hold the beads on.  4.  Wooden dowel, I tried my hand at making a spiral shaft, but you really kind of need a wood turning machine.  The pendant glued and wired on to this was the top of a broken hair stick. 5.  Haven’t decided what to put on this stick from the yard yet, but it is urethaned and ready….   6. This was a chopstick from a chinese restaurant, unstained.  I colored it with colored pencils to look like those harmony wood knitting needles you see in magazines. (This was an experiment, didn’t come out quite like I hoped, but its okay.)  Copper colored wire wrapped through the hole and spiraled at the ends to hold the bead on.

ShawlPinHairSticksDone copy

Read Full Post »

This was my first project trying to wing it with continuous /seamless crochet motifs.  My tank top has a LOT of problems, but they were easy repairs, and at least I’ll know better for next time.  I’ll tell you all of the problems I had in case it helps someone else’s first project come out a little better.

CrochetContinuousMotifTankFrontHere is the front, this is the finished product, after most of the repair.  (There is one forgotten unconnected loop sticking out near the middle, but I’ve since tied that to an adjacent loop and that is fixed now too.)

Main Problem:  There is a great need for planning.  I just learned how to do continuous crochet (meaning making the motifs connected together as you go so you don’t seam any of them together).  So, I hadn’t wrapped my brain around all of this that thoroughly and I just had the most general of plans.  My plan was this:

CrochetTankTopMotifsI was going to make a tank top in this shape, with long straps only on one side which I’d attach at the back instead of making 4 identical straps to join at the tops of the shoulders.  I thought that might help avoid a potentially bumpy over-shoulder seam.  The width is long enough to wrap around the body and seam together under one arm.  (This seam is pretty obvious, it is the stripe of big holes under the arm in the top photo – lack of planning.  I’ll get back to that seam later.)  The same lack of planning caused other worse problems, such as those you see below.

CrochetMotifConitnuousTankBackThis has since been fixed, but this was how it looked.  The back neckline is crooked, where you have a high motif and a low one, and another motif is folding over under the right arm because it is also a high one.  This project would have been easy if my motifs lined up in a straight line, such as if you do granny squares and attach them together corner to corner.  You can keep connecting them and get a bigger square or rectangle with even sides.  If they had been the kind of motif that lined up evenly, the neckline and hemline would have automatically come out even, in a straight line.  Easy peasy!

grannyMotifs

In the chart of motifs I chose, one row of motifs nestles into the spaces between the motifs on each adjacent row (rows really meaning columns as they are worked vertically).  This makes for an uneven bottom, which was fine as it was decorative,  and an uneven top, which was less fine.  You have high columns and low columns alternating. (Excuse my bad art, but you get the idea.)

HexagonsSuch an organization of motifs can work, but it requires either some fudging at the end like I did, or more planning.  If you plan in advance, and draw out your design, you will see how many rows you need between the shoulder strap-having rows, and whether they end up tall or short.

Things you can do:

1.  Modify the number of rows as described in 2 pics below.   2.  Plan to do half-motifs to fill in the gaps (this is what I did to fix necklines after the fact, but if you plan for them, you can work them in as you go in the first place leaving no need for repair).    3. You can decide to work in another direction.  This top is worked vertically up and down, going across makes a straighter edge, but you may get the top portions of your motifs folding over at the necklines.  You may have to swatch a few to see if this is a problem for you.

About #1:  I needed only 2 rows between the straps  using a size H hook and the yarn I chose.  In other words, I had this (2 rows of motifs between the straps = uneven neckline):

neckline1

If I had drawn it out and seen that, I could have planned for this instead (3 rows between the straps, giving 2 higher close to the straps and a lower one in the middle, making a reasonable looking design).  To make that happen I could have used a smaller hook, or thinner yarn to make the top come out the same size.

neckline2

About #2:  If you have your heart set on a certain yarn and hook, you can plan to do half motifs instead to fill in any gaps.  If you put some thinking into it, you can figure out how to do a half motif and work it into your design seamlessly, doing it much the same way as the rest of the motifs on your chart.  This is how I wound up repairing the top edge – adding half-motifs after the fact.   After the fact means I had to work extra ends in.

About that holey side seam – again, lack of planning.  If I had drawn out what this design would look like, given the number of rows I was making between the straps and under the arms, I would have seen this row clash where the side seam was going to go.  It was a low column and a low column…. (More bad art, but you get the idea):

motifsHitting

…instead of this (a high and a low column next to each other, meshing together like they did for the rest of the tank top):

motifsBlended

To make them mesh, it would have required adding a row, or removing a row.  This can mean changing hook or yarn size, or it can mean adding rows and making a tank top with a little more give.  You can see if this can work by drawing all of this out and planning in advance.  You don’t need to be a major artist, just drawing rough circles in the place where they’d be will let you see how it will come out.  You will probably need to swatch or at least just make the first row so you can get an idea of how many motifs you’ll need to draw where.

About seamless crochet for anyone who may not already know it:  If you aren’t familiar with this technique, so far all of the seamless crochet I’ve seen consists of making a long chain, then working upwards on it to complete one motif, then moving on to the next motif by making a long chain, leaving off much of the outer edge on all.  Once you have a row of motifs, you then work back up the row doing the outer edge on the top halves where you left it off.  You still leave some outer edge off of the beginning motif because when the whole shirt is done, you will work that last edge of all of the rows as one.  For my tank top, each row is worked upward, then down, (vertically), and the last outer edge was the bottom hem at the hip.

Charts are very helpful because they show you exactly how much to work on each motif and when, which gets it to come out looking good.

CrochetConinuousMotifBookI used the above yarn and followed a chart from this book, putting my motifs into a tank top shape.  I do not speak Chinese, but you only need to follow the pictures.  In the handful of continuous crochet charts I’ve seen, the starting chain is always in blue, you do black next, then do dark pink last.   Some charts use purple for the very last finishing outer edge (though not in this book, both are dark pink.)  You can usually find this book in Chinese or Japanese on Amazon by searching for continuous crochet, and you can of course also find books in English.

For more on continuous crochet, see part 2 here, where I make a different style of tank top.

Book reference: Continuous Crochet Motif 60. Nihon Vogue-Sha. 2009.  ISBN-10: 9866817466.  I used design #2 for this tank top, pg. 9.

Yarn: Red Heart Shimmer in “Purple”. Art E763, Col 1536.

Read Full Post »

Here I have a tunisian crochet entrelac purse.  There are patterns for this out there, but you can also just wing it.

TunisianCrochetPurse

I got my instructions on how to do “first triangles”,  “end triangles”, top and bottom ones, and squares from this book – reference at the bottom of this post.  (There is also a pattern for a tunisian entrelac bag in here, but for this bag I just put squares and triangles where I thought they should go and put this together as shown below.)  You can also search on the web for how to do entrelac tunisian, I believe there are youtube videos on it out there, but I haven’t watched them.  I wanted this book because it offers “how to”  for many different types of tunisian stitches, and it taught me the tunisian entrelac.

TunisianCrochetBook

Construction of the entrelac bag was much easier than making the inner fabric bag, and the photo below is pretty much all there is to it.  Tunisian is always worked with the right side facing you, so you just do first triangles, middle squares, then last triangles, then once you’re done, fill in the top and bottom triangles to get your square or rectangle.  Voilà, you’ve got the front of a purse.  Then just make the back side to match in size.  For this purse, I did the sides and bottom in one long strip to wrap around and seam to the front and back pieces.  For this side strip, I just did a first triangle, then a last triangle, then a middle square between them, and repeated until it was long enough.

For the handle, I just did 8 simple tunisian stitches, attached at one side of the purse, then after 3 rows decreased to 7 and worked until it was long enough.  Then I increased back to 8 for the last 3 rows and attached to the other side of the purse.  The increasing and decreasing was just by choice, you can of course make it straight, or do as you wish with it.  Tunisian curls inward, so this naturally becomes a rounded strap as shown in the first photo.

TunisianCrochetPurseConstruction

Everything below this point is how to do the sewing for the inner cloth sack.  If you already know how to whip up a zipper bag, congrats!  You’re free!  Free like the birdies!  You just sew your cloth sack to the inside of your entrelac sack close to the zipper, and you’ve got a new purse.

Having a cloth interior will ensure that your stuff doesn’t fall out through the looser stitches of knitting or crochet.  (This is less likely through the tight stitches of tunisian, but you could still lose things like hairpins and pencils which can jab their way out.)

To make the cloth sack with a zipper, you can cut 2 pieces of cloth in a rectangle, or whatever shape you want your purse.  Cut them one on top of the other so they are the same size, and slightly bigger than the size you will want for the inside of your knit or crochet purse. (You will lose a little when you fold up the sides to seam them.)

Lay the fabric rectangles side by side with the zipper face up in the middle, oriented so that this will be the top of your purse.   Leave a little extra fabric at both ends of the zipper.   Fold the fabric edge in to be sewn under the edge of the zipper to seal it in.  It may help to pin it in place.  Wherever the inside of the zipper is will be the inside of your purse, so think about whether you want your seams inside your purse where you see them, or whether you want them between the cloth and crochet bags where no one sees them.  Think about which side of the fabric you want where, you might want the right side of your fabric to be on the inside of the bag so you see the pretty side when you look in your purse. (If so, when you set it up like the drawing below, the wrong side of the fabric should be up when zipper is right side up.)

ZipperSack1

Not what I did of course, I tend to sew things together backwards, even though I know I do that and try to watch out for it, and I did indeed do that again on this purse.  I wonder what’s wrong with me sometimes.  (Then I forget about it and go do something else.)  Here is what I will see when I look inside my purse.  I got my fabric inside out and my seams where I will see them.  I also didn’t have fabric big enough so I sewed a bunch of scrap squares together to make fabric, thus I have a whole boatload of seams to look at.

TunisianCrochetPurseInnerSack2

So your bag at this point should look like this drawing below from the inside (this would be the back of the zipper).  If you have plenty of fabric above and below the zipper, sew the pieces together where the red arrows show to seal up this side of the bag.

ZipperSack2arrows

If you didn’t leave enough fabric on the ends of your zipper, you can do what is shown below.  Cut 2 more pieces of fabric and place them over the ends of the zipper, all edges folded under, and sew them on.  If your zipper really goes right to the end, you may want to cover the zipper a little with it and sew it across the zipper itself, that way you aren’t pulling the zipper off the end when you open the purse.  Hitting the zipper broke my sewing machine needle, as I did mine that way, so have some spare needles around.  (This was an idea that didn’t work out, I made the zipper go to the end because I didn’t want closed off space at the opening of my bag, I wanted all access.)

ZipperSack1EndCovers

My kitteh won’t let me pose objects.  Awww.

You can see where I sewed over the end of the zipper on the inside of the bag here with white stitching, as my zipper went right to the end.

TunisianCrochetPurseInnerSackAfter that, you can just seam around the edges of the bag, (thinking about what side you want your seams to be on when you look in the purse), or you can make a side edge to add thickness to the purse as I did with the entrelac bag.  I just added a long cloth strip between the front and back to make sides and a bottom.

Now, if you want inner pockets, you can add some.  Cut a piece of cloth bigger than you want the pocket,  fold under and hem the top edge like shown.

TunisianCrochetPurseSackPocket1

TunisianCrochetPurseSackPocket2

Turn the bag so the zipper is inside out, and attach the bottom of the pocket where you will want it (to only one side. Be sure you are not about to sew the bag to itself on the back where you can’t see.).  Pin the bottom in place with the edges folded in like so and sew the bottom on.

TunisianCrochetPurseSackPocket3

Now fold the sides of the pocket under and sew them under with the same stitching as you use to sew the sides of the pocket to the bag.  I did some extra back and forth stitching at the tops of the pockets and ran off of the top a little so they wouldn’t pull loose if I put heavier objects in them.

TunisianCrochetPurseSackPocket4

Now you have open pockets on the inside.   Once your cloth bag is done, just sew it inside the entrelac bag close to the zipper, and you’ve got the finished bag.  You can use the sewing machine to sew right over the yarn, you just have to keep an eye on the foot to make sure the yarn isn’t catching on it.  You may have to lift it to release it on occasion, but it works fairly easily.

___________

Book reference:  The New Tunisian Crochet, contemporary designs from time-honored traditions.  Dora Ohrenstein.  Interweave Press LLC, Loveland, CO, USA. 2012.

General tunisian entrelac instructions are on pg. 39.

Read Full Post »

When I saw things such as tea cozies, mug cozies, and egg cozies, I used to wonder why on earth anyone would make such a thing, other than for quirky cuteness.  After becoming an addicted tea drinker, I now know.  It’s the weekend and I can futz around the house for hours on end, forgetting my tea until it gets cold.  A tea cozy allows you to make a whole pot of tea at one time, keeping it nice and hot for you for ages.  It IS practical!

So, here’s how to wing a tea cozy.  You want a shape that is something like a submarine.  The rounded ends are because your teapot is wider in the middle and narrower at the top and bottom.  The top rectangle lays over the lid of the pot.  You can achieve this submarine any old way you want to, crocheting or knitting; across, then upward; up and down the length; however you like – then attaching a closure at the back to hold it on.

TeaCozyDrawing

You just sit with your teapot in front of you as you go so you can hold it up to the pot and get your sizing right.

Here are mine.  The small one was crocheted back and forth in a long strip, then a strip of crochet ruffle was added to each end and a button was threaded on to close it at the back.  The ruffle had holes in it, so made an automatic buttonhole. (This was my first one and I hadn’t thought of the over-flap yet.)

For the larger one, I crocheted 2 circles like the beginning of granny squares (but without corners).  I then held up the circles to each side of the pot so they’d come out on the front and back, then chained and double crocheted straight lines between them to connect them to each other until I had the length of the submarine shape. If your shape isn’t exactly right for your pot, just wing it until it is – you can graduate single crochet, double crochet, treble crochet etc. to make the rounded edge more square.  (You can see this near the handle in the maroon color on the big tea pot where I turned the granny circle more square – triples near the top and bottom, graduating to shorter stitches in the middle.)  I then did another row around the submarine body in blue to make it bigger and make a decorative edge.  I tied on new blue yarn to double crochet the rectangle on top, and attached crochet chains to the back as a tie closure.  Boy, since my pots were thin glass, it really made a difference in tea temperature!

CrochetTeaCozies

For mug cozies, just make a rectangle with a closure at the ends.

Read Full Post »

This came about because I have 3 dogs and 1 cat.  We go to the pet food store about every 3 weeks, and each trip sends me away with 2 big bags from a store that only uses paper, not plastic. (Bless their collective soul.)  Sometimes I get all the way to the car before the bag breaks and the cans roll out.  Sometimes I make it all the way home so the cans can roll down my driveway instead.  Those cans get out and run free in the street more than the dogs do.  Oh well, I like a good excuse to make something new!

Only one of my bags included crochet, so I’ll speak mostly on that one.  This is the outside, which is just made of fabric.  CrochetFabricPurse

Here is the inside, the crochet was added  after the fabric bag was finished to add strength (after realizing that dog food cans are mighty, and I wasn’t 100% sure that fabric alone would keep them contained.)

CrochetFabricPurseInside

Here are the details of construction of the fabric part.  A sewing machine will definitely make this go quicker, though it can be done with needle and thread if that is your choice.

CrochetPurseFabric1

Here is how to make the crochet part.  I made it out of Arch Mesh stitch, which is my easy go-to netting stitch (reference below).  Its fast and easy, but you can do double crochet, or knit, or anything else you like for the bag.CrochetPurseNet1

To the get the size of the crochet bag, just hold it up to your fabric bag and keep going until its big enough. The crochet part is then sewn to the inside of the fabric bag (or outside if that was your choice), with the bottom resting on the bottom (line your markers up with the corners).  If you sew around the top edge of the crochet bag, not leaving any gaps, the bag will stay attached and it should prevent items from getting between the fabric and crochet.  Handles:  Once I had the bags attached to each other, wanted to reinforce the fabric handle to make sure it wasn’t going to pull off of the bag.  I grabbed a crochet hook and joined yarn to the crochet bag at the end of one handle, then made a chain for one handle and attached to the crochet bag at the other end.  I then double crocheted back along the handle and attached again back at the beginning.  I then sewed the crochet and fabric handle together along it to add strength to the handle.  Repeat for the second handle.

I wasn’t sure of the sturdiness of the sides of this fabric bag, since I made mine more flat and wide, and out of a thinner material.  If you make a deeper, narrower bag, or use a stronger material like canvas, your sides will certainly stay up.  So I sewed fabric pieces around the outside edge of the bag so that I could run a braided piece of yarn through it as a drawstring.  (Blue drawstring is visible in the first photo.)

Side note:  I decided to try my hand a quilting too since I had my machine out and I’d never done that before.  Time to get rid of some of that fabric scrap stash!   To make a stronger bag without crochet reinforcement, I sewed a bunch of fabric scraps and squares together to make 2 pieces of fabric, then placed the 2 pieces together with seamy “insides in” and cut and sewed the bag shape as shown on the construction drawing above.  (The only difference being that I pulled the corner fabric layers apart to sew the seam of both fabric pieces on the inside only so no seam showed on the inside or outside of the bag.)  I did not add any quilt material between the fabric pieces, just let the 2 layers of fabric be thick enough.  This was quicker to do than crocheting, and did make a very strong bag, (which is reversible since there are “outsides” even on the inside). That dog food’s not running down the street this time!

QuiltBagWorkingWithoutPatterns

Arch Mesh Stitch can be found in:  The Crochet Stitch Bible.  Betty Barnden. Krause Publications, Quarto Inc. 2004. This chart was “Arch Mesh” pg. 87.

Read Full Post »

KnittingGrayWinterSweaterFront

So very warm!  For this sweater I started at the waist and worked up.  I did a front piece, then a back piece, then seamed them together on the sides and shoulders.  Unusual for me, I usually try to eliminate as much seaming as possible, but I’m happy with the result, it fits very well.  Charts were used to add fanciness (see refs below), but otherwise I just did what seemed sweater shaped.  A ribbed looking chart was used at the bottom and wrists to stop curling.

KnittingGrayWinterSweaterBack

Once I had the vest shape after seaming the front and back together, I did ribbing for the neck and made some sleeves, wrist upwards.  I did my sleeves by making them identical, which when seamed on with the pattern design on the top caused the increase seam to be on opposite sides of the arms (meaning what looks like a seam goes up the front of one arm and up the back of the other arm, making the sleeves look different, and the pattern looks off center in opposite directions.  I’m not displeased about it, it is unusual but doesn’t look bad.

Charts:   The New Knitting Stitch Library.  Lesley Stanfield.  1992 Quarto Publishing.  Ribbing: Chart #21, pg. 32.  Middle of body: Chart 188, pg. 124.   Sides of the body and arms: Chart #185, pg. 124.

Yarn:  Vanna’s Choice, Art #860, color #405, Silver Heather.

Read Full Post »

A new Knifty Knitter pattern-free sweater, made solely on the largest round loom (the yellow one pictured below).  I made some mistakes on mine, but it all worked out okay.  So, I’ll tell you all about it so you can make yours even better.

KniftyKnitterLooms

KniftyKnitterPurpleSweaterFront

I made this one with the body all in one piece instead of separate back and fronts.  Now that I’ve done that, I’d recommend making the pieces separately, then seaming them together and adding sleeves.  Making it all in one piece may avoid needing to seam over the shoulders, but I wound up doing that anyway for support (see below) and doing it in one piece made it a lot harder because you still need to hold it up to yourself to check some things, like arm hole height for example.

Here’s the easy way.  Measure yourself in all the places indicated in the photo below, using a swatch you knitted with the same yarn on the same loom (something like 10 rows wide by 5 high is a good sized swatch to make, then you can save it and reuse to measure yourself anytime you want to loom something.)  Be sure not to stretch the swatch or your sweater will be too tight, and add a couple of stitches if you want some extra give in your garment.   Then, just make the sweater as directed in the photo, using your numbers of stitches instead of mine.  Hold the pieces up to yourself as you go to see when the various places are long enough.  I have increases and decreases for hips, waist, bust, and arm holes.  Bind off stitches for the neck hole.  For more detailed directions, from when I made earlier sweaters, and photos on how to increase and decrease, see this post:  Working Without Patterns, The Knifty Knitter – Rainbow Chakra Vest.   For more directions, and how-to on binding off, use a crochet hook as directed on the photo in this post:  Working Without Patterns:  The Knifty Knitter Round loom sweater.

KKpurpleSweater

The waist decreases, bust increases, and arm hole decreases were all done on the sides where the arms are.  The fronts should be straight on the neck side from the neck down.

Finishing the body:  After making your pieces to your own measurements, seam the shoulders and sides together.  (Seams on the inside!  Believe it or not, that’s the kind of stuff I forget! lol).  I added granny squares on the bottom of mine because I didn’t feel it was long enough.  I am impatient so I tend to go “I think its long enough!”, then quit, then wish I hadn’t.  It’s all okay though, you can always add more crochet if you are an impatient person like me.  The crochet edge also stops the curling that knit edges tend to have.  If you don’t know how to crochet granny squares, try this page, or doing a search for other pages or youtube videos to show you:  http://www.craftstylish.com/item/1437/granny-square-how-to/page/all. I used a size K hook and attached these as I went – and was surprised to see them turn out exactly the right width!  Go figure!  You can make yours all in one piece and attach them to the sweater afterward if you want more certainty in life.  That way if they are off by a little, you can always do a row of double crochet around the edge of them, or do a crochet trim, or whatever you need to fix whatever width it comes out to make it match your sweater.  Have fun being creative with it!

I also used double crochet, (same K hook), to add a few rows around the front piece edges and neck hole.  This prevents curling, made the sweater a little roomier, and gave me automatic button holes, after which buttons were sewn on the narrower side.  I had designed this sweater with one front piece wider than the other so the buttonhole side would overlap to one side over the buttons, and so there would be a flap over the top button, but you can always do equal pieces if you prefer, and put your buttons on where it will line up right on the other side.

Making the sleeves.  You can stop there if you want a vest, and if you wish, add some double crochet to the arm holes to finish it up.  If you want sleeves, measure your arm in the following places to get your number of stitches.  The sleeves start at the shoulder and are worked on the yellow loom back and forth, then seamed to the sweater, then seamed up the underside of the arm.  (I found I had measured too tightly and wished I had made my sleeves bigger.  They work, but I’ll probably like them better once I’ve worn out the sweater more and stretched them a bit.  I didn’t even seam all the way to the wrist or my hand would not have fit through it.)

KKpurpleSweaterSleeve

You’re finished!  Now, discussion of my mistakes….

KniftyKnitterPurpleSweaterBack

The way I would NOT recommend making this sweater:  Now, that way above will help you do it better, but here’s what I did, which I wouldn’t recommend.  See how my neck hole is so big?   It hangs low in the back.  That wouldn’t have happened if I had made it in separate pieces and seamed them together.  This happened because I wanted to avoid any extra seaming and made it like this:

KKpurpleSweaterWrongWay

The problem with doing it that way occurs when you hit the arm holes.  This is the inside of the back piece, (showing where I marked rows for increases or decreases so I could make the front pieces match without too much row counting).  You have to take one shoulder off of the loom if you want any hope of holding it up to yourself to see if its long enough to fit you.  If you have a definite stop point where your shoulder seam is going to go, you know that “Okay, I hold this spot right at the top of my shoulder”.  If you do it the way pictured below, you have no seam, so deciding how big to make the neck and arm holes is more of a challenge because there’s a lot of swing room in what you hold up to yourself as “the top” of the shoulder.  My decision making was a little off.  My arm holes are a bit small, and my neck hole hangs too low.  It all could have been avoided by making separate flat pieces.  KniftyKnitterPurpleSweaterShoulder

I also saved myself no pain at all, I only added extra, because I wound up adding shoulder seams anyway.  This is the inside over the shoulder area, I wound some yarn through these stitches to add support.  If you don’t have seams, because there is so much space between stitches on the yellow loom, your rows can start to pull apart as the sweater ages.  So, the seams do serve a good purpose, and that’s why I added some where there were none.

KniftyKnitterPurpleSweaterAfter

If you add fake seams the way shown above, they won’t show on the front side, its the same method you would use to work in ends.

KKpurpleSweaterShoulders

If you found this post through a search, please visit my Links page to see my other Knifty Knitter projects.  There is a “Links” tab at the top of this page, and also a link to it at the right.

Yarn:  Caron One Pound acrylic, in Deep Violet (this sweater took more than one, but not much more, so you will have most of the second one left with which to make a matching scarf or other accessory.)

Read Full Post »

I’ve been working on this since:  https://ilovesocks.wordpress.com/2011/05/30/what-im-working-on-now-fairisle-scarf-with-spun-yarn/, which I see was May 2011.  It was knit in one long panel, then folded in half longways and sewn together on the side edge to hide the backside.  That makes for one THICK scarf!  I wet it and let it dry just to flatten it down a little.  Tying the fringe on closed the top and bottom edges.

KnittingFairisleScarf

All charts on this scarf came from:

1000 Great Knitting Motifs by Louise Roberts.  Trafalgar Square Publishing, Vermont/ Collins & Brown Limited, 2004. Snowflake, 2nd chart on pg.117.  Flower above snowflake, pg. 88, top chart.  Round one above flower, pg. 77, 4th chart (blue and white).  Flower on main body of scarf, pg. 180. 

Black yarn was Patons, 100% wool, color was a wool singles (unplied) yarn I spun myself.


Read Full Post »

Older Posts »