This post is mainly for the knitters, but for those who crochet, you can cable too! I found this Craftsy tutorial online for cables on crochet: http://www.craftsy.com/blog/2013/12/how-to-crochet-cables/
If knitting cables is old hat for you, you probably already know all of this. But if you are in the group who says “Wow, look at those beautiful cables on that sweater, I’d love to cable but it looks too hard.”, this post will help you out. You don’t have to understand confusing looking charts to learn how to cable. (I put off learning to cable for years because the charts looked hard.) But it isn’t hard at all! It really only requires you to look at your cable and do what it looks like needs to happen. If you want to, you can just make them up and throw them into anything you make. Here’s an example:
Designing your cable: In my recent poncho post, I showed this as my “random cable”. This is just one I made up that will go around the neckline on this work in progress. All it takes to make it look professional is to do the same thing to each one and get a whole row of things done the same way. To do that, make sure you always move your cables over the same number of stitches, and always at a regular interval (move cables every 2 rows, or every 4 rows for example.) These are stockinette stitches on a garter stitch background.
I would highly recommend doing a project, (or at least a swatch with some leftover yarn), just to practice random cabling. Just free wheel it and make stuff up as you go, and see how it all comes out looking. That’s what I did a long time ago with this scarf. This experimentation helped me know what worked and what didn’t. It is a mix of random cabling of stockinette stitches with backgrounds of garter, purl and seed stitch, with garter on the edges to help foil curling. I learned what parts want to roll inward, what parts came out looking wider, etc. So, here we go!

Link to post I made about this scarf while I was doing it:
https://ilovesocks.wordpress.com/2009/08/31/working-without-patterns-cabled-purse/
How to cable
Moving stitches to the right:
Here we see a cable which I’ve moved randomly back and forth, stockinette on a purl background. I’m 2 stitches ahead of my cable, so what I do now is stop and look at it, and decide what I want it to do. I want this cable to now swing to the right. I think about what will make this happen. It will happen if the 2 stitches of stockinette cable go over the one purl stitch to the right of the cable, so that is what I’m going to do.
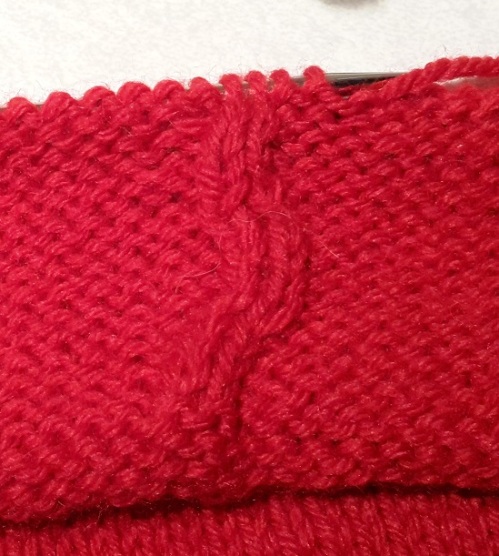
You need a cable needle. You can use any big piece of bent wire if you don’t have one. I’m going to move this cable over one stitch. (You can also move over 2 or a few stitches if you want a more extreme bend to the right.) I put the one purl stitch on my cable needle.

Now I think about how I want it to look. I want the stockinette to be on the top of the right side of the cloth, so this means the cable needle stitch has to be in the back when I knit the stockinette cable stitches. If I want the cable to move one to the right, I need to knit the cable stitches first. Throw the cable needle to the back side, then knit the 2 stitches that come next, the cable stockinettes. (photo below)

Next, put the stitch from the cable needle back onto the left hand needle, then work that stitch, (in this case, it’s a purl – do the stitch type you’re doing as your background.) Then just continue on, working the rest of the background.

In short, just look at it, and see what it looks like you should do to achieve what you want to see.
Moving the cable to the left:
I’ve arrived at the cable, so I stop here and decide what to do. I’m going to move these two cables toward each other, and eventually cross one over the other. This means the first cable has to move one to the left.

I purl up to the cable, because I want to see the two stockinette stitches go over the top of the purl stitch on the left side of them, so I don’t need the purl stitch before the cable.

I put the two stockinette cable stitches on a cable needle, which will lay on the front side of the work. (I don’t want them getting covered up, which they would if the needle with those on it hung to back side.)

I then purl the background stitch that was to the left of the cable, this moves it behind and to the right side of the cable. Then put the 2 stitches from the cable needle back on the left needle and knit them. You’ve finished moving the cable one to the left.

(The plan for this cable: These two cables have been moved – one to the left which I showed you, then I moved the other one to the right – now they meet. I’ll do the reverse side of this garment without moving any cables, then when I’m back on the right side for the following row, I’ll cross one cable over the other here. To do that, I will move one cable over two stitches instead of one, just to get it all over at once.)

Doing a rope cable:
This is a cable that just twists around and around itself to look like rope. It has a stockinette background, so doesn’t stand out so much as it would if you do it over a purl, or other type of background. To achieve rope, I wait 4 or more rows between each cable twist, (otherwise you’ll get a very tightly twisted rope – also okay, if that’s what you’re going for.) You can see that it looks like three stitches just wrap around 3 stitches each time, and you can see what needs to happen next. The three outlined in black will go in the front, and the three outlined in blue will go behind them. So you have 6 stitches involved in this cable.
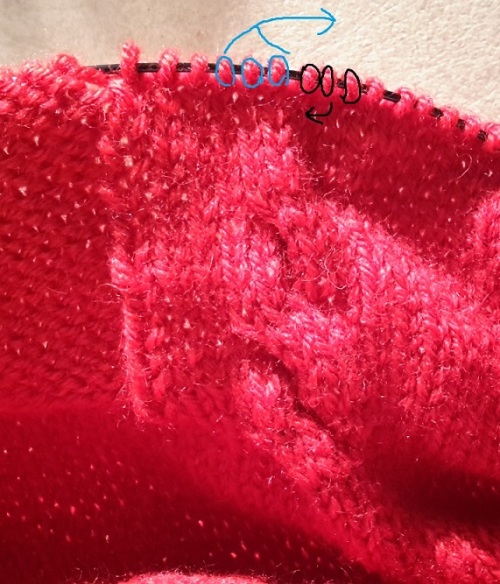
When you arrive at this cable, the three on the right side (black outline) go on the cable needle and hang in the front, (because you want them to end up in the front). Knit the three on the left hand needle, (these were the blue outline stitches), which will bring those behind.

Then put the three from the cable needle back on the left needle and knit those. Finished! Continue knitting.

How to cable a braid:
(If you don’t know how to braid, please do a search online for instructions. You will need to know how to braid to do this cable.) The braid cable is a little more complicated than the other three, but if you know how to braid you shouldn’t have any problem, you already know what it should look like. The cable on the left is a braid on a stockinette background, but would stand out more on a contrasting background, as you see the cable over purls on the right side does.
I’m including a lot of detail in case it helps someone, but in short, you are only moving one section over the other, left and right, just like what was done to cable above. I’ve covered cable braids a long time ago, but this is more detailed and has more pictures.
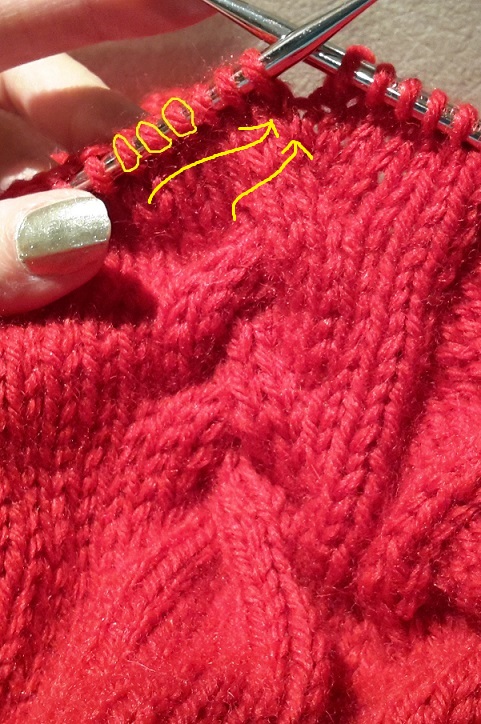
Lets braid: Go up to the stitches that are involved, and stop to think about what should happen next. Notice I have a band of 3 stitches that are not involved (the three immediately after the purls). I have already knit those to get them out of the way. The next 9 on the left needle are all of the stitches involved in the braid.)

I’m braiding just like you would hair. I have three equal sections to intertwine. In this case, I made each section three stitches wide, so there are 9 stitches involved in this cable, but you only ever work with 6 at once, (you only ever cross one section over one other at a time, never two, just like when you braid).
I will keep these same three stitches outlined in yellow to make them easy to follow. You can see below that these three are the left section that needs to cross in front of the middle section to make the next cross. Also, you can see I waited 4 rows between moving each part of the cable, (at least up until this point, before I decided to just go crazy random with it). I never cable on the wrong side for this, only the right side, and only every other visit to the right side.
In the photo below, I have knit 3 more stitches beyond the photo above. To move the left section of the braid over the middle section, I don’t do anything with the right section of the braid right now. I knit past it.
So what do you do now? You want these 3 in yellow to go over the top of the three to the right of them. See if you can figure out what to do with your cable needle, then check the photo below for the answer.

You can make this happen by putting the three that are next on the left needle onto a cable needle, and putting them to the back side of the work. Now you are ready to knit the three on the left needle outlined in yellow, which will make them go in front and to the right.

After you knit the yellow ones, you put the three from the cable needle back onto the left needle and knit those.

You’ve made the next section in the braid. Continue the rest of the row.
A few rows later, how will you do the next section, which goes back the other way? Of your nine braid stitches, three on the right hand side will have to go onto a cable needle and hang to the front while you work the three to the left of that (the middle section), then put the 3 back on the left needle and knit. Just knit the leftmost section, and continue your row.
After you do a few cables, you will stop at the cable, look and think, and you will know what needs to happen next and how to do it. If you make a mistake, and it doesn’t look right, it’s only a few stitches, you can always unknit those few and try again.
Making a repeating cable pattern: Once you’ve tried some cabling, and you know what cables you want to do on a project, then comes a little planning. If you want it to come out perfect, you’ll have to do some counting to make sure you have the right number of stitches for each cable area with no leftovers. It may be easier for you if you draw out what you want to do, just to help you count your needed number of stitches.
Counting example from what I did on the red poncho neckline above: The cable starts out 4 stitches wide at the bottom, then splits into 2 groups of 2 stitches, cabling to the left and right, then joins again as 4 at the top. There were 10 garter stitches between each group of 4 starting cable stitches. This means each motif was 14 stitches wide. Great tip to make this particular cable super easy – If you do a stockinette cable on a background of garter stitch, always move your cables when you’re working on the purl side (back side) of the garment. This will make it so the right side row is always all knits, with no cabling, all the way across! I only moved the cables on the purl side so the knit side could always be fast and easy to do.
UPDATE: How much random is too much random?
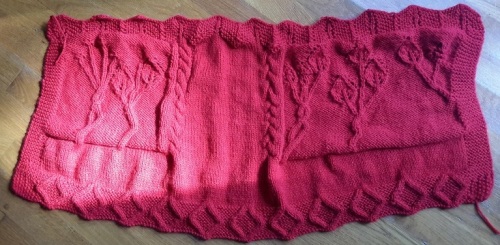
One piece of the poncho is complete, I still have to make the other rectangle. Here’s how it came out.
Before blocking:
After blocking:

There might be such a thing as TOO random, as you can see by the very uneven braid. I was still playing with this garment and doing many things in a very random way. I didn’t worry about counting rows between crosses of the braid, so I have crossovers that are wider than others. That can be good or bad, depending on how you view it. If you have something so strangely made and unfactory-like, its obvious that its a home made object, not a storebought item of which there are a thousand other copies. On the other hand, you can also view the “too random” cable as childlike, or unprofessional looking. In the case of the leaves, I like the randomness, because it makes the cables look more like natural tree branches. The uneven braid, I wound up liking less, because people aren’t used to seeing this much random on most sweaters. But, that’s what can happen if you play. As with many things I make up, it may be a little strange looking, but I will still wear it and not worry about it.
I will make the other rectangle using different motifs and see how that comes out!
Reference: The cabled branches were random, but the leaf came from a chart. The New Knitting Stitch Library. Lesley Stanfield. Quarto Publishing, 1992. Chart 179, pg. 116. I didn’t do the cables on this chart, just used the center part of the chart which made the leaf shape, including the yarnovers above the leaf.


 If you want, you can fold the towels to your appropriate rectangle length, re-clip, and try it on again. (Clip white to white, blue to blue.)


 The scalloped bit hangs low because I did so many decreases in the lace above it. This works sort of for over your butt, because your rear pushes the fabric out where decreases make the dress bulge in other areas. You see big holes near the back seam too, where sometimes I wonder what I was thinking! Those are areas with massive decreases because I was afraid it was turning into a too big sack. So, if you make yours in a straight tube with no decreases, you’ll get a straight scalloped part, and no holes.


