It is very easy to design a bolero or shrug with either crochet or knitting. The drawing below shows you just two ways a shrug or bolero can be made. As shown in the top drawing, you can work across the body, starting at the end of one sleeve, increasing to make the body a little bigger, then decreasing to do the other sleeve. Then seam the sleeves where the stars show. And of course you can also work upwards instead, adding increases to add the sleeves, or downward, using decreases to remove sleeves. Your choice.
Or as the bottom drawing shows, you can just make a rectangle, working upwards (or sideways), and seam the sleeves where the stars show. You can decorate it by adding ribbing or a crochet trim to the top and bottom edges. (My drawings are always a little crooked, but you get the idea.)
 How to measure yourself (for knitting): You need to measure across the back of your shoulders, then add to that measurement about 4 inches (10 cm.) to each end for short sleeves (or whatever number inches you want for any other length of sleeves, just add it twice for 2 arms.) For long sleeves, measure your arms. For the bottom drawing – example, 18″ body + 4″ sleeve + 4″ sleeve = 26″, so make it 26″ wide for a short sleeve shrug. (You will need to know your gauge if you are knitting so you will know how many stitches to an inch. See this post for gauge, inches and knitting calculations)
For the height, measure around your upper arms. This is the height you want to make the sleeve part (or the whole thing if you’re making a rectangle). You can add a couple of inches if you want a looser sleeve.
For crochet getting measurements is easy, you just chain until it’s wide enough, holding it up to yourself (no stretching).
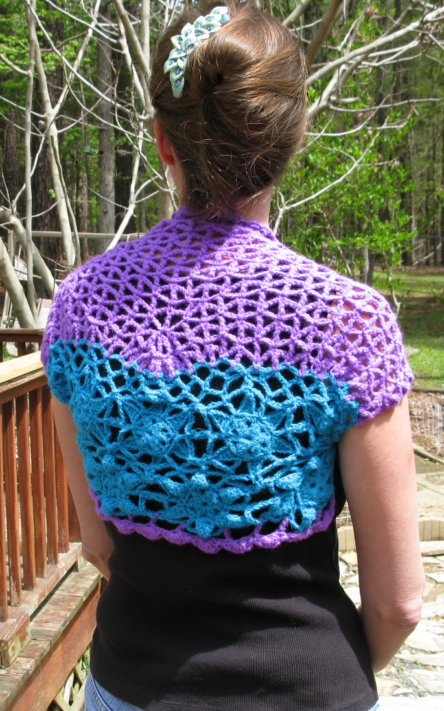
The shrug above is the shape of the top drawing, made with arms and a body. I started at the bottom / back with the star pattern (in blue), but since it is one of those that is alternate, I didn’t use stars the whole way. (By alternate I mean not one motif above the other so it makes an even edge, but each motif over the space between the motifs so the edge is uneven.) Since I wanted short sleeves, I did the second row with two end motifs that stuck out farther than the body. I then did some arch mesh type stitches (just chains connected with single crochets here and there) across the top to even out the edge. Then I switched to triangle mesh stitch (in purple, references below).
When you don’t have a pattern, and you switch from doing one thing to doing a very different thing, you never really know how many stitches to pick up as you go. So, I just added triangle mesh stitch from one end to the other. I knew it would be wide enough that way, but chances were also good that it would be too wide to exactly match the blue part.
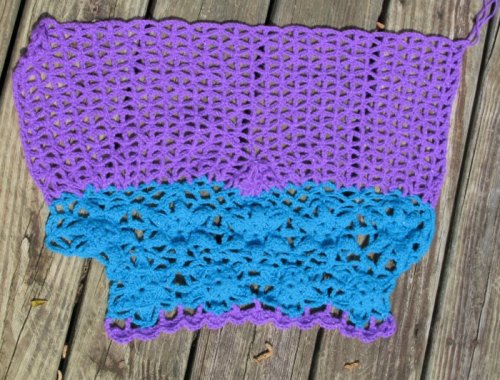
It was, and this picture shows what I did about it. I had two choices, 1. I could have seen how it went, counted how many triangle mesh repeats would have made it perfect, then ripped back and done it right. Or 2., (what I usually do), I made it work out as I went. I had too much fabric forming after the change to the new stitch, so I pulled it together in a bunch – pulling a loop through, connecting several places on the row I was working, and pulling them tight. I did this once, then again on the next row in the same spot when I decided it was still ruffling out too much. If you do this in the middle, it looks like you meant to do that! Often button-down-the-front-shirts have that gathered place in the back to give you moving room, it just resembles something like that. here you can see that pulling the purple top row stitches inward makes it into a butterfly shape. 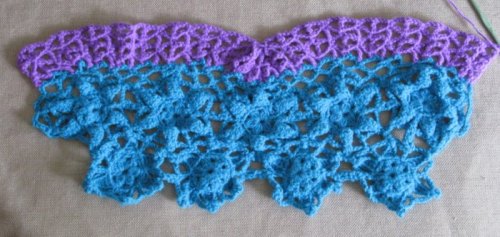
I then worked up until it was the height I needed, and ready to fold over and seam. Here’s what it looks like at that point. I also added the purple shell trim for the bottom edge at the back. I waited to do the shells at the neckline, I did this as I seamed so that I wouldn’t have to cut the yarn and have more ends.
Below shows you how to fold to make it a shrug. I made a seam across under one arm, then I crocheted the shell border across the top for the neckline, then seamed under the other arm. 
Above, the finished shrug looks like this.
Another:
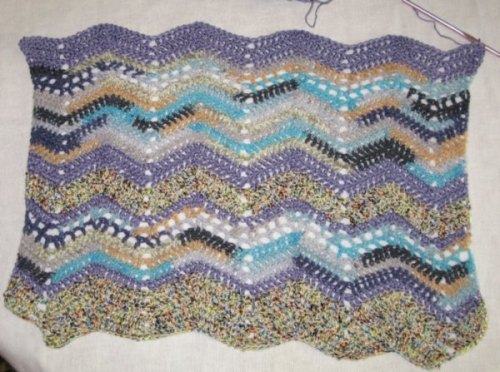
This one is done in zigzag crochet, and used up lots of leftover yarn from other projects (yay!). My cousins taught me this stitch, but something similar is in one of my books too so I can give it a reference below (they call it chevron stitch). The zigzag made a nice shape for the neckline, so I didn’t bother with a border on this one. It is very simple, almost just a rectangle. I left a little bit of a “body” area for the bottom back, the two shorter rows you see at the bottom.
Then I rolled it over and seamed for under the arms as shown above. This one had very short sleeves, so that is only 2 inches or so at the edges.
I’m not sure I like how the shorter body rows came out, I feel it makes the back a bit baggy. I may just do shrugs as rectangles without them from now on. I will see for sure soon though. I’m working on a knitted shrug with Lionbrand Homespun, and that one will be just a rectangle. I will come back later when that is done and add a photo of it as an update to this post, (to try to keep most of the shrugs together).
The knit shrug, simply a rectangle, which used up all the rest of my Lionbrand Homespun yarn. This one came out with more of a casual look, like a fuzzy t-shirt.
I did ribbing (1k, 1p) for the bottom 3 or 4 rows in brown, then switched to stockinette with 4 rows of garter on each edge to help the sleeves to not curl. I did this half and half colors as an experiment to see how that would come out -if it would make it so I could wear it one way or the other and have it look different on the front. Then ended with the same, 3-4 rows of brown in k1, p1 ribbing, and seamed the sleeves as shown in the shrug drawing above.
 More detail on calculations: I measured shoulder seam to shoulder seam across my back, then added 6″ for each sleeve, and did a small swatch in this yarn and needles to calculate how many to cast on. I found something unexpected, the seaming caused the sleeves to pull inward (not sure why, I think I did it evenly, so I wound up with 5.5″ of each seamed area instead of 6″ for each sleeve. (The swatch gauge was size 10 1/2 needles and 2 inches =5 st. with this yarn (so call it 2.5 st. =1 inch). I made the body 15 inches, +6 inches for each sleeve = 27 inches wide. To figure out how many cast on stitches I needed, I wanted 27 inches x 2.5 (stitches per inch) =67.5 st. So I cast on 68.
The top 2 pictures show it with the beige side facing front, the bottom 2 show it with the purple side facing front. You can see that it got wider sleeves by doing a rectangle shape than you do if you made it like the top 2 shrugs. It has more of a t-shirt look with short sleeves. I was unhappy with the baggy back flap on the shrugs above. This one doesn’t have a baggy back, but seaming a rectangle does give you bagginess under the arms. (I haven’t decided yet which I prefer.)
It does keep you warm, I can see myself bringing this around with me in the summer, where many places have the air conditioning way too cold for comfort in sleeveless shirts.
References:
Good news! You can get pieces of the book I’m citing for free on google! Link here, (or search for the book on google and you’ll find it). Unfortunately you can only see the shell edging of the stuff I’m citing.
Chart for the triangle mesh stitch: The Crochet Stitch Bible. Betty Barnden. 2004. Krause Publications, Quarto Inc. pg. 92 (not online).
Chart for the stars in blue: Continuous Crochet Motif 60. Nihon Vogue-Sha. 2009. ISBN-10: 9866817466. Design No. 17, pg. 24. (This book is in Chinese, I only follow the drawings.) (Often available on amazon in both Chinese or Japanese)
Arch mesh stitch: The Crochet Stitch Bible. Betty Barnden. 2004. Krause Publications, Quarto Inc. Pg. 87. (not online)
Shell Edging: The Crochet Stitch Bible. Betty Barnden. 2004. Krause Publications, Quarto Inc. Pg. 126. (online)
Zigzag stitch: Mine was taught to me by my cousins, and is repeats of 7 double crochet, chain 2, 7 dc, 3 dc in one spot, repeat. To see a chart that is similar for more details, this book has one called “chevron stripes” that is about the same thing: The Crochet Stitch Bible. Betty Barnden. 2004. Krause Publications, Quarto Inc. 71, pg. 185. (not online)
Yarn: Top crochet shrug, purple is Red Heart Shimmer in “Purple”, blue is Red Heart Shimmer in Turquoise; bottom crochet shrug, sorry I don’t know! These were all odd balls of yarn left over from other projects with no labels. They are all the width of “sock yarn”, some of which had written on it “fingering weight”. Knit shrug, all lionbrand Homespun. I lost a couple of the labels, not sure about the brown but it might be “Prairie”. The purple is “Gothic” and the beige is probably “Rococo”.
Hooks: Both done on size G (6, 41/4mm.). Needles: size 10 1/2

