For the past couple of years, whenever I passed through a clothing store when the long sleeved goods were out, (which was almost never, I seldom shop), I looked for a bright yellow… anything for winter. I never once found it. Popular winter attire is largely made up of fairly dull colors, which do nothing for me! So since I couldn’t find it, I made it.
Since I had done so many sweaters before using Red Heart yarn and size 7 needles, I knew exactly how many stitches to cast on for the waist band. If you think you might make a lot of no-pattern sweaters, and you plan to use the same yarn and needle size, you may as well just knit yourself a nice long swatch or a waist band so you can use it to measure you, then write down your number of stitches so you can always just cast on and go. To risk sounding like an ad, I use Red Heart because its not only the cheapest, it doesn’t shrink or felt in the wash like real wool. I have found that real wool and nice little balls of fancy yarn are wonderful to knit with, and make a really nice garment, but if you forget and throw it in the wash once, its over. Not only that, but it may take 6 or 8 balls of nice yarn to make a sweater, and at the usual price for fancier yarns, this can run you up to $80 bucks quick. That’s just too much for me to want to spend on a sweater, especially if I have to make it myself! This yellow sweater took me 2 skeins of Red Heart super saver. I forget if that was $2.50 a skein or $4, but it was somewhere in there, for a very cheap sweater.

Here I am in this slouched position again. That’s because I’m always bending to pet a dog.
How to make it:
I used a 40″ circular for the cast on, size 7 for the whole sweater except the neck ribbing (which I used size 5 for). I cast on 160 (for my size), using knit 2 purl 2 ribbing. Always use an even number for cast on if you want to do 1:1 ribbing, and a number divisible by 4 for k2, p2 ribbing. That way you will end with p2 if you started with k2, and you won’t have a seam. (160 divided by 4= 40, so I know I have a whole number of repeats, no decimals (leftover stitches)).
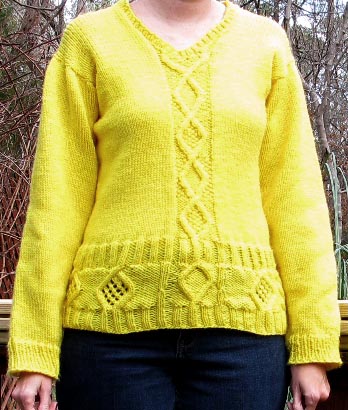
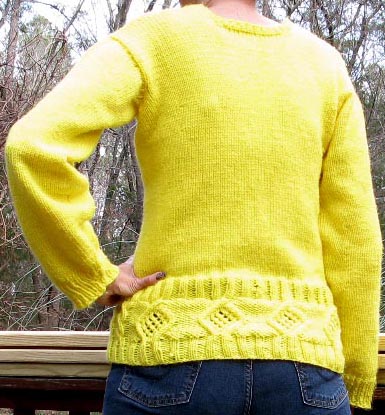
For those who have never cabled: A discussion on how to do pattern-free cables: After I ribbed for as long as I wanted, I just went upward in a tube in stockinette to make the body. I added a cable for interest up the middle, so in the first row after the ribbing, I used 2 markers to separate out 12 stitches where the cable area would be, and started working the cable stitches on that first row. I decided to use a cable of 2 stitches on each branch and that I would separate, then cross them over each other in a twist, and alternate purl stitches and seed stitches on the background. (You can see that in the photo, the inside of the bottom cable has seed stitch, and the background has purl, and this alternates for the cable above it, etc.) So for this first row, I just set aside the 4 stitches in the middle of the section between the markers to be in stockinette and make the cable, and did all other stitches in the background (purl). If you want to vary your cable thickness, again just be sure to use an even number of stitches between your markers so that it won’t end up closer to one edge of the cable area than the other. (Drawing it out on graph paper can help you design a cable visually.)
I moved my cable stitches over using 2 cable stitches and 2 background stitches, and only on every other row. If you use only 1 background stitch to move the cable with, your cable will move left or right with a less extreme angle. So, this is something you can vary. When I worked on my sweater, I always made sure to do a non-moving row last before putting the sweater away, so that when I picked it up to work the next time, I’d know the first row would be a cable moving row. This kept me from messing it up. You may notice that my cables don’t look all exactly the same, that is because the stitch you use for background effects the way the cable looks too.
How do you know what to do on a cable without written instructions or a chart? Cabling follows logic, so after you do it enough, it will just become obvious what needs to happen next to make it move in any direction. If you’re just starting learning cables:
To make your cable stitches go to the left: When you get to the cable stitches, put your two cable (stockinette) stitches on the cable needle and let it hang to the front, work the next 2 stitches in whatever background stitch you’re using, then knit the 2 cable stitches from the cable needle.
To make your cable stitches go to the right: Put the 2 (or whatever number you want) stitches located before the stockinette cable stitches on the cable needle and let those hang to the back, knit the stockinette cable stitches, then do the stitches from the cable needle in the background stitch.

Then, much like the other pullovers I’ve made before, just work upward until you get to the arm holes. Armholes: You know how many stitches you’ve got, divide your body stitches in half equally and separate these 2 halves at the sides where you want arms to be (either using markers, or setting half aside on another needle or piece of yarn). These will now be front and back pieces. Make sure your cable is exactly in the middle of the front piece (same number of stitches on each side of the cable on the front piece). As you continue working in stockinette, (and continue the cable pattern on the front piece), decrease at the arm holes (knit 2 together a couple of times on the first row, then a couple more times on the next row until the arm hole is the shape you want.) Add a neck hole once you get as high as you want it to be. Knit a couple of stitches together in the middle of the front piece and start working in 2 pieces side to side. Decrease by knitting 2 together as you wish at the neck edges for the neck shape, just always do the same thing on both sides. For the back I did my neck hole straight across, so just bound off those stitches, leaving the same number of stitches to keep working for over each shoulder. Remember to make it the same number of stitches on the front piece shoulders as the back piece shoulders so that they match when you seam them together. You can kitchener stitch over the shoulders if you don’t want there to be a seam, (which was what I did). I continued my cable pattern into the neck hole in the front, until my decreases had me run out of cable area stitches. K1 p1 neck hole ribbing was added last – after seaming the shoulders together, stitches were picked up around the neck for the ribbing using a size 5 needle (this was the only place on the sweater I used the smaller needles). I decreased during the ribbing only once, on the first row of the ribbing to help it lay flat against the body, (I knit 2 together in the center of the front above the middle of the cable.) Again, if you have an even number of stitches after that point, no seam.
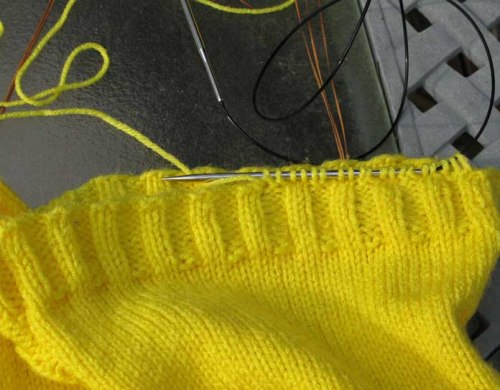
Arms: Stitches were picked up, then worked in stockinette for arms (I picked up 74, this may vary for whatever size armhole you make, but this made a fairly loose arm). I marked where the underarm was and gradually decreased along the arm always above that marked spot, mostly once I was past the elbow, until I got to 48 right before the 1:1 ribbing. (Read on before doing…this was probably a mistake). I found this still made a big wrist hole, so I decreased 8 more stitches within the wrist ribbing (always doing 2 or 4 decreases at once to keep the ribbing pattern and always where it would be located under the wrist and more hidden. It ain’t pretty though, so you may want to get any decreasing in before starting the ribbing.
UPDATE – FIXING STUFF I CHANGED MY MIND ABOUT LATER
You CAN change your mind later! After wearing this for awhile, I decided this sweater was too short for the bulkiness of the sleeves, so I made it longer. I didn’t feel like pulling all the ribbing out, so I made it part of the design:
 The trick to making that work is using the same yarn, the same size needles, and making sure you pick up exactly the same number of stitches you had before. If you add too many or too few, your sweater will buckle out or be pulled in and it will look like more of an add- on. It was easy to tell how many stitches I had, both because I keep notes when I make a sweater, and because my bottom ribbing was knit 2 purl 2, so it was really easy to see what needed to be picked up where.
This was the cast on edge originally, as the sweater was worked from the hips upward. I picked up stitches on the outside, picking up the bar going across the front, that way what was knitted from there on would look like it was connected with no dividing line. Picking up stitches this way is easier if you pick up a loop, then knit or purl that stitch, then pick up the next and knit or purl that one, etc. It keeps the picked up loops from being very tight on the needles, (which would make doing the whole first row very hard).
I also chose a pattern that matched the rest of the sweater, which helps to keep it from looking like as much of an add-on. The center cable is done the same way as the rest of the cables up the front were, and the others on the bottom are all alike, and similar to it. Then a new bottom ribbing edge was done, identical to the first.
Yarn: Red Heart, regular old bright-as-can-be-yellow (for which I lost the label)
Cables: The cables and design up the front of this sweater was random and made up, as well as the middle-front cable on the bottom. The other cable design around the hips was a chart from: The New Knitting Stitch Library. Lesley Stanfield. Quarto Publishing, 1992. Chart # 175, page 113.
Read Full Post »


