Feeds:
Posts
Comments

Archive for March, 2014

knittingentrelacweave

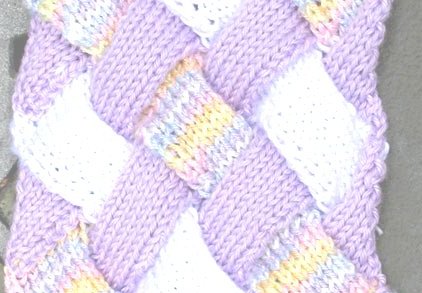
If you are unfamiliar with entrelac, instead of what you see above, it usually looks like this example from knitting daily:

http://www.knittingdaily.com/media/p/48939.aspx  (Isn’t that lovely?)

The yarn changes color, so each block is next to a similar color, and gradually changes as you knit upward block by block.    Since entrelac appears to be inter-laced, my brain always has the urge to see what it would look like if it were really woven like a basket.  So, I had to make one to see it, and here it is!You can make one too if you want, here are some instructions on how to make either scarf.  Whenever I want to make entrelac, I take Eunny Jang’s Entrelac Block by Block, pages 2, 3 and 4 with me, and do exactly what it says.  You may need to sign up to get it, but the download is free.  http://www.knittingdaily.com/media/p/24512.aspx

(Tip on that download:  It sounds weird at first to cast on only 24 stitches for the first row of triangles, but it’s correct – this will give you a scarf like in my photo, about 7 inches wide (17 1/2cm.) if you’re using something equivalent to Caron Simply Soft yarn and size 7 needles.)

At first I thought doing this Woven Entrelac would be terrible!  You have to cut the yarn a lot, and you will have lots of ends, (which you don’t have with regular entrelac and color changing yarn).  But I figured out how to work them in as I go, so there’s no big end-work-in-fest when it’s finished.   It’s okay!  The back of entrelac is not pretty anyway, here is what that comes out looking like:

KnittingEntrelacWeaveBackWorking in ends as you go:  After cutting and tying a new strand, I work the row where you pick up loops on the next square normally, and work back to the knot.  Then I hold the ends between the needle/loop and the working yarn so that when the next stitch is made, it gets trapped under the working yarn.  Hold it between the needle and working yarn for each following stitch until it’s all the way trapped.  I usually alternate, holding it upward one stitch, then holding it downward for the next one.  I don’t think it matters though, as long as it gets trapped in there somehow.  Then you just have the little tips sticking out.  For the first side triangle I gradually just work those ends away from the edge.

How to make Woven Entrelac

You will have one color that is used for more of the scarf (in this case, purple, color #3), and two other colors that are used less (#1 and #2), like this:

KnittingEntrelacWeaveBottom(You can leave the ends hanging like that on the first row where they can blend in when you add fringe.)

Then knit with the colors as follows, using the knitting daily pattern:

Cast on with color 1:

Base triangles:   1st one:  color 1;   2nd one:  color 2;   3rd one:  color 1

Tier 1:

First side triangle:  Always color 3  (no cutting the yarn this tier – yay!)

Continue with row of blocks:  Always color 3

Second side triangle:  Always color 3  (cut yarn only at end of second side triangle)

Tier 2:

Second tier of blocks:  Always colors 1 and 2.  Swap order each time you do this tier, (just do the opposite of what you did the last time you did the second tier).

More details on second tier:  Since you did color 1, color 2, color 1 for the base triangles, when you get to this tier the first time, do color 2, color 1, color 2.  Then the next time you get to the second tier, it will be color 1, color 2, color 1 again.  After that point, it will just be obvious to you what should come next.  It should look like a basket, and each color flows under one and out the same color.  Feel free to print this light picture of my scarf and write your own color names on it where they will go.  (I had to draw it out before I started.)

WovenEntrelacScarfLt

Alternative weaving:  You could also knit strips with 45 degree angled ends and just weave them, but if they were stockinette like in entrelac, they would roll into i-cords, so would need stitching on all of the edges to look the same.  I don’t like hand sewing, so doing it that way sounds less fun to me.  For those who like hand sewing, maybe that would be fun for them.  If your strips were garter or another flat-lying stitch, weaving those would probably be nice, and much faster than entrelac, but I haven’t tried it.

My yarn:  Caron Simply Soft -color Baby Bright (color 1); Caron Simply Soft -color white (color 2); Caron Simply Soft -color Orchid (color 3).  Size 7 needles.

Read Full Post »

The only instructions I used for this vest were for the staggered fern lace that runs down the middle, and a chart for the bottom edge at the hips. You can get the staggered fern lace instructions here for free:

http://www.knittingdaily.com/media/p/109896.aspx  (This page will allow you to download the pdf “Techniques for Knitting Stitch Patterns: A Guide to Knitting Stitches from Knitting Daily”.  Inside this free ebook you find instructions for “Staggered Fern Lace”, among some other very nice stitches.)

KnittingVestStaggeredFern

Basic Instructions: The vest is worked from the hips upward, and for the back I just started the fern lace a little later with stockinette done first.  After making a back and front, I seamed the sides and shoulders.  Three rows, plus a loose bind off row of knit 2 / purl 2 ribbing was used at the armholes and around the neck.  I didn’t do the neck in the round, the knits/purls go back and forth to leave a split in the middle at the front.

KnittingVestStaggeredFernBack

Those are the basics of how to put it together, but first, you need the math and measuring to figure out how to do it with your choice of needles and yarn.  Get your measurements, then do a small swatch with your chosen needles a little bigger than 2 inches by 2 inches (5 cm. x 5cm.).  With this information you can easily calculate how many stitches to cast on, and what numbers to increase and decrease to for each body part.  (For more detail on how to get from measurements and a swatch to these numbers, see this earlier post:  Working Without Patterns – How to get the right size when designing with knitting)

The Fern pattern is 20 stitches wide, so just keep an equal number of stitches on each side of it to keep it in the middle, and do your increases and decreases at the side seam edges.

The chart for the bottom edge (see reference below) – you can do anything you want for the bottom rows, just make sure it’s something that won’t curl if you do your sweater in mostly stockinette like this one.  (I love stockinette, I can do it while watching tv and don’t have to look at it, so it gets done pretty quickly on autopilot.)

Shaping the pattern for the neck:  This is what I did for your reference, but you can do this any way you want to for your chosen neckline.  For the back, when my armholes were big enough, I bound off the 20 stitches of the pattern and worked the over-the-shoulder stitches back and forth for about 5 rows, then bound those off.  Your measurements and math will tell you how many stitches you want for over the shoulder, although at that point you can just hold the lower part of the sweater up to you over your shoulder and count.  (If you want a seamless shoulder, just string yarn through the loops to hold them until you are ready instead of binding them off, then do Knitting Daily’s Grafting on the Needles over the shoulders when you are done making the front.)

For the front – basic instructions: I split the pattern in half in the middle, then ran each half up the side of the neck to make it look more flowy and continuous.  After splitting it in the middle and doing back and forth on each side, I did my decreases to get the correct over-the-shoulder numbers on the knit stitches immediately outside the pattern stitches.  The white arrow in the photo below is showing you which knit stitches are disappearing as I knit 2 together every couple of rows (the ones just outside the “purl 2” in the pattern).

KnittingNeckRustyFernVest

Just do what you feel intuitively needs to be done.  You know you need a certain number over the shoulders and you have to get to that number – somehow.  Any old way.  You can stop your pattern if its easier, or continue with it, or change it into something completely different on each side of the neck if that is easier.  If what you’re doing seems too hard, try doing something easier and more fun!  There are no rules in making up your own clothing.

For those who want to know – Continuing the patterned stitches in the front -more detail:  Note:  This made a pretty small neck hole, so if you prefer a bigger neck hole, you may want to knit for longer, and modify as mentioned below.  Previously, I worked until the end of one pattern repeat (completed row 12 and was starting over with row 1).   I divided the middle of the pattern (of 20 stitches across) by flipping stitch 10 over stitch 9, and stitch 11 over stitch 12 while doing row 1.  In row 1, on one side I did the last 9 stitches of the pattern, then for the other side I did the first 9 stitches of the pattern, (continuing what was done before).  Whether you include yarn forwards is your choice.  Sometimes I did, sometimes I didn’t.  Even rows are all still just purl rows.  Row 3: last or first 9 stitches of the pattern (depending which side you’re on).  Row 4: purl.  Row 5: the last or first few stitches of the pattern (beginning or ending with 2 purls)…by this time you are used to working the pattern, so you will see what needs doing.  However many stitches you have left, do that number, along with the purl 2.  This row (row 5), was the first row I did knit 2 together in the stockinette area to decrease for the over-the-shoulder number.  If you are making a bigger neck hole, you would likely do this sooner.  Row 6: purl.  Row 7: pattern stitches with 2 purls, and a k2tog in the stockinette area. Row 8: purl.  Row 9. pattern stitches with 2 purls and a k2tog in the stockinette area. Row 10: purl.  By now you realize you have fewer and fewer pattern stitches because the pattern keeps knitting things together, and you are leaving out most of the yarn overs, so eventually the patterned stitches just disappear.  I kept the 2 purls for an edge (since you purl both sides it is garter, so it made a nice non-rolling border.  The neck would have been okay without a ribbed border, but I added one anyway.)  Row 11 was the last row I knitted 2 together in the stockinette region because at this point, I had my correct number of stitches for over the shoulder.  I started another pattern repeat (although there was no pattern left at this point, just for numbering sake), I did rows 1-6, then knit row 7 loosely and bind off.  (I did not do seamless shoulders, just regular seams on this sweater.)   Tip:  The group “sl1, k2tog, psso” counts as 3 stitches.

Chart for the bottom few rows of the sweater at the hips:  The New Knitting Stitch Library. Lesley Stanfield. Quarto Publishing, 1992.  Pg. 26, chart #4, three repeats.

Yarn and needles:  Size 8 needles with ribbings done on size 7 dpns.  Yarn is Promotion Bergere de France (no color written).

Read Full Post »