Feeds:
Posts
Comments

Archive for October, 2009

I go by the name ilovesocks, but yet, I’ve talked so little about them.  Its coming to winter now, so time to dig out those wonderful warm toe savers!

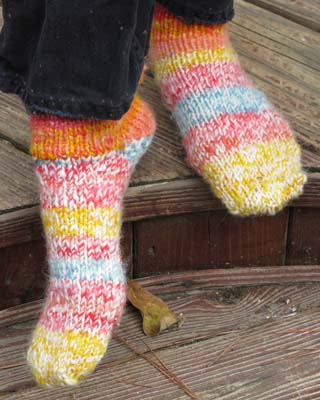
Candyland colored socks

Candyland colored socks

These were done by first dyeing the corriedale wool using food coloring (you use distilled water and mix it with some vinegar, and a few drops of food coloring – acid makes the dye washfast for animal fiber, then heat it until it steams).  Dyed it red, yellow and blue.  Then the yarn was spun, long sections of yellow, then long sections of red, long section of blue etc.  Then it was plied in the opposite direction with white wool to get the tweed effect for the foot.  (Another ball of yarn was spun using the red plied with yellow for the back of the heel up.)   These were knit starting at the toe with Judy’s Magic Cast on to make the toe seamless, then using short rows for the heel (you just leave stitches off the ends of your heel flap every other row, then start adding them back on 1 stitch on each end every other row when you get to the very back of the bottom of your foot, leaving a few stitches in the middle for the back of the heel – try it on as you go).  You may get holes on the heel sides doing that, just pick up yarn from around them as you go and knit the yarn with an added on stitch (knit the two together).

Made these toes too long, but still love the socks

Made these toes too long, but still love the socks.

You saw these uber-long toe socks before on the Magic and Lollypops post.  I sleep in these and that extra toe pocket is great for warmth.  I love these because of the tweedy yarn color changes.  These were spun by me too, but not dyed.  This is the effect you get if you don’t plan what you will ply together, and just make 2 balls of singles in random order then ply them together randomly.  Wonderful variety!

Read Full Post »

You can make a sweater on a Knifty Knitter round loom set.  (Of course you can also use the straight looms they sell, but say you bought the round set just to learn how to use it to see if you’d like it – well, those are really all you need).

A sweater made on a Knifty Knitter round loom set

A sweater made on a Knifty Knitter round loom set

If you’ve already followed the instructions that came with the loom set to learn how to use it and you made the hat, not only do you already know most all you need to know, but you can use the hat to measure yourself for anything else you want to make.  Just hold it up to yourself systematically and count the rows around whatever body part you need to know about.  This is the number of stitches you need to be on your loom when you’re making that part.  Be very careful to not skip any space on yourself as you move the hat.  You can of course also make a swatch to use for this, a longer swatch is more helpful than a shorter one – just make one 10 or more stitches long and 5 stitches high, then you can save it for measuring anytime you plan to loom.  Make sure to leave yourself a little room, a sweater that is a little big is better than one that is too small.  You will likely wear this over another shirt because it is so thick (you may get very hot if you can’t take it off in heated buildings) so you will want a little room in it.

It may not sound that easy, counting stitches to get to your size, but the stitches made by these looms are HUGE, and you use either very bulky yarn or 2 strands of something worsted thickness, so counting is really quite easy. These are the counts for the first Knifty Knitter sweater I made.  These counts should not be used for you, they are just to illustrate where on yourself you need to measure.

KKAquaSweaterMapYou can see that I did the back straight, ignoring the need for an underarm area, (I wish I could remember why) which I later found I needed.  That’s why the optional under arm filler is there.  I whipped up some quick sides for the under arm area.  You can avoid doing sides by simply adding the needed area for your underarm to both your back and front pieces.

First you’ll make the back piece, you can use the biggest loom (yellow one in my set).  It has 41 pegs, so as long as your back piece is 41 or less, you can just make the whole piece at once.  If its more than 41, you may want to do your back in two halves.  You make a flat back piece by going back and forth on the loom and not connecting it into a circle.  I used 2 strands of Red Heart worsted weight yarn for mine (one aqua, one mint green).  I started at the hips and worked up.  If you don’t want the side pieces that allow you to work in a straight line, you will have to account for that in your measuring, and you will need to decrease once you hit the arm pit area to make an armhole.  Picture this, you’re going back and forth in rows, knitting your back piece on your loom – to decrease you take a loop off of a peg on the end of your knitting (the one closest to the arm hole), and flip that loop onto the peg next to it (which has the second from the end on it).  You now have 2 loops on that peg.  Then, you can do the decrease one of two ways, whichever you prefer.  1.  Flip the bottom loop yarn over the top one and off the peg, you’re done.  Or 2.  Wrap and work the next row as normal (after you’ve moved that end stitch to the 2nd peg), and when you get to that peg with the 2 loops on it, wrap that peg and lift both loops over and off (leaving the wrapped yarn on as usual).  It is essentially a “knit 2 together”. and you’ve decreased one stitch.  Do it again and you’ve decreased 2, and you are well on  your way to shaping the armhole.  Then just knit the next row as normal, knitting all occupied pegs.  Just decrease until you’ve got the count you need for the part that stretches across your back near the neck (the top “32” on my chart).

(Note:  Since this post I have done another one of a vest with pictures demonstrating increasing and decreasing on the Knifty Knitter here.

This is the under arm side piece, done with 2 strands of mint green and attached after the fronts and back were done.  You can see that using this piece allows you to avoid increases and decreases and work in a straight line until you get to the neck.  A lighter mint green was used with aqua for the lower back, and regular mint with aqua at the top.

This is the under arm side piece, done with 2 strands of mint green and attached after the fronts and back were done. You can see that using this piece allows you to avoid increases and decreases and work the back in a straight line until you get to the neck. A lighter mint green was used with aqua for the lower back, and regular mint with aqua at the top.

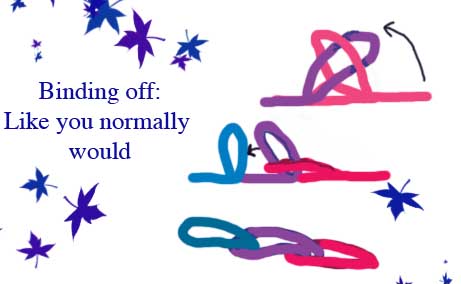
When you want to shape the neck hole in the back, you don’t need to leave off many of those huge stitches.  I bound off 9 of my stitches in the middle, (I think 8 would have done it too) leaving on the pegs the two ends which are the count that I would need for the shoulder flaps (which was 11, the amount I’d need to meet the shoulder flaps in the front and match them)..  Bind off the neck stitches the way you normally bind off knitting, taking just those stitches off the pegs as you go.  Then you just work on your back shoulder flaps, going back and forth on each flap until its big enough – hold it up to yourself and see.

KKloomBindingOff

Work the front pieces in the same manner, from the bottom up.  Straight if you use a side piece, or decreasing at the armpit if you didn’t use a side piece.  (Remember that if you decrease to hold the sweater up to you before you start so you decrease on the right side (you don’t want two left fronts!).  Makes sure also that you’re making all of your pieces the same length so that when you stitch them all together, they line up at the bottom.

For the sleeves, I used the 2nd smallest loom (red in my set), which has 31 pegs, starting at the shoulder.  I did not do a shoulder cap, just made a tube.  I worked in a circle (connected it) until the point where I wanted to decrease, then flipped a loop over another as described above under decreasing, and started working back and forth.  The opening can be seamed later and  located under the arm to hide it more.  This photo shows what happens when you change from working in the round to working back and forth.  It changes the shape of your stitches.  I liked this effect as I felt it added interest to the sweater.  If you don’t want this, do your sleeve back and forth down the whole length and stitch it up at the end.

KKAquaSweaterSleeve

Finishing: I didn’t worry about curling, and all the stitches are stockinette. (You can do purl stitches on the loom, search online and you will find videos showing you how).  So to help with some of the curling and add interest to the sweater, I did double crochet on all edges (around the wrists, around the neck and down the front, and at the bottom).  I wish I could tell you what hook I used to do that, but my hook has no size written on it.  20 years ago, it used to be the only giant hook I could find, plastic and light blue.  I’m guessing its a size O or P or something.  The crochet also gives you buttonholes, so I got some big buttons that were long in one direction so they would stay closed.

KKAquaSweater2

I like this sweater, its thick enough to use as a light coat in milder weather, and it was FAST to make with these big ol’ stitches.  Have fun designing your own original sweater!

If you found this post through a search, please visit my “Links” page to see other Knifty Knitter projects.  There is a “Links” tab at the top of this page, and also a link to it at the right.

Read Full Post »

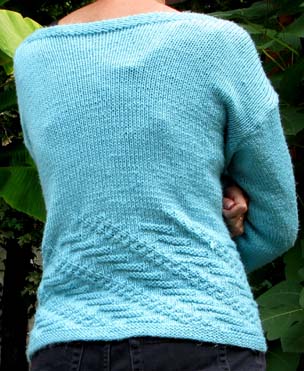
Knitted sweaters can be done almost the same as crocheted sweaters.   The trickier part with knitting is getting the size to fit you right.  If a person is not careful when working pattern free, this can mean starting over three times or more once you get going and realize you’ve casted on too many or too little.


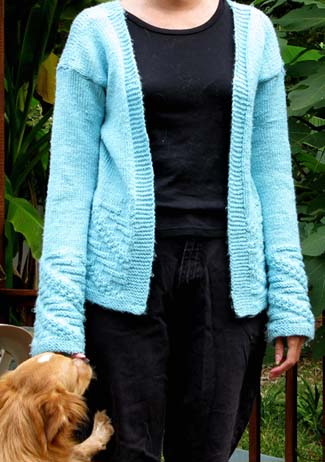
Aqua cardigan (and the back of Cody's head, which it appears you'll be seeing a lot more of!)

Aqua cardigan (and the back of Cody's head, which it appears you'll be seeing a lot more of!)

How do you avoid that?  Since you don’t start with a chain you just wrap around yourself like with crochet, its a good idea to make a permanent swatch (a swatch you can reuse extensively).  If you want to start at the bottom of a sweater and knit up, use the same yarn and same size needle you want for your sweater and make a swatch long enough to wrap around your hips -or longer, and, say, 2 inches high at least.  You can keep this band and use it for measuring everything you will make in the future with this same yarn and that same needle, so its a great thing to have.  You can wrap it around your fingers to know finger sizes for gloves, your head to know hat sizes – everything!  Attach a piece of paper to it saying what s needle you used and what yarn so you’ll never forget, and keep it for reference.  (This is one reason I use so much Red Heart yarn.  Its all the same size so I never need to reswatch, I just use an old count on the same needle and cast on).  Once that’s made, all you have to do is wrap it around your hips, hold it at the spot where it meets (or a little looser than that spot if you want a baggier sweater) then take it off and count the rows.  That’s how many to cast on.

If you absolutely do not want to swatch, even once, (maybe your yarn was really pricey and there’s not that much of it in the skein for example), you can just go for it.  I warn you that you may need to start over more than once, (or make a fold over and hide it as a twisted cable like I was squawking about in my Magic and Lollypops post on the tanktop that wound up too big). Once you make your first sweater, you can just use that as your swatch in the future, wrapping it around yourself however you need to measure and count when you plan to use the same yarn and needles.  Okay, are you still with me?  That was really the most tricky part, the rest is easy!

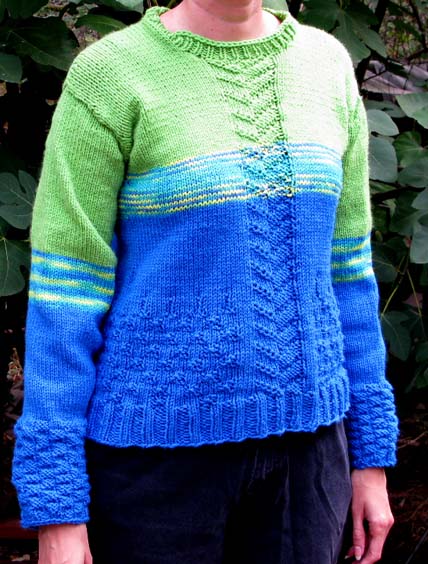
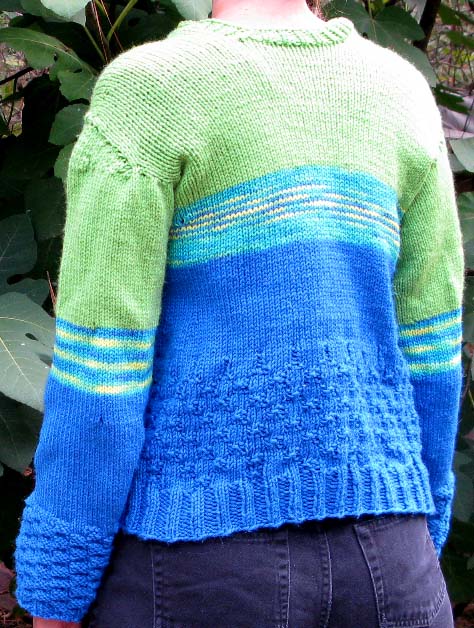
KnittingNeonSweater1

Woops, my collar was folded under - the collar is actually there, not missing like it appears!

If you want to make a cardigan like the aqua one, I used a circular needle for this, it will help later, but didn’t join the circle, just left an opening for the front.  There are 8 garter stitches on each side of that opening, and on the bottom to keep it from rolling. (Garter is great for that, also seed stitch.  Seed stitch won’t pull tight like garter sometimes does).  Then a chart was followed to make the pattern as I worked up from the hips (see chart ref. below).   Then you just keep going until you get to where you want your arm holes to start.

For the pullover, you just connect the circle on your 40 inch circular needle and go up n a tube.  Mine was done with k2 p2 ribbing for the bottom few inches (I did not use a needle 2 sizes smaller for that, that’s why my ribbing doesn’t look tight), then a chart was followed for the design (see chart ref. below).  You just go up straight, and you can add increases or decreases (put them where they’ll hide in the area under the arm) for your curves if so desired.

My shoulder pieces were left very wide so shoulder caps were not necessary and the sleeves could just be made in tubes.

My shoulder pieces were left very wide so shoulder caps were not necessary and the sleeves could just be made in tubes.

Cardigan – from the arm holes up: This is where the circular needle helps, you get a better idea of where to put the armholes by holding it around yourself.  Make sure to set aside an equal number of rows for the two front pieces (use dividers – little loops of yarn or stitch markers), and go back and forth on the pieces to leave the arm hole opening.  You can decrease for under the arm to make it arm hole shaped by knitting 2 together a few times only on the 10 or so stitches on the end under the arm (stop doing that when its arm hole shaped, before you get very high on the arm hole).  On the back piece you will want to add your non-rolling stitches in the middle to start the neck, and start working only the ends (the 2 parts that rest on the shoulders)) to leave an opening for the neck in the back once you are done with an equal number of non-rolling stitches as you did on the front.  My neck was done straight across and wide for a square neck.  (This was my bright idea for a cool design, but it lead to a sweater that falls off the shoulders, so I don’t recommend it!)  The back parts for the shoulder should be the same number of stitches as the front shoulder parts – if you need to fudge this, its better to decrease than increase, do that where the sleeve will meet.  Then once you have gotten your arm holes big enough, you just stitch the top of the shoulders together.  Kitchener stitch will leave you with an almost seamless sweater, or you can just sew them together normally.


caption

Shoulder caps were done on these sleeves, but they weren't necessary because the sleeve seam droops past the shoulder. Trying on your sweater before you start sleeves will help you plan for the right kind of sleeve.

The pullover from the arms up:  Divide the front and back pieces equally for arm holes. You can leave the 2 pieces on the big circular needle, just work each one separately, back and forth. Decrease for arm hole shaping by knitting 2 together repeatedly at the edges where the arm holes are, only on about the last 10 stitches.  (Stop doing that when its arm hole shaped, before you get very high on the arm hole).   When its time for the neck, leave off some stitches in the middle of both the back and the front pieces (how many?  Neck width, hold it up to you and see).  Do this lower in the front than in the back (most tops are higher in the back).  You can run yarn through the neck stitches to hold them, or use stitch dividers and leave them on the needle, or bind them off and pick them up later when you want to do the collar – up to you. The back parts for the shoulder should be the same number of stitches as the front shoulder parts – if you need to fudge this, its better to decrease than increase, do that where the sleeve will meet.  Then once you have gotten your arm holes big enough, you just stitch the top of the shoulders together.  Kitchener stitch will leave you with an almost seamless sweater, or you can just sew them together normally.  After you seam your shoulders, you can pick up your neck stitches to do ribbing or whatever you’d like for your collar.  Then just add sleeves.

Sleeves on both: Just work in a tube on a short circular needle the same size that you used for the sweater, or on double pointed needles.  The cardigan’s were done from the wrist up and attached to the body at the end, starting with 8 rows of garter stitch at the wrist for non rolling.  The neon pullover’s stitches were picked up at the armhole and worked to the wrist, doing a chart pattern at the wrist that mixes knits and purls for non rolling.  The cardigan’s decrease on the way up to the shoulder for a wide flared sleeve, the pullover’s are wider at the shoulder and decrease toward the wrist.

References:

The Aqua Cardigan chart used for the bottom of the sweater and ends of the sleeves: The New Knitting Stitch Library. Lesley Stanfield. Quarto Publishing, 1992. Chart #70, page 47.

The Neon Pullover chart: Ribbing was k2, p2 repeats (no chart). The braid up the middle of the front was The New Knitting Stitch Library. Lesley Stanfield. Quarto Publishing, 1992. Chart #33, page 35 (this chart is for a multiple of 10 stitches, only 10 stitches were used). The checkerboard pattern above the ribbing and at the ends of the sleeves (no chart)  k3 p3, then repeat, always doing knits and purls on top of the same for 3 rows, then for the 4th row doing the 3 knits over 3 purls, and 3 purls over 3 knits (to alternate and make 9 stitch checker squares). On the body, on top of the checkers I did a few straight rows of purl thinking it would help it blend (left those off on the sleeves).

Read Full Post »

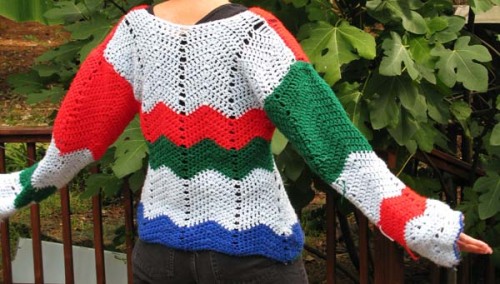
This sweater was also crocheted, again using Red Heart yarn  (its just so inexpensive I found myself with a huge stash – so I made it my business to work through it and get it off the shelf this winter), and a size K hook.

Ocean Waves Crocheted sweater

Ocean Waves Crocheted sweater

This one was going to be a poncho, but after working a flat, rectangular section -which you can now identify as the entire front of the sweater- I realized it would be too thick to hang right as a poncho and would wind up looking stiff and sack-like.  I held it up to myself and realized it could be turned into a sweater that was crocheted longways (each row going back and forth from neck to hips). I had been going across the rows in a wave pattern (see below for chart info), so all I had to do now to make it a sweater was add shorter rows for under the arms (from hips to under-arm) and then make the back exactly the same as the front (a rectangle).  So, this sweater was worked around the body in a sideways direction.  It really is like just making two tiny blankets which are rectangles.  The sides of the rectangle are straight and make a straight row around the hips, and a straight flat neckline.

I left off the light blue rows in the back, otherwise its identical.

I left off the light blue rows in the back, otherwise its identical. (That's my Stella).

Leaving the side straight gives you an almost off the shoulder neck hole, you just join your “blankets” at the very corners on top of the shoulders, and you’ll have a very square vest with armholes.  That’s why after the fact I did some double crochet strips over the tops of the shoulders, because leaving it that way may have let the shoulders slip off.  Not only would that be annoying, but not very warm either.

After the body is made into a vest, just make tubes longways for sleeves.  You can either make them alone and attach them later, or attach as you go (attaching each row to the arm hole as you go).  You will need to do a few rows (preferably under the arm where they’re more hidden) that are shorter to make the sleeve bigger at the shoulder.  In other words, some rows will be started at the shoulder, and only worked partway down the sleeve, then reversed and worked back up to the shoulder.  Most rows, especially those on top of the sleeve,  will go all the way from shoulder to wrist.  Keep wrapping it around your arm and just do what seems logical to make it fit.  To blend your shorter rows, you can taper them at the end by doing shorter and shorter stitches (if you were doing double crochet, do a couple of single crochet, then some loop lifts with no stitch at all, then turn).   If you do a decorative pattern, such as one row of holes every few rows like I did, you will have to try to just make your sleeves where the holes are even numbers of rows apart.  The tapering will make that more challenging, but just put the holes where it looks like holes should go.  This is the intuitive part of intuitive crochet – relax and go with the flow!  My sleeves were made too long and rolled up on the end.

Yarn:  Red Heart, color 0886 Blue. (I lost the tag for the light blue, that is the darker blue).

Waves chart:  The Crochet Stitch Bible.  Betty Barnden.  Quarto Inc. 2004. pg. 184. I left holes in some rows by chaining 1 instead of crocheting every other stitch.

Read Full Post »

Crocheted sweaters are great, they are quick to make (as compared to knitting) and they are thick and quite warm.

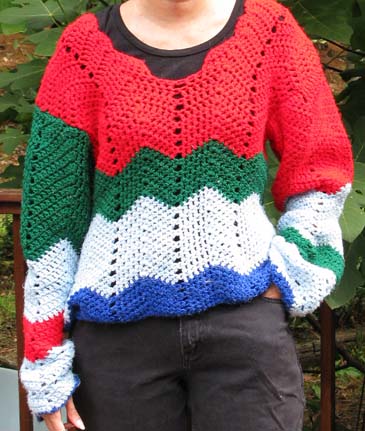
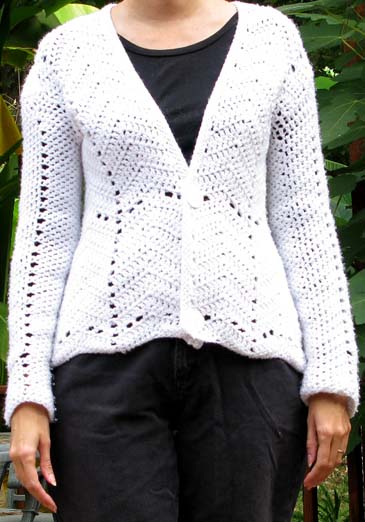
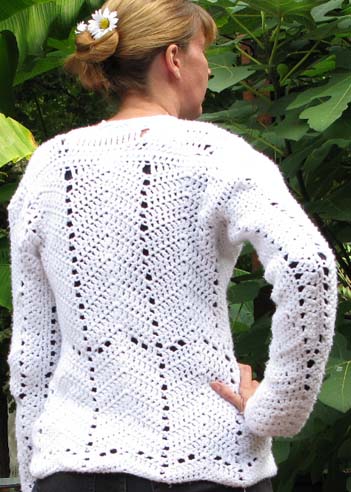
Crocheted pullover

Crocheted pullover

Today I’ll go over doing zig zag stitch and making either a pullover or a cardigan without a pattern.

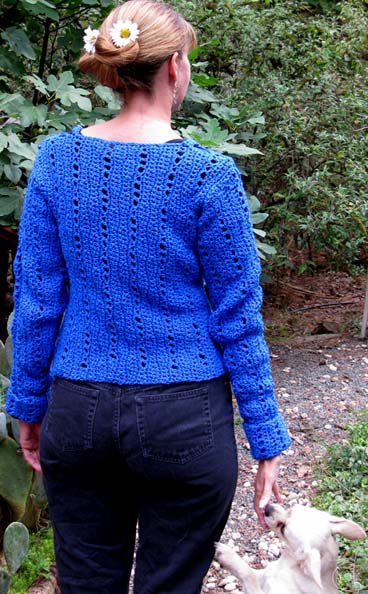
Crocheted cardigan

Crocheted cardigan

How to do the zig zag stitch: I learned this stitch from a cousin, but I’ve also seen a chart for it in The Crochet Stitch Bible (Betty Barnden, 2004 Krause Publications.  Quarto Inc. pg. 71) if its easier for you to do following a chart.  Basically you start at the bottom of the sweater, and chain as long as you need to fit around your hips (or wherever you want the sweater to end).  You will have to count as you chain though, let me explain (and that’s really the most challenging part of the whole sweater).  First lets talk about what you need in chain length.  You need to know that after you’ve made your chain -what you will do is insert the hook into the 3rd chain and make a straight section of double crochet, half the width you want your chevrons to be, (lets say for example 6 double crochet).  So, you will count the first 2 chains as 1 double crochet, then you will do 5 more double crochet (total of 6).  Then you will make your chevron bend down – in the next chain stitch, do 3 double crochet in the same stitch.  Then do 6 more double crochet (each in its own chain stitch).  Then you need to make it bend upwards to start the next chevron, so skip 2 chains, and then do 6 more double crochet, then do 3 dc in the same chain, then 6 more dc (you’ve now made 2 chevrons).   So that’s why the chain is challenging.  You can make it any length you want to fit around your hips, but it has to be a multiple of  6 + 1 (the bend down) + 6 + 2 (the bend up) chains long, plus the 2 chains on the end that you skipped to make your first stitch.  If you want your chevrons to be a little wider and you do sections of 7, it would be a multiple of  7 + 1 + 7 +2 plus 2 on the end.  An easy non-mathy way to do it if you don’t want to bother calculating all that to come out with a perfectly even number of complete chevrons, is just to make your chain as long as you need it to be for around your hips, do a few extra chains, start your first row, and any chain that is left over at the end after you’ve made complete chevrons, just plan to stitch it to the inside of the sweater to hide it when you’re done. Then after you’ve done your first row, the next row just goes on top of it.  The 3 you stitch in one place to make it bend down always gets put into the middle stitch of the 3 in 1 below it.  Likewise, your 2 chains that make the bend upwards go on top of the 2 chains you skipped in the row below.  So you just have to make sure if you wanted lengths of 6, that you can fit 6 in and have the 3 in 1 and the skipped 2 always wind up at the right place. Your rows will jog because when you do 3 in 1, a double crochet in the next row goes in the 2 side ones of the 3 in 1.  Once you’ve done a couple of rows it becomes very easy and obvious to you where to put your hook.  Use a hook 2 sizes bigger to do your chain or the chain will pull tight (you can see that in my photos, my edges curl under instead of being nice scalloped edges.  That’s because my chain was done with the same hook and pulls too tight).

If you want a pullover, after you stitch your chain and figure out the right number of chain holes you’ll need, attach it to itself and crochet in a circle.  If you want a cardigan, go back and forth so there is an opening in the front. So, you’ve started at the hips and you’re just working upward in both cases.

If you want to decrease a little to shape the waist line, you can decrease by reducing the number of dc in a straight section (do equal decreasing on both sides of the 3 in 1 to keep it even).  For example if your doing straight sections of 6, make one chevron 5s and keep the rest 6s (Just skip a chain within the middle of the straight section so that it will disappear from the next row). Its good to do this on the sides above the hips to keep the front and back of the sweater even.  You can see on the photo below that decreases were done in the same way under the arm to decrease the sleeve size. Increases can be done the same way, by adding another dc within the middle of the straight section (doing 2 stitches in one chain to add that next spot for a new dc in the next row).

To make the row of holes that goes across, just skip double crochets in an even pattern (chain 1 instead of 1 dc so you keep your numbers correct).  This is how I made button holes in the sweater below, 2 buttons were sewn on across from the holey rows.

The decreases are hidden under the arms, not in the back where all chevrons are kept the same width so the holes line up straight.

The decreases are hidden under the arms, not in the back where all chevrons are kept the same width so the holes line up straight.

Whether making a pullover or cardigan, you just work upward from the waist, increasing or decreasing if you choose to shape it to match your shape, or just working straight.  Armholes: When you get to a spot an inch or two below your armpits, decrease around the spot your arm would go to make an arm shaped hole (you’ll put the sleeves on later).  Then you will now work the front and back separately.  Just stick with your chevrons and keep going up, you can hold it up to yourself to see exactly how wide the front and back parts have to be, and you can decrease to make them that size.  Around the arm holes, you can just leave stitches off the ends instead of decreasing in the middle of straight sections.  Wherever you envision the seam to be for your sleeve to start, that’s where you want your rows to end.

Cardigan neckline: After you’ve gone a little past halfway up the arm holes, you can see that I did a straight row across the back of mine.  This was just so I didn’t have to figure out how to do chevrons around the neck hole and I could just do straight rows of double crochet for around the neck, leaving holes (skipped chains) in the same line with the holes below.  Once you get to where your arm holes are big enough and you’ve shaped a neck hole by leaving off stitches on the top of the middle of the back piece, just stitch the back and front pieces together.  You now have a cardigan that looks like a vest and you’re ready for sleeves.

Pullover neckline: After you get halfway up the armholes, you may want to start the hole for the neck on the front.  To make my pullover neckline, I left off stitches in the middle and started going back and forth on 2 shoulder pieces, leaving off stitches from the ends, the same number on both sides to make the scalloped look and keep it even.  The back piece is just worked straight up, only descreasing on the ends at the armholes, and a hole is left in the middle of the back (higher than the front) by stopping and going back and forth the same way, keeping an even number of stitches for the shoulders.  Then the shoulders are stitched together at the top once the neck hole  and the arm holes are big enough.  You now have a vest type sweater and you’re ready for sleeves.

Sleeves: In both cases, just tie on your yarn under the armpit and double crochet in a chevron pattern, picking up stitches from around the armhole (you use the sides of those stitches as the base for your first row of sleeve).  If your shoulder pieces droop off of your shoulders like mine, you don’t need to do extra rows on top of the shoulder for a shoulder cap, you can just work pretty much straight.  I did a slight shoulder cap on my white sweater, but it kind of sticks out, so it probably would have been better if I hadn’t.  The worst that can happen if you don’t shoulder cap is that you get a bunch up under your arm.  Try it on, make sure you like the size, and check for needing capping or bunching, and write down what you do so you can repeat it for the second arm.  (Or, you can do both arms at once, do a few rows on one arm, then do a few rows on the other, working from both ends of your skein to make that 2nd sleeve easier).  You can decrease to slim your sleeves as you go like I described above in the decreasing section. I made my sleeves too long, because I hate too short sleeves as I’m a relatively long armed person. If you try on as you go you will get perfect sleeve length.

The bottom is folded under, but the chevrons make a nice scalloped edge on the bottom and around the neckline.

The bottom is folded under, but the chevrons make a nice scalloped edge on the bottom and around the neckline. The under folding happened because my chain was a bit too tight. Doing your chain with a hook 2 sizes bigger than the one you'll use for the rows will fix this.

Finishing both:  Once you’re done with the pullover sleeves, your finished.  For the cardigan, I made a fancier edge on the front, and sewed on the buttons across from the open hole rows.  You don’t need to do this, you can just leave it, but here’s what I did.  I used a huge knitting needle (size 10 if I remember right) inserted into the stitches on the edge.  First I did one half of this edge, then I did the second half.  So, first I inserted the needle under a piece of yarn in each stitch from the middle of the back of the neck down the edge to the bottom of the front.  If you knit, you have a pretty good idea how far apart the stitches are supposed to be on the needle, that’s how far apart you should pick up a piece of yarn on these stitches so it comes out even.  Then I did garter stitch (knit every row, back and forth) for a few rows (5 or 6).  Then I did the same on the other half, from the middle of the back of the neck down the front on the other side and stitched the 2 pieces together in the middle of the back.  If you want a fancier edge but don’t want to knit, you can just tie your yarn on at the bottom edge and pull up loops with the crochet hook (like making chain stitch) in an even row around the whole edge, angled toward the front for a finished look.

The yarn for both of these sweaters is Red Heart.

Read Full Post »

Card Weaving

I got the urge to start a new purse, this one with fair isle type color strands.  With the cool weather arriving, I saw some lovely fall colors on some yarn and had to pick some up!  I absolutely hate doing I-cord to make straps, not sure why, maybe because the needles I wind up using are long ones, so its cumbersome to keep swinging them around back and forth.  I’ve even tried using a sock loom for it, you just do knit stitch on 3 pegs back and forth, and that’s quicker, but I still find it takes annoyingly long, so I thought this time I’d do the strap with card weaving.   Does card weaving save time?  I’m not so sure, it does take a good bit of time to set up your weaving, but instead of doing the same thing over and over, it feels more divided up, so that makes it more interesting (at least to me).

How do you card weave?  You don’t need anything you probably don’t already have, so its free!  You need cardboard, (regular probably works better than corrugated, less shreddy), scissors, yarn of different colors, a rubber band, a belt you can wear to hold your weaving, and a large pin.

Setting up card weaving

Setting up card weaving

To do a purse strap, you need to cut all your pieces of yarn the same length, with maybe a foot extra yarn on each end past the length you want the strap to be.  Don’t start cutting yarn yet though!  Each of your cards should be about 4 inches square.  Give each card a number, 1,2,3 etc, and four holes should be punched in each card, a hole for each corner, each hole labeled with one letter, A, B, C, and D.  The card’s number can be written between the A and the D, this is the top of the card.  (You can vary card number, and shape and hole number later for different effects).  I did mine with 10 cards, and this with Red Heart yarn made a strap 1 and 1/2 inches wide.  This is a little wider than I wanted for a purse, but I will still use it, so you may want to use less cards if you want a thinner one.

Now to make your design (or find one on the web) which you need to do before you start cutting your yarn to know what to cut.  How to read your chart: Picture graph paper.  You’ve got a grid with squares, and you’ve got A, B, C and D down the left side, and numbers 1,2,3 etc. along the bottom of your graph.  The letters represent each hole in a card, and the numbers each represent one card.  So, each square inside this grid  is one strand of yarn, and the grid tells you where to thread it.   You can draw a design in this grid, say you want to use 3 colors of yarn.  You can draw a design using those 3 colors in your grid graph, making a picture – stripes, a triangle, whatever.  (Each square in your grid can only be one color.)  So to know how to thread your cards, look at your graph.  A1 is hole A in card number 1.  What color is it in your design?  That’s what color yarn you put in that hole on your card.

You can get different effects based on whether you thread them back to front, or front to back, or mixed.  I’d just do them all the same way the first time.  An easy way to cut all of your yarn the same length is to wrap it around upside down chair legs of two chairs set on a table.  I rubber band pencils to the legs to hold the yarn up as I wrap it.  That way you just wrap and cut the number of strands you need without measuring them all out.
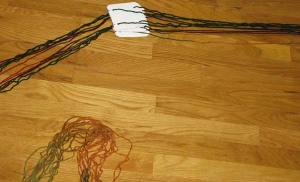
As I'm threading the cards, I set them aside

As I'm threading the cards, I set them aside, in numerical order, with all the lettered sides facing up.

You can see in the first picture up top that I used dark green, brown and a color changing yarn as my 3 colors.  I wanted to see what it would look like if I cut my color changing yarn so that all the colors were together so it would change color gradually in my design, instead of being a mixed up jumble of color it would be if I’d used the color changing one randomly.

After threading all the cards, all you do is tie one big knot on one end and attach the knot to a doorknob on a door you can close and sit across from.  (Remember that your cards should all face left as you’re looking down at them, so if your weaving is oriented like mine in the photo above, tie the big knot in the end of the yarn that’s on the right and tie that to the doorknob). After attaching, comb your yarns straight using your cards (pull them down, but don’t let them fall off), and once you’ve got all your yarn pulled equally tight, tie a big knot in the other end.  This knot you can flip under your belt and pin it to itself to attach.  You are now attached to the weaving and the weaving is tied to the door.  I hope you weren’t planning on getting up to do anything!  Seriously, if you do want to get up, just put a rubber band around the cards so they stay in the same position when you let it go, then unpin it from your belt.  (If you have a dog or cat, take it off the doorknob and stick it in a drawer.  Your knots will keep all of your yarn in place, so don’t undo your knots.)
If you have one of these, these things are trouble

If you have one of these, don't leave card weaving hanging on a doorknob unattended. You can hear it now, "The card weaving did that all by itself! I swear!"

Now, all you need is a “weft” yarn (make a ball of one color and this ball is what you pass through the weaving to weave it).  The thing that makes your cardboard and yarn weave is turning the cards, all at once, then passing the weft yarn through the space that opens in each turn between the cards and your belt (called the “shed”).  Your weaving will appear at your belt, and you can keep moving it around your belt and repinning to advance, and moving your chair closer to the door.   You turn all of the cards at the same time, and keep all of the letters lined up.  (That’s another thing you can vary later for more intricate effects, turning different cards different ways, but lets just do it all at once the first time).  If you’re turning towards you, the letter on top closest to you is the letter you’re on in your chart.  If you’re turning the cards away from you, the letter on top that is furthest from you is the letter you’re on in your chart. You can turn them A, B, C, D, or you can turn them backwards, D, C, B, A, or vary it to see what you get.  If you always turn the same direction, your threads near your back knot will twist and you’ll have to untie it to straighten them once in awhile.  If you always turn as many times forward as backward, such as going D C B A , then going A B C D, then repeat, you will avoid that.

I used a chart in a card weaving book to make fish on my purse strap:
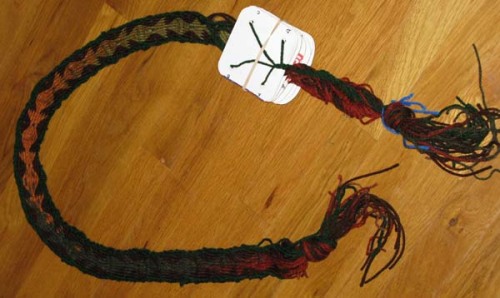
Purse strap after card weaving

Purse strap after card weaving

I’ve made my strap longer than I want it to be, that way I can cut it and keep only the colors I want and cut off any parts with mistakes.  The beginning usually looks less good than the middle and end.

Chart used to make fish pattern from: Card Weaving by Candace Crockett (Interweave Press LLC, Loveland Colorado, 1991. pg. 53.)   Yarn is Red Heart:  Coffee, Hunter Green, and Fall.

Read Full Post »