I got the urge to start a new purse, this one with fair isle type color strands. With the cool weather arriving, I saw some lovely fall colors on some yarn and had to pick some up! I absolutely hate doing I-cord to make straps, not sure why, maybe because the needles I wind up using are long ones, so its cumbersome to keep swinging them around back and forth. I’ve even tried using a sock loom for it, you just do knit stitch on 3 pegs back and forth, and that’s quicker, but I still find it takes annoyingly long, so I thought this time I’d do the strap with card weaving. Does card weaving save time? I’m not so sure, it does take a good bit of time to set up your weaving, but instead of doing the same thing over and over, it feels more divided up, so that makes it more interesting (at least to me).
How do you card weave? You don’t need anything you probably don’t already have, so its free! You need cardboard, (regular probably works better than corrugated, less shreddy), scissors, yarn of different colors, a rubber band, a belt you can wear to hold your weaving, and a large pin.

Setting up card weaving
To do a purse strap, you need to cut all your pieces of yarn the same length, with maybe a foot extra yarn on each end past the length you want the strap to be. Don’t start cutting yarn yet though! Each of your cards should be about 4 inches square. Give each card a number, 1,2,3 etc, and four holes should be punched in each card, a hole for each corner, each hole labeled with one letter, A, B, C, and D. The card’s number can be written between the A and the D, this is the top of the card. (You can vary card number, and shape and hole number later for different effects). I did mine with 10 cards, and this with Red Heart yarn made a strap 1 and 1/2 inches wide. This is a little wider than I wanted for a purse, but I will still use it, so you may want to use less cards if you want a thinner one.
Now to make your design (or find one on the web) which you need to do before you start cutting your yarn to know what to cut. How to read your chart: Picture graph paper. You’ve got a grid with squares, and you’ve got A, B, C and D down the left side, and numbers 1,2,3 etc. along the bottom of your graph. The letters represent each hole in a card, and the numbers each represent one card. So, each square inside this grid is one strand of yarn, and the grid tells you where to thread it. You can draw a design in this grid, say you want to use 3 colors of yarn. You can draw a design using those 3 colors in your grid graph, making a picture – stripes, a triangle, whatever. (Each square in your grid can only be one color.) So to know how to thread your cards, look at your graph. A1 is hole A in card number 1. What color is it in your design? That’s what color yarn you put in that hole on your card.
You can get different effects based on whether you thread them back to front, or front to back, or mixed. I’d just do them all the same way the first time. An easy way to cut all of your yarn the same length is to wrap it around upside down chair legs of two chairs set on a table. I rubber band pencils to the legs to hold the yarn up as I wrap it. That way you just wrap and cut the number of strands you need without measuring them all out.

As I'm threading the cards, I set them aside, in numerical order, with all the lettered sides facing up.
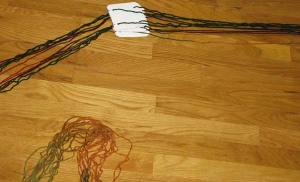
You can see in the first picture up top that I used dark green, brown and a color changing yarn as my 3 colors. I wanted to see what it would look like if I cut my color changing yarn so that all the colors were together so it would change color gradually in my design, instead of being a mixed up jumble of color it would be if I’d used the color changing one randomly.
After threading all the cards, all you do is tie one big knot on one end and attach the knot to a doorknob on a door you can close and sit across from. (Remember that your cards should all face left as you’re looking down at them, so if your weaving is oriented like mine in the photo above, tie the big knot in the end of the yarn that’s on the right and tie that to the doorknob). After attaching, comb your yarns straight using your cards (pull them down, but don’t let them fall off), and once you’ve got all your yarn pulled equally tight, tie a big knot in the other end. This knot you can flip under your belt and pin it to itself to attach. You are now attached to the weaving and the weaving is tied to the door. I hope you weren’t planning on getting up to do anything! Seriously, if you do want to get up, just put a rubber band around the cards so they stay in the same position when you let it go, then unpin it from your belt. (If you have a dog or cat, take it off the doorknob and stick it in a drawer. Your knots will keep all of your yarn in place, so don’t undo your knots.)

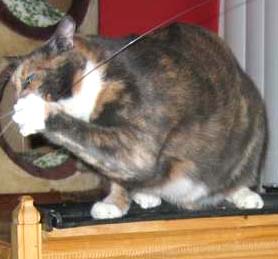
If you have one of these, don't leave card weaving hanging on a doorknob unattended. You can hear it now, "The card weaving did that all by itself! I swear!"
Now, all you need is a “weft” yarn (make a ball of one color and this ball is what you pass through the weaving to weave it). The thing that makes your cardboard and yarn weave is turning the cards, all at once, then passing the weft yarn through the space that opens in each turn between the cards and your belt (called the “shed”). Your weaving will appear at your belt, and you can keep moving it around your belt and repinning to advance, and moving your chair closer to the door. You turn all of the cards at the same time, and keep all of the letters lined up. (That’s another thing you can vary later for more intricate effects, turning different cards different ways, but lets just do it all at once the first time). If you’re turning towards you, the letter on top closest to you is the letter you’re on in your chart. If you’re turning the cards away from you, the letter on top that is furthest from you is the letter you’re on in your chart. You can turn them A, B, C, D, or you can turn them backwards, D, C, B, A, or vary it to see what you get. If you always turn the same direction, your threads near your back knot will twist and you’ll have to untie it to straighten them once in awhile. If you always turn as many times forward as backward, such as going D C B A , then going A B C D, then repeat, you will avoid that.
I used a chart in a card weaving book to make fish on my purse strap:

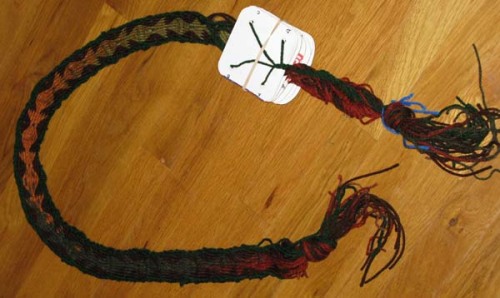
Purse strap after card weaving
I’ve made my strap longer than I want it to be, that way I can cut it and keep only the colors I want and cut off any parts with mistakes. The beginning usually looks less good than the middle and end.
Chart used to make fish pattern from: Card Weaving by Candace Crockett (Interweave Press LLC, Loveland Colorado, 1991. pg. 53.) Yarn is Red Heart: Coffee, Hunter Green, and Fall.