Feeds:
Posts
Comments

Posts Tagged ‘pullover’

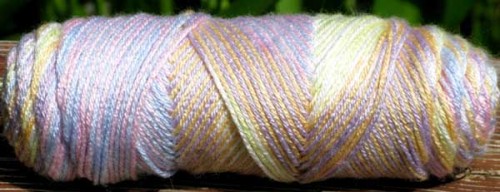
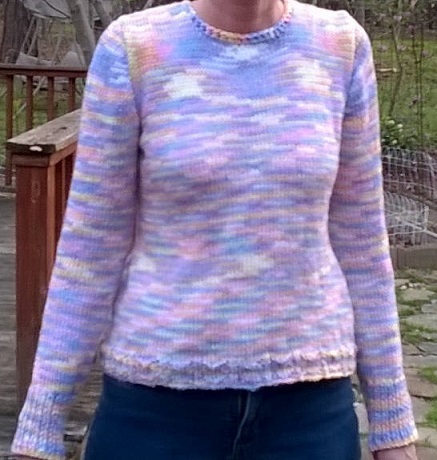
There are some BEAUtiful pastel yarns in the baby color section.  I made this sweater using Caron Simply Soft in Baby Brights Ombre.  I’ve used this color before on an entrelac scarf and people always compliment it.

The color pattern varied with how many stitches I used per row, but seemed to mostly want to make stripes.

babybrightsSweaterKnitting2

My mistake:  I learned something doing this.  It came out a bit short.  Not so short I can’t wear it, but shorter than it was when I held it up to myself and decided it was the right length from the hip to start the armholes.  This is why you see a bulge at the waist, that was supposed to be a bulge for the hip.  (It’s a little weirdly lumpy, but I’ll still wear it.)  What went wrong was that I overestimated how big I’d make the armholes, and made them pretty tight.  I shot for an 8″ armhole, (measured flat on one side from middle of the armpit to over the shoulder), and this turned out to fit, but it was small and effected the sweater length.  From now on I will not do armholes as small as that.

babybrightsSweaterKnitting

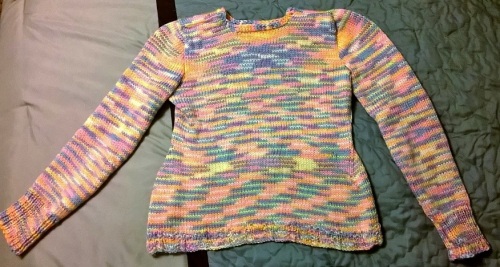
This picture is probably closer to representing the colors on this yarn.  Every pastel color of the rainbow except green.

How it was made:

I calculated my needed gauge for hips, waist and bust.  I’ve used this yarn before so I already had my # of stitches per inch.  I cast on in the round at the hip and worked upwards in a tube, increasing or decreasing as needed to reach my numbers.  I tried a knit/purl texture chart for the bottom edge, but didn’t wind up liking it.  The variation in color pretty much hid the textured pattern so you can’t even really see what it is, and it looks a bit messy.  Ribbing /garter /or seed stitch would have done the trick to prevent curling and probably looked nicer.

I divided front and back for the armholes and continued working upward (first the back piece then the front piece).  I bound off the correct # of stitches for the neck in the back and made it shallow, (just a couple of rows from the tops of the shoulders), and kept an equal # of stitches over each shoulder.  Write down how many so you don’t have figure out what that number was when you make the front to make the front shoulder stitch number equal the back number.  The front neck hole I bound off the same way, but made it a little deeper.  Then I did double crochet around the neck hole to make it look nice.  I did a pretty small opening to have the sweater up around the neck so it would be warm … and I almost messed this up!  I can fit my head through this neck hole, but just barely!  Make sure you don’t make your neck hole too small to fit your head through, or you can’t wear your sweater.

Sleeves with a shoulder cap:  I did something different this time.  I copied a pattern, but in the reverse direction.  I used the sleeve pattern of a sweater I made by calculating their number of inches they used for each part of the sleeve, then calculating my needed number of stitches to achieve this, then doing it all in reverse of the direction of the pattern, which was made from wrist to shoulder, (I do like to make things difficult, don’t I).  I did have a reason – I like to make mine from shoulder to wrist, because I can attach the sleeve after I’ve made a few inches of it, then accurately get a reading on length when I put on the sweater.

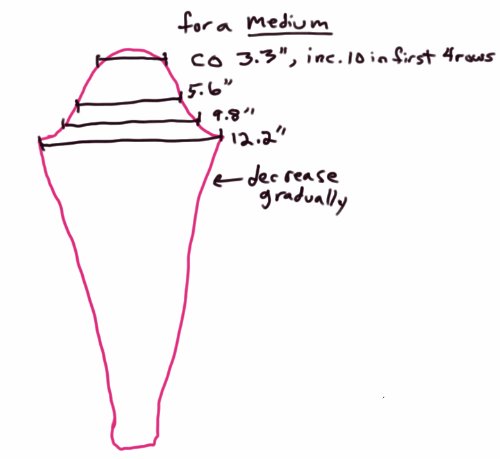
The shoulder cap part was about 6 and 3/4 inches high (from cast on to the widest part of the sleeve), and the widths had to be calculated with my gauge to come out like this.  Increase or decrease on both ends equally to make it come out a symmetrical piece.  To get the width in inches for the lower part of the sleeve, measure your arm around the elbow and around the wrist, (add room to the measuring tape for a less tight sleeve).

This is for a tightly fitted sleeve in size medium, not at all baggy.  SleeveKnittingSketchilovesocks

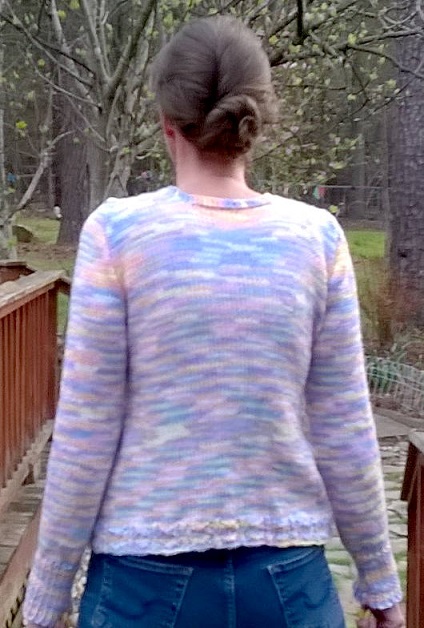
I see by this photo I did pretty thick seams over the shoulders.  I grabbed 2 strands of yarn from both pieces, the shoulder and the sleeve, making a 4 strand thick seam, (plus more for seaming yarn).  I probably could have grabbed only 1 piece of yarn from each piece to make it look better, but I like things bolted down and secure, so there it is.

babybrightsSweaterKnittingBack

Caron Simply Soft, Baby Brights Ombre.  Needles: size 8.  Gauge: 4.5 stitches =1 inch


Read Full Post »

For the past couple of years, whenever I passed through a clothing store when the long sleeved goods were out, (which was almost never, I seldom shop), I looked for a bright yellow… anything for winter.  I never once found it.   Popular winter attire is largely made up of fairly dull colors, which do nothing for me!  So since I couldn’t find it, I made it.

Since I had done so many sweaters before using Red Heart yarn and size 7 needles, I knew exactly how many stitches to cast on for the waist band.  If you think you might make a lot of no-pattern sweaters, and you plan to use the same yarn and needle size, you may as well just knit yourself a nice long swatch or a waist band so you can use it to measure you, then write down your number of stitches so you can always just cast on and go.   To risk sounding like an ad, I use Red Heart because its not only the cheapest, it doesn’t shrink or felt in the wash like real wool.  I have found that real wool and nice little balls of fancy yarn are wonderful to knit with, and make a really nice garment, but if you forget and throw it in the wash once, its over.  Not only that, but it may take 6 or 8 balls of nice yarn to make a sweater, and at the usual price for fancier yarns, this can run you up to $80 bucks quick.  That’s just too much for me to want to spend on a sweater, especially if I have to make it myself!  This yellow sweater took me 2 skeins of Red Heart super saver.  I forget if that was $2.50 a skein or $4, but it was somewhere in there, for a very cheap sweater.
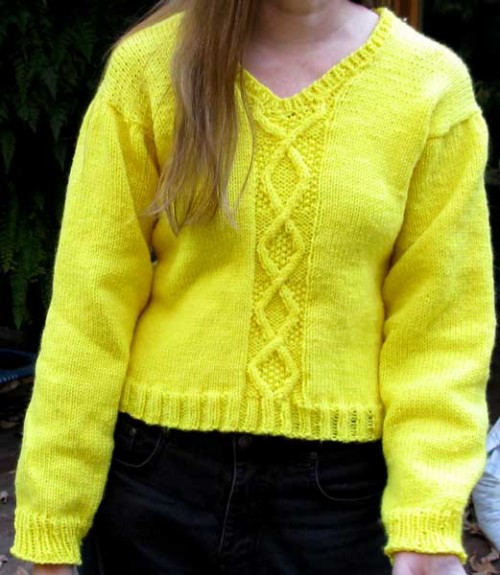
Here I am in this slouched position again.  That’s because I’m always bending to pet a dog.

How to make it:

I used a 40″ circular for the cast on, size 7 for the whole sweater except the neck ribbing (which I used size 5 for).  I cast on 160 (for my size), using knit 2 purl 2 ribbing.  Always use an even number for cast on if you want to do 1:1 ribbing, and a number divisible by 4 for k2, p2 ribbing.  That way you will end with p2 if you started with k2, and you won’t have a seam. (160 divided by 4= 40, so I know I have a whole number of repeats, no decimals (leftover stitches)).

For those who have never cabled:  A discussion on how to do pattern-free cables:  After I ribbed for as long as I wanted, I just went upward in a tube in stockinette to make the body.  I added a cable for interest up the middle, so in the first row after the ribbing, I used 2 markers to separate out 12 stitches where the cable area would be, and started working the cable stitches on that first row.  I decided to use a cable of 2 stitches on each branch and that I would separate, then cross them over each other in a twist, and alternate purl stitches and seed stitches on the background.  (You can see that in the photo, the inside of the bottom cable has seed stitch, and the background has purl, and this alternates for the cable above it, etc.)  So for this first row, I just set aside the 4 stitches in the middle of the section between the markers to be in stockinette and make the cable, and did all other stitches in the background (purl).  If  you want to vary your cable thickness, again just be sure to use an even number of stitches between your markers so that it won’t end up closer to one edge of the cable area than the other. (Drawing it out on graph paper can help you design a cable visually.)

I moved my cable stitches over using 2 cable stitches and 2 background stitches, and only on every other row.  If you use only 1 background stitch to move the cable with, your cable will move left or right with a less extreme angle. So, this is something you can vary.  When I worked on my sweater, I always made sure to do a non-moving row last before putting the sweater away, so that when I picked it up to work the next time, I’d know the first row would be a cable moving row. This kept me from messing it up.  You may notice that my cables don’t look all exactly the same, that is because the stitch you use for background effects the way the cable looks too.

How do you know what to do on a cable without written instructions or a chart?  Cabling follows logic, so after you do it enough, it will just become obvious what needs to happen next to make it move in any direction.  If you’re just starting learning cables:

To make your cable stitches go to the left: When you get to the cable stitches, put your two cable (stockinette) stitches on the cable needle and let it hang to the front, work the next 2 stitches in whatever background stitch you’re using, then knit the 2 cable stitches from the cable needle.

To make your cable stitches go to the right: Put the 2 (or whatever number you want) stitches located before the stockinette cable stitches on the cable needle and let those hang to the back, knit the stockinette cable stitches, then do the stitches from the cable needle in the background stitch.

Then, much like the other pullovers I’ve made before, just work upward until you get to the arm holes.  Armholes:  You know how many stitches you’ve got, divide your body stitches in half equally and separate these 2 halves at the sides where you want arms to be (either using markers, or setting half aside on another needle or piece of yarn).  These will now be front and back pieces.  Make sure your cable is exactly in the middle of the front piece (same number of stitches on each side of the cable on the front piece).   As you continue working in stockinette, (and continue the cable pattern on the front piece), decrease at the arm holes (knit 2 together a couple of times on the first row, then a couple more times on the next row until the arm hole is the shape you want.)  Add a neck hole once you get as high as you want it to be.  Knit a couple of stitches together in the middle of the front piece and start working in 2 pieces side to side.  Decrease by knitting 2 together as you wish at the neck edges for the neck shape, just always do the same thing on both sides.  For the back I did my neck hole straight across, so just bound off those stitches, leaving the same number of stitches to keep working for over each shoulder.  Remember to make it the same number of stitches on the front piece shoulders as the back piece shoulders so that they match when you seam them together.  You can kitchener stitch over the shoulders if you don’t want there to be a seam, (which was what I did). I continued my cable pattern into the neck hole in the front, until my decreases had me run out of cable area stitches. K1 p1 neck hole ribbing was added last – after seaming the shoulders together, stitches were picked up around the neck for the ribbing using a size 5 needle (this was the only place on the sweater I used the smaller needles).  I decreased during the ribbing only once, on the first row of the ribbing to help it lay flat against the body, (I knit 2 together in the center of the front above the middle of the cable.)  Again, if you have an even number of stitches after that point, no seam.

Arms:  Stitches were picked up, then worked in stockinette for arms (I picked up 74, this may vary for whatever size armhole you make, but this made a fairly loose arm).  I marked where the underarm was and gradually decreased along the arm always above that marked spot, mostly once I was past the elbow, until I got to 48 right before the 1:1 ribbing.  (Read on before doing…this was probably a mistake).  I found this still made a big wrist hole, so I decreased 8 more stitches within the wrist ribbing (always doing 2 or 4 decreases at once to keep the ribbing pattern and always where it would be located under the wrist and more hidden.  It ain’t pretty though, so you may want to get any decreasing in before starting the ribbing.

UPDATE – FIXING STUFF I CHANGED MY MIND ABOUT LATER

You CAN change your mind later!   After wearing this for awhile, I decided this sweater was too short for the bulkiness of the sleeves, so I made it longer.  I didn’t feel like pulling all the ribbing out, so I made it part of the design:
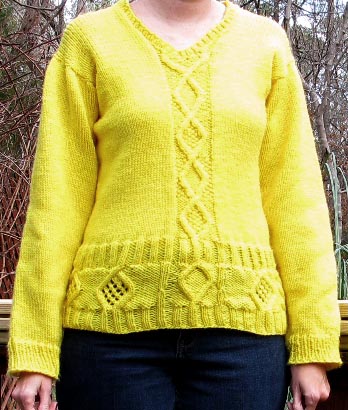
KnittingYellowSweaterUpgradedFrontThe trick to making that work is using the same yarn, the same size needles,  and making sure you pick up exactly the same number of stitches you had before.  If you add too many or too few, your sweater will buckle out or be pulled in and it will look like more of an add- on.  It was easy to tell how many stitches I had, both because I keep notes when I make a sweater, and because my bottom ribbing was knit 2 purl 2, so it was really easy to see what needed to be picked up where.

This was the cast on edge originally, as the sweater was worked from the hips upward.  I picked up stitches on the outside, picking up the bar going across the front, that way what was knitted from there on would look like it was connected with no dividing line.  Picking up stitches this way is easier if you pick up a loop, then knit or purl that stitch, then pick up the next and knit or purl that one, etc.  It keeps the picked up loops from being very tight on the needles, (which would make doing the whole first row very hard).
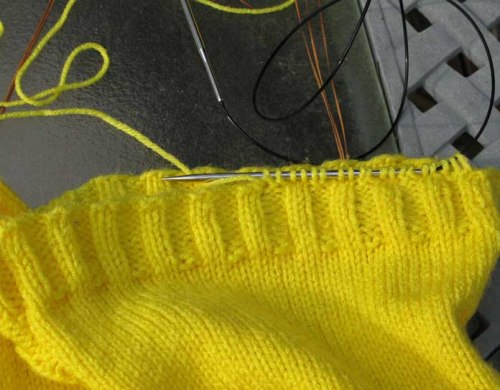
KnittingYellowSweaterPickUP

I also chose a pattern that matched the rest of the sweater, which helps to keep it from looking like as much of an add-on.  The center cable is done the same way as the rest of the cables up the front were, and the others on the bottom are all alike, and similar to it.  Then a new bottom ribbing edge was done, identical to the first.
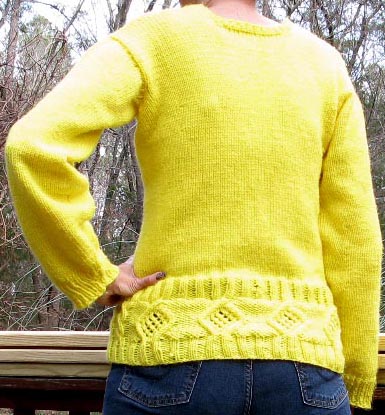
KnittingYellowSweaterUpgraded

Yarn:  Red Heart, regular old bright-as-can-be-yellow (for which I lost the label)

Cables:  The cables and design up the front of this sweater was random and made up, as well as the middle-front cable on the bottom.  The other cable design around the hips was a chart from:  The New Knitting Stitch Library. Lesley Stanfield. Quarto Publishing, 1992. Chart # 175, page 113.


Read Full Post »
Knitted sweaters can be done almost the same as crocheted sweaters.   The trickier part with knitting is getting the size to fit you right.  If a person is not careful when working pattern free, this can mean starting over three times or more once you get going and realize you’ve casted on too many or too little.


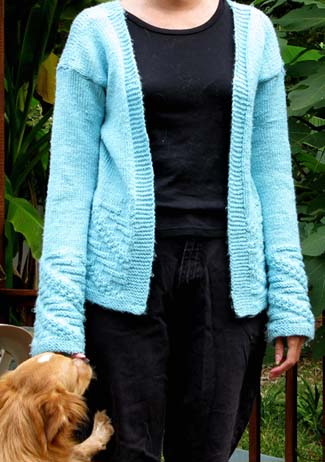
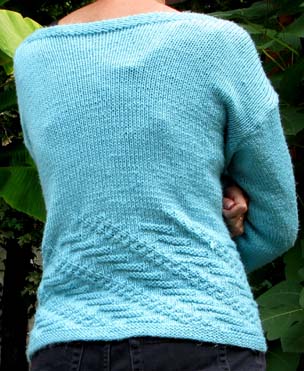
Aqua cardigan (and the back of Cody's head, which it appears you'll be seeing a lot more of!)

Aqua cardigan (and the back of Cody's head, which it appears you'll be seeing a lot more of!)

How do you avoid that?  Since you don’t start with a chain you just wrap around yourself like with crochet, its a good idea to make a permanent swatch (a swatch you can reuse extensively).  If you want to start at the bottom of a sweater and knit up, use the same yarn and same size needle you want for your sweater and make a swatch long enough to wrap around your hips -or longer, and, say, 2 inches high at least.  You can keep this band and use it for measuring everything you will make in the future with this same yarn and that same needle, so its a great thing to have.  You can wrap it around your fingers to know finger sizes for gloves, your head to know hat sizes – everything!  Attach a piece of paper to it saying what s needle you used and what yarn so you’ll never forget, and keep it for reference.  (This is one reason I use so much Red Heart yarn.  Its all the same size so I never need to reswatch, I just use an old count on the same needle and cast on).  Once that’s made, all you have to do is wrap it around your hips, hold it at the spot where it meets (or a little looser than that spot if you want a baggier sweater) then take it off and count the rows.  That’s how many to cast on.

If you absolutely do not want to swatch, even once, (maybe your yarn was really pricey and there’s not that much of it in the skein for example), you can just go for it.  I warn you that you may need to start over more than once, (or make a fold over and hide it as a twisted cable like I was squawking about in my Magic and Lollypops post on the tanktop that wound up too big). Once you make your first sweater, you can just use that as your swatch in the future, wrapping it around yourself however you need to measure and count when you plan to use the same yarn and needles.  Okay, are you still with me?  That was really the most tricky part, the rest is easy!

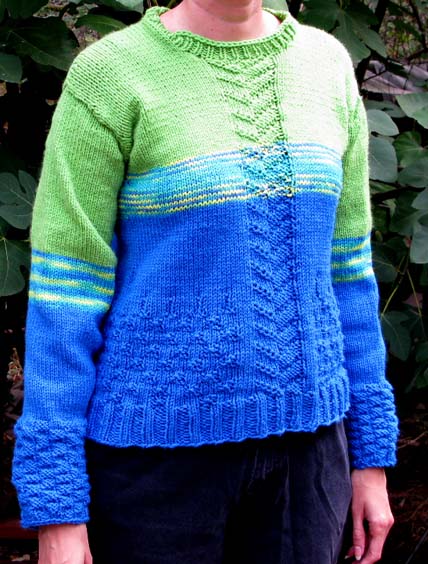
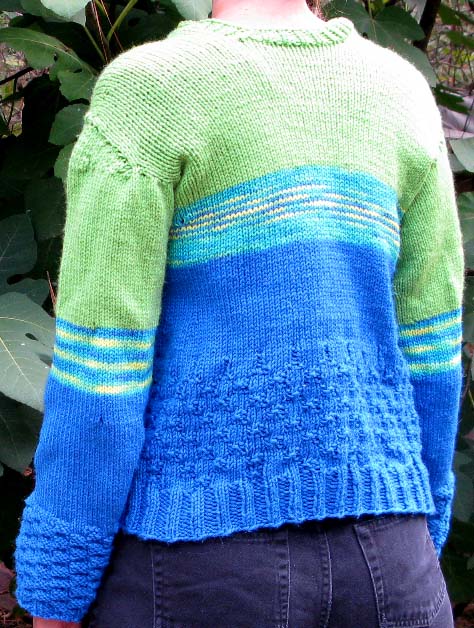
KnittingNeonSweater1

Woops, my collar was folded under - the collar is actually there, not missing like it appears!

If you want to make a cardigan like the aqua one, I used a circular needle for this, it will help later, but didn’t join the circle, just left an opening for the front.  There are 8 garter stitches on each side of that opening, and on the bottom to keep it from rolling. (Garter is great for that, also seed stitch.  Seed stitch won’t pull tight like garter sometimes does).  Then a chart was followed to make the pattern as I worked up from the hips (see chart ref. below).   Then you just keep going until you get to where you want your arm holes to start.

For the pullover, you just connect the circle on your 40 inch circular needle and go up n a tube.  Mine was done with k2 p2 ribbing for the bottom few inches (I did not use a needle 2 sizes smaller for that, that’s why my ribbing doesn’t look tight), then a chart was followed for the design (see chart ref. below).  You just go up straight, and you can add increases or decreases (put them where they’ll hide in the area under the arm) for your curves if so desired.

My shoulder pieces were left very wide so shoulder caps were not necessary and the sleeves could just be made in tubes.

My shoulder pieces were left very wide so shoulder caps were not necessary and the sleeves could just be made in tubes.

Cardigan – from the arm holes up: This is where the circular needle helps, you get a better idea of where to put the armholes by holding it around yourself.  Make sure to set aside an equal number of rows for the two front pieces (use dividers – little loops of yarn or stitch markers), and go back and forth on the pieces to leave the arm hole opening.  You can decrease for under the arm to make it arm hole shaped by knitting 2 together a few times only on the 10 or so stitches on the end under the arm (stop doing that when its arm hole shaped, before you get very high on the arm hole).  On the back piece you will want to add your non-rolling stitches in the middle to start the neck, and start working only the ends (the 2 parts that rest on the shoulders)) to leave an opening for the neck in the back once you are done with an equal number of non-rolling stitches as you did on the front.  My neck was done straight across and wide for a square neck.  (This was my bright idea for a cool design, but it lead to a sweater that falls off the shoulders, so I don’t recommend it!)  The back parts for the shoulder should be the same number of stitches as the front shoulder parts – if you need to fudge this, its better to decrease than increase, do that where the sleeve will meet.  Then once you have gotten your arm holes big enough, you just stitch the top of the shoulders together.  Kitchener stitch will leave you with an almost seamless sweater, or you can just sew them together normally.


caption

Shoulder caps were done on these sleeves, but they weren't necessary because the sleeve seam droops past the shoulder. Trying on your sweater before you start sleeves will help you plan for the right kind of sleeve.

The pullover from the arms up:  Divide the front and back pieces equally for arm holes. You can leave the 2 pieces on the big circular needle, just work each one separately, back and forth. Decrease for arm hole shaping by knitting 2 together repeatedly at the edges where the arm holes are, only on about the last 10 stitches.  (Stop doing that when its arm hole shaped, before you get very high on the arm hole).   When its time for the neck, leave off some stitches in the middle of both the back and the front pieces (how many?  Neck width, hold it up to you and see).  Do this lower in the front than in the back (most tops are higher in the back).  You can run yarn through the neck stitches to hold them, or use stitch dividers and leave them on the needle, or bind them off and pick them up later when you want to do the collar – up to you. The back parts for the shoulder should be the same number of stitches as the front shoulder parts – if you need to fudge this, its better to decrease than increase, do that where the sleeve will meet.  Then once you have gotten your arm holes big enough, you just stitch the top of the shoulders together.  Kitchener stitch will leave you with an almost seamless sweater, or you can just sew them together normally.  After you seam your shoulders, you can pick up your neck stitches to do ribbing or whatever you’d like for your collar.  Then just add sleeves.

Sleeves on both: Just work in a tube on a short circular needle the same size that you used for the sweater, or on double pointed needles.  The cardigan’s were done from the wrist up and attached to the body at the end, starting with 8 rows of garter stitch at the wrist for non rolling.  The neon pullover’s stitches were picked up at the armhole and worked to the wrist, doing a chart pattern at the wrist that mixes knits and purls for non rolling.  The cardigan’s decrease on the way up to the shoulder for a wide flared sleeve, the pullover’s are wider at the shoulder and decrease toward the wrist.

References:

The Aqua Cardigan chart used for the bottom of the sweater and ends of the sleeves: The New Knitting Stitch Library. Lesley Stanfield. Quarto Publishing, 1992. Chart #70, page 47.

The Neon Pullover chart: Ribbing was k2, p2 repeats (no chart). The braid up the middle of the front was The New Knitting Stitch Library. Lesley Stanfield. Quarto Publishing, 1992. Chart #33, page 35 (this chart is for a multiple of 10 stitches, only 10 stitches were used). The checkerboard pattern above the ribbing and at the ends of the sleeves (no chart)  k3 p3, then repeat, always doing knits and purls on top of the same for 3 rows, then for the 4th row doing the 3 knits over 3 purls, and 3 purls over 3 knits (to alternate and make 9 stitch checker squares). On the body, on top of the checkers I did a few straight rows of purl thinking it would help it blend (left those off on the sleeves).

Read Full Post »

Crocheted sweaters are great, they are quick to make (as compared to knitting) and they are thick and quite warm.

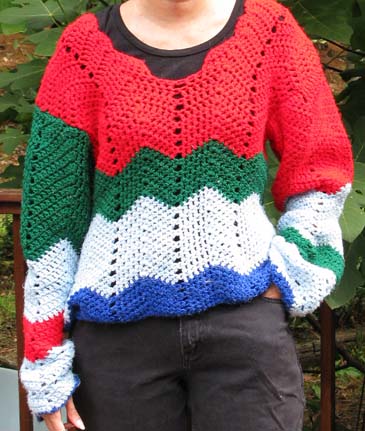
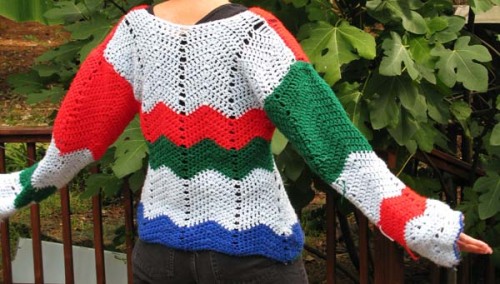
Crocheted pullover

Crocheted pullover

Today I’ll go over doing zig zag stitch and making either a pullover or a cardigan without a pattern.

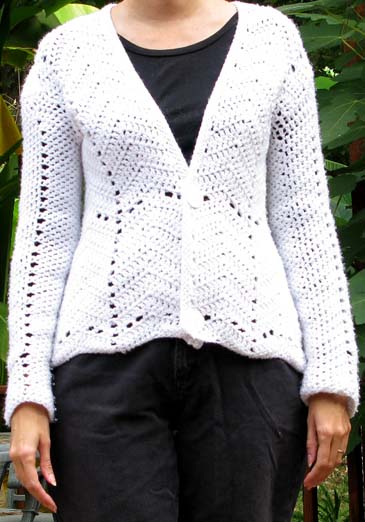
Crocheted cardigan

Crocheted cardigan

How to do the zig zag stitch: I learned this stitch from a cousin, but I’ve also seen a chart for it in The Crochet Stitch Bible (Betty Barnden, 2004 Krause Publications.  Quarto Inc. pg. 71) if its easier for you to do following a chart.  Basically you start at the bottom of the sweater, and chain as long as you need to fit around your hips (or wherever you want the sweater to end).  You will have to count as you chain though, let me explain (and that’s really the most challenging part of the whole sweater).  First lets talk about what you need in chain length.  You need to know that after you’ve made your chain -what you will do is insert the hook into the 3rd chain and make a straight section of double crochet, half the width you want your chevrons to be, (lets say for example 6 double crochet).  So, you will count the first 2 chains as 1 double crochet, then you will do 5 more double crochet (total of 6).  Then you will make your chevron bend down – in the next chain stitch, do 3 double crochet in the same stitch.  Then do 6 more double crochet (each in its own chain stitch).  Then you need to make it bend upwards to start the next chevron, so skip 2 chains, and then do 6 more double crochet, then do 3 dc in the same chain, then 6 more dc (you’ve now made 2 chevrons).   So that’s why the chain is challenging.  You can make it any length you want to fit around your hips, but it has to be a multiple of  6 + 1 (the bend down) + 6 + 2 (the bend up) chains long, plus the 2 chains on the end that you skipped to make your first stitch.  If you want your chevrons to be a little wider and you do sections of 7, it would be a multiple of  7 + 1 + 7 +2 plus 2 on the end.  An easy non-mathy way to do it if you don’t want to bother calculating all that to come out with a perfectly even number of complete chevrons, is just to make your chain as long as you need it to be for around your hips, do a few extra chains, start your first row, and any chain that is left over at the end after you’ve made complete chevrons, just plan to stitch it to the inside of the sweater to hide it when you’re done. Then after you’ve done your first row, the next row just goes on top of it.  The 3 you stitch in one place to make it bend down always gets put into the middle stitch of the 3 in 1 below it.  Likewise, your 2 chains that make the bend upwards go on top of the 2 chains you skipped in the row below.  So you just have to make sure if you wanted lengths of 6, that you can fit 6 in and have the 3 in 1 and the skipped 2 always wind up at the right place. Your rows will jog because when you do 3 in 1, a double crochet in the next row goes in the 2 side ones of the 3 in 1.  Once you’ve done a couple of rows it becomes very easy and obvious to you where to put your hook.  Use a hook 2 sizes bigger to do your chain or the chain will pull tight (you can see that in my photos, my edges curl under instead of being nice scalloped edges.  That’s because my chain was done with the same hook and pulls too tight).

If you want a pullover, after you stitch your chain and figure out the right number of chain holes you’ll need, attach it to itself and crochet in a circle.  If you want a cardigan, go back and forth so there is an opening in the front. So, you’ve started at the hips and you’re just working upward in both cases.

If you want to decrease a little to shape the waist line, you can decrease by reducing the number of dc in a straight section (do equal decreasing on both sides of the 3 in 1 to keep it even).  For example if your doing straight sections of 6, make one chevron 5s and keep the rest 6s (Just skip a chain within the middle of the straight section so that it will disappear from the next row). Its good to do this on the sides above the hips to keep the front and back of the sweater even.  You can see on the photo below that decreases were done in the same way under the arm to decrease the sleeve size. Increases can be done the same way, by adding another dc within the middle of the straight section (doing 2 stitches in one chain to add that next spot for a new dc in the next row).

To make the row of holes that goes across, just skip double crochets in an even pattern (chain 1 instead of 1 dc so you keep your numbers correct).  This is how I made button holes in the sweater below, 2 buttons were sewn on across from the holey rows.

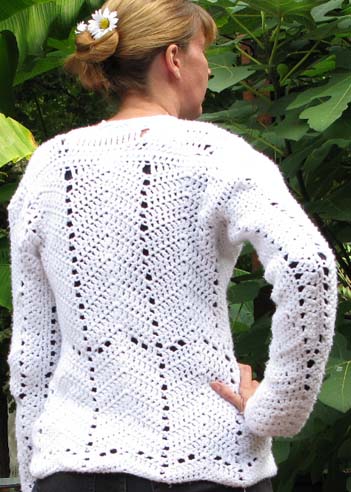
The decreases are hidden under the arms, not in the back where all chevrons are kept the same width so the holes line up straight.

The decreases are hidden under the arms, not in the back where all chevrons are kept the same width so the holes line up straight.

Whether making a pullover or cardigan, you just work upward from the waist, increasing or decreasing if you choose to shape it to match your shape, or just working straight.  Armholes: When you get to a spot an inch or two below your armpits, decrease around the spot your arm would go to make an arm shaped hole (you’ll put the sleeves on later).  Then you will now work the front and back separately.  Just stick with your chevrons and keep going up, you can hold it up to yourself to see exactly how wide the front and back parts have to be, and you can decrease to make them that size.  Around the arm holes, you can just leave stitches off the ends instead of decreasing in the middle of straight sections.  Wherever you envision the seam to be for your sleeve to start, that’s where you want your rows to end.

Cardigan neckline: After you’ve gone a little past halfway up the arm holes, you can see that I did a straight row across the back of mine.  This was just so I didn’t have to figure out how to do chevrons around the neck hole and I could just do straight rows of double crochet for around the neck, leaving holes (skipped chains) in the same line with the holes below.  Once you get to where your arm holes are big enough and you’ve shaped a neck hole by leaving off stitches on the top of the middle of the back piece, just stitch the back and front pieces together.  You now have a cardigan that looks like a vest and you’re ready for sleeves.

Pullover neckline: After you get halfway up the armholes, you may want to start the hole for the neck on the front.  To make my pullover neckline, I left off stitches in the middle and started going back and forth on 2 shoulder pieces, leaving off stitches from the ends, the same number on both sides to make the scalloped look and keep it even.  The back piece is just worked straight up, only descreasing on the ends at the armholes, and a hole is left in the middle of the back (higher than the front) by stopping and going back and forth the same way, keeping an even number of stitches for the shoulders.  Then the shoulders are stitched together at the top once the neck hole  and the arm holes are big enough.  You now have a vest type sweater and you’re ready for sleeves.

Sleeves: In both cases, just tie on your yarn under the armpit and double crochet in a chevron pattern, picking up stitches from around the armhole (you use the sides of those stitches as the base for your first row of sleeve).  If your shoulder pieces droop off of your shoulders like mine, you don’t need to do extra rows on top of the shoulder for a shoulder cap, you can just work pretty much straight.  I did a slight shoulder cap on my white sweater, but it kind of sticks out, so it probably would have been better if I hadn’t.  The worst that can happen if you don’t shoulder cap is that you get a bunch up under your arm.  Try it on, make sure you like the size, and check for needing capping or bunching, and write down what you do so you can repeat it for the second arm.  (Or, you can do both arms at once, do a few rows on one arm, then do a few rows on the other, working from both ends of your skein to make that 2nd sleeve easier).  You can decrease to slim your sleeves as you go like I described above in the decreasing section. I made my sleeves too long, because I hate too short sleeves as I’m a relatively long armed person. If you try on as you go you will get perfect sleeve length.

The bottom is folded under, but the chevrons make a nice scalloped edge on the bottom and around the neckline.

The bottom is folded under, but the chevrons make a nice scalloped edge on the bottom and around the neckline. The under folding happened because my chain was a bit too tight. Doing your chain with a hook 2 sizes bigger than the one you'll use for the rows will fix this.

Finishing both:  Once you’re done with the pullover sleeves, your finished.  For the cardigan, I made a fancier edge on the front, and sewed on the buttons across from the open hole rows.  You don’t need to do this, you can just leave it, but here’s what I did.  I used a huge knitting needle (size 10 if I remember right) inserted into the stitches on the edge.  First I did one half of this edge, then I did the second half.  So, first I inserted the needle under a piece of yarn in each stitch from the middle of the back of the neck down the edge to the bottom of the front.  If you knit, you have a pretty good idea how far apart the stitches are supposed to be on the needle, that’s how far apart you should pick up a piece of yarn on these stitches so it comes out even.  Then I did garter stitch (knit every row, back and forth) for a few rows (5 or 6).  Then I did the same on the other half, from the middle of the back of the neck down the front on the other side and stitched the 2 pieces together in the middle of the back.  If you want a fancier edge but don’t want to knit, you can just tie your yarn on at the bottom edge and pull up loops with the crochet hook (like making chain stitch) in an even row around the whole edge, angled toward the front for a finished look.

The yarn for both of these sweaters is Red Heart.

Read Full Post »