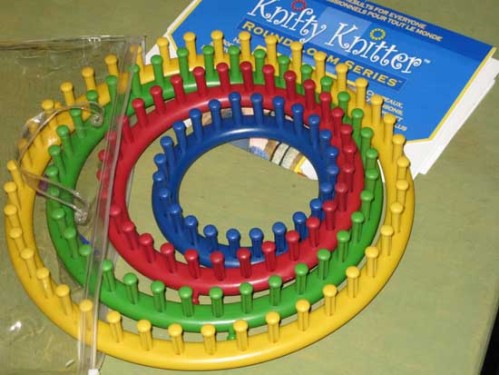
A new Knifty Knitter pattern-free sweater, made solely on the largest round loom (the yellow one pictured below). I made some mistakes on mine, but it all worked out okay. So, I’ll tell you all about it so you can make yours even better.
I made this one with the body all in one piece instead of separate back and fronts. Now that I’ve done that, I’d recommend making the pieces separately, then seaming them together and adding sleeves. Making it all in one piece may avoid needing to seam over the shoulders, but I wound up doing that anyway for support (see below) and doing it in one piece made it a lot harder because you still need to hold it up to yourself to check some things, like arm hole height for example.
Here’s the easy way. Measure yourself in all the places indicated in the photo below, using a swatch you knitted with the same yarn on the same loom (something like 10 rows wide by 5 high is a good sized swatch to make, then you can save it and reuse to measure yourself anytime you want to loom something.) Be sure not to stretch the swatch or your sweater will be too tight, and add a couple of stitches if you want some extra give in your garment. Then, just make the sweater as directed in the photo, using your numbers of stitches instead of mine. Hold the pieces up to yourself as you go to see when the various places are long enough. I have increases and decreases for hips, waist, bust, and arm holes. Bind off stitches for the neck hole. For more detailed directions, from when I made earlier sweaters, and photos on how to increase and decrease, see this post: Working Without Patterns, The Knifty Knitter – Rainbow Chakra Vest. For more directions, and how-to on binding off, use a crochet hook as directed on the photo in this post: Working Without Patterns: The Knifty Knitter Round loom sweater.
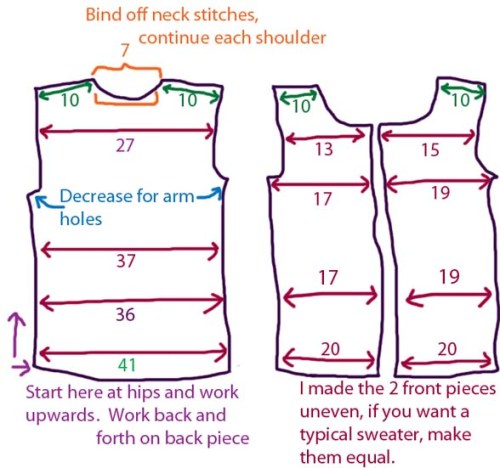
The waist decreases, bust increases, and arm hole decreases were all done on the sides where the arms are. The fronts should be straight on the neck side from the neck down.
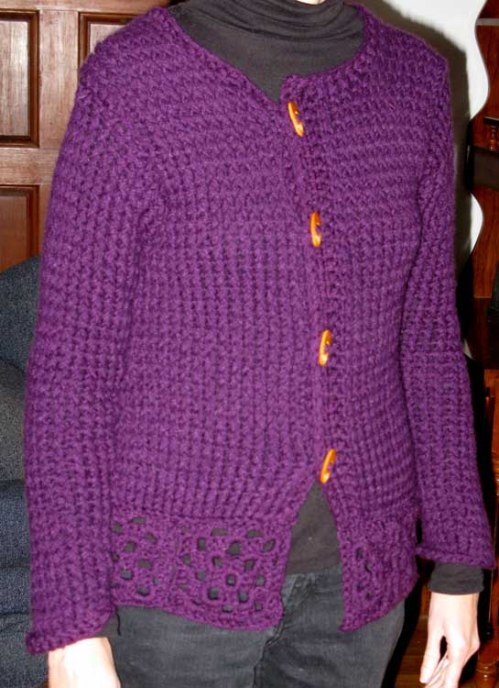
Finishing the body: After making your pieces to your own measurements, seam the shoulders and sides together. (Seams on the inside! Believe it or not, that’s the kind of stuff I forget! lol). I added granny squares on the bottom of mine because I didn’t feel it was long enough. I am impatient so I tend to go “I think its long enough!”, then quit, then wish I hadn’t. It’s all okay though, you can always add more crochet if you are an impatient person like me. The crochet edge also stops the curling that knit edges tend to have. If you don’t know how to crochet granny squares, try this page, or doing a search for other pages or youtube videos to show you: http://www.craftstylish.com/item/1437/granny-square-how-to/page/all. I used a size K hook and attached these as I went – and was surprised to see them turn out exactly the right width! Go figure! You can make yours all in one piece and attach them to the sweater afterward if you want more certainty in life. That way if they are off by a little, you can always do a row of double crochet around the edge of them, or do a crochet trim, or whatever you need to fix whatever width it comes out to make it match your sweater. Have fun being creative with it!
I also used double crochet, (same K hook), to add a few rows around the front piece edges and neck hole. This prevents curling, made the sweater a little roomier, and gave me automatic button holes, after which buttons were sewn on the narrower side. I had designed this sweater with one front piece wider than the other so the buttonhole side would overlap to one side over the buttons, and so there would be a flap over the top button, but you can always do equal pieces if you prefer, and put your buttons on where it will line up right on the other side.
Making the sleeves. You can stop there if you want a vest, and if you wish, add some double crochet to the arm holes to finish it up. If you want sleeves, measure your arm in the following places to get your number of stitches. The sleeves start at the shoulder and are worked on the yellow loom back and forth, then seamed to the sweater, then seamed up the underside of the arm. (I found I had measured too tightly and wished I had made my sleeves bigger. They work, but I’ll probably like them better once I’ve worn out the sweater more and stretched them a bit. I didn’t even seam all the way to the wrist or my hand would not have fit through it.)

You’re finished! Now, discussion of my mistakes….

The way I would NOT recommend making this sweater: Now, that way above will help you do it better, but here’s what I did, which I wouldn’t recommend. See how my neck hole is so big? It hangs low in the back. That wouldn’t have happened if I had made it in separate pieces and seamed them together. This happened because I wanted to avoid any extra seaming and made it like this:

The problem with doing it that way occurs when you hit the arm holes. This is the inside of the back piece, (showing where I marked rows for increases or decreases so I could make the front pieces match without too much row counting). You have to take one shoulder off of the loom if you want any hope of holding it up to yourself to see if its long enough to fit you. If you have a definite stop point where your shoulder seam is going to go, you know that “Okay, I hold this spot right at the top of my shoulder”. If you do it the way pictured below, you have no seam, so deciding how big to make the neck and arm holes is more of a challenge because there’s a lot of swing room in what you hold up to yourself as “the top” of the shoulder. My decision making was a little off. My arm holes are a bit small, and my neck hole hangs too low. It all could have been avoided by making separate flat pieces. 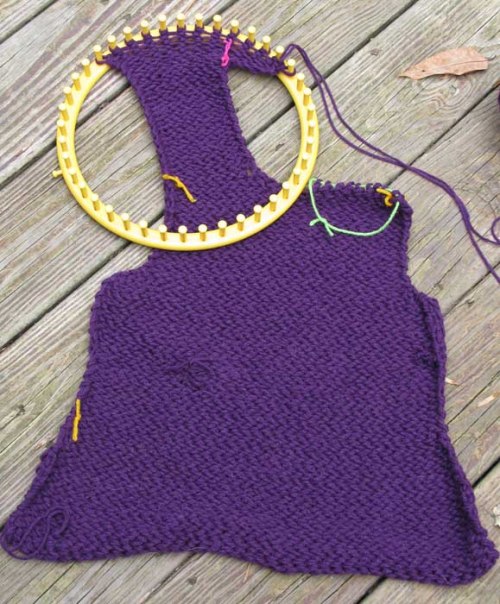
I also saved myself no pain at all, I only added extra, because I wound up adding shoulder seams anyway. This is the inside over the shoulder area, I wound some yarn through these stitches to add support. If you don’t have seams, because there is so much space between stitches on the yellow loom, your rows can start to pull apart as the sweater ages. So, the seams do serve a good purpose, and that’s why I added some where there were none.

If you add fake seams the way shown above, they won’t show on the front side, its the same method you would use to work in ends.

If you found this post through a search, please visit my Links page to see my other Knifty Knitter projects. There is a “Links” tab at the top of this page, and also a link to it at the right.
Yarn: Caron One Pound acrylic, in Deep Violet (this sweater took more than one, but not much more, so you will have most of the second one left with which to make a matching scarf or other accessory.)

Thanks for posting the “mistakes.” I find sharing what NOT to do sometimes helps as much as what TO do. I’ve been trying to figure out how to make myself a sweater before I “bless” others with them.
Best,
Mir
I agree, I’m happy if others can learn from my mistakes. Thanks for reading!
[…] Custom Sweater Instructions […]
[…] Custom Sweater Instructions […]
[…] Custom Sweater Instructions […]
[…] Custom Sweater Instructions […]
[…] Loom Knit Sweater Pattern […]
[…] Custom Sweater Instructions […]
[…] Custom Sweater Instructions […]
[…] Custom Sweater Instructions […]
Hi
Would you be able to.help me make s sweater with raglan sleeves I know the sizes in inches but don’t know how many stitches that is
If you are using yarn that you haven’t used before, you may need to do a swatch to count how many stitches are in an inch. Here is a post which may help explain: https://ilovesocks.wordpress.com/2013/11/15/working-without-patterns-how-to-get-the-right-size-when-designing-with-knitting/
[…] Custom Sweater Instructions […]
[…] Custom Sweater Instructions […]
[…] Custom Sweater Instructions […]
[…] Custom Sweater Instructions […]
[…] Custom Sweater Instructions […]
[…] Custom Sweater Instructions […]
Thanks for sharing this. Its very helpful and it is an interesting approach to making a sweater. Definetly an idea to play with. I love it
Hello so happy I found your site. You do not seem to have a follow button so have book marked you. I have always knitted normally but recently ( well about 2 years ago!) bought some looms and was trying to work out how to use them. Thanks for posting this. Your site is very interesting. I really like blogs where people tell how it went wrong. So much more useful than those who always post the perfect stuff. Not much I make is really perfect. It usually works OK and is wearable but there always seems to be somethimg that does not quite work right. I shall look around at the rest of what you do.